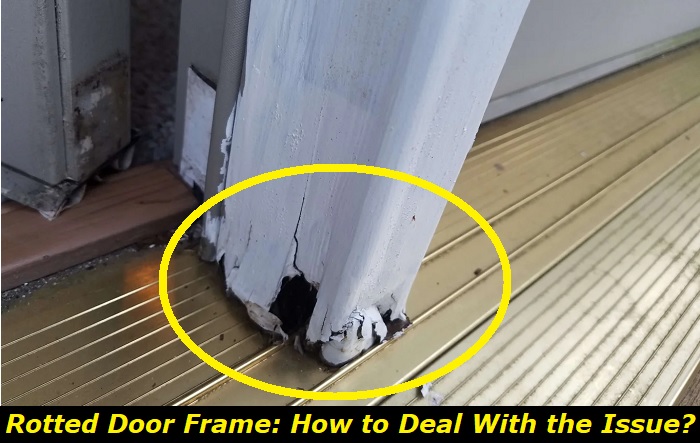
Ignoring a rotted door frame is costly. The rot will spread further and force you to install a new door frame. The signs of rotting wood are obvious. You will first notice black stops before the wood starts to crumble. Rot due to water contamination often starts from the bottom.
Read on for further instructions on the repair kit and tools you need to fix a rotted door. We have also outlined the repair process and useful tips to prevent rotting.
Rotted Door Frame Repair Kit
Most doorframes rot from the bottom section because of constant contact with water. We will discuss prevention measures later but let us discuss the repair options first. One way to replace a rotted jamb is with a new piece of wood.
For this option, you need to cut and paint a new piece of wood to match the doorframe design. The process is lengthy, even for an expert door installer. The best approach for DIY repair jobs is to buy a repair kit.
You have multiple options for rotted doorframe repair kits. Do not worry about the size of your door. Most doorframes have a standard 4-9/16″ or 6-9/16˝ width. Repair kits are in both sizes.
The repair kit has two pre-cut jamb bottoms to repair both sides. Your part is to adjust the length of the jambs to fit the rotted section on the doorframes. You will also need to specify the color or repaint the jamb to match your door.
Some of the trusted brands of rot repair kits include FrameSaver and Boss Jamb. Order a repair kit that matches your door width. The sellers assume that you have all the necessary tools and expertise to install the new jamb.
If you are doing this for the first time, get a utility knife, door screws, shims, miter saw, and straight edge. You will also need 2-inch nails, insulating foam sealant, flashing tape, an oscillating tool, and putty or wood filler.
We will show you how to use these tools in the next section. It is advisable to have a complete tool kit to replace wooden doors and fences. Order these tools with your repair kit for future use.
Should You Repair or Replace A Rotted Door Frame?
You need to answer this question before ordering a repair kit. The decision depends on the extent of the damage to the frame. You can use a screwdriver or any other tool to inspect the door frame.
The wood feels soft when you poke the spotted section with a screwdriver. You can repair the section if the wood remains intact. However, professional help is necessary if the screwdriver pokes a hole or sinks into the frame.
A repair is advisable if the rot is limited to a section on the door jamb. You may notice some spots or swelling on the frame, especially at the bottom. Mold and fungi invade moist wood. Cutting off the rotted part will solve the problem.
A replacement is necessary if the mold or fungi have spread to all parts of the door jamb. You will notice dark spots from top to bottom. The rotted wood will start falling off as you close the door.
Do not wait for the damage to spread to the full length of the jamb. Repair any section with signs of fungi or mold infestation immediately. We will discuss further prevention measures after outlining the repair process.
How to Repair a Rotted Door Frame
Replacing a door frame may require professional help. However, you can repair sections of the frame with a repair kit and the necessary tools. If you are up to the task, here is the process of fixing a rotted door frame.
1. Prepare the doorframe
The first step is to inspect your doorframe and remove the corner pads and weatherstrips if present. You will reinstall them after repairs, so you need to be careful to avoid damage.
Using a utility knife, cut along the caulk line on both sides of the brick mold and ensure that you cover its full length. Remove the brick mold and set it aside.
2. Remove the rotted section
The rotted part may be visible or noticeable when you prod the frame with a screwdriver. The standard repair kits fit about 12 inches. Measure this height from the bottom of the sill and mark a straight horizontal line.
Use the oscillating saw to cut the rotted section along the line. Remove the section and scoop any wood rot on the surface. Do the same thing on the other side of the frame and measure the rotted part again.
3. Resize the new jamb
The bottom part of the replacement jamb will fit your door sill. Factories cut the jambs with the standard width of the frame and degrees of sills. Measure the height from the bottom of the sill to the mark or line where you removed the damaged area.
Trim the new jamb based on the measurement. A miter saw is advisable for an accurate and straight trim. Remember to check the bottom for any excess that needs a trim.
4. Try the resized jamb
The next step is to confirm if you got the measurements right. Insert the trimmed jamb into the frame to check if it fits perfectly into the section you removed.
Experts recommend that you apply caulk while inserting the jamb. You also need at least two shims while installing to ensure that the jamb aligns perfectly with the old jamb.
Do not force the jamb into the plane. Keep trimming it until it fits perfectly. You do not want to break the jamb or crack the doorframe while forcing a larger jamb into the frame.
5. Secure and seal the jamb
Fasten the jamb with screws. You can use as many screws as you need depending on the length of the replacement jamb. Trim any excess shims as well for a neat finish.
Apply wood filler or putty into the seals and sand down for a perfect blend of the two jambs. In addition, apply insulating foam sealant to any gaps at the back of the new jamb.
6. Reinstall the brick mold
If you are satisfied with the results, it is time to reinstall the parts you removed in the first step. Start with the brick mold and then replace the weatherstrip and corner pad.
You need flashing tape to secure the section between the jamb and the house sheeting. Resize the old brick mold to fit the new length and fasten it with brad nails. Apply caulk on all seams around the brick mold, sill, and blended jamb.
7. Repaint the doorframe
Repaint the doorframe after fastening the brick mold. You may need to sand the whole frame before repainting, especially if you have not repainted the doorframe for a long time.
Use at least two coats of paint and allow it to dry. You can also add a protective sealant to prevent rotting or mold.
8. Reinstall the corner pad and weatherstrip
You can reinstall the order corner pad if it is still in good condition. A new corner pad is often necessary when repairing rotted doors. Reinstall the weatherstrip as well from top to bottom.
You can tell from this systematic guide that repairing a rotted door frame requires precision and skills. The repair kit makes the work easier because the jambs are shaped to size. However, you need additional tools for repairs.
Consider hiring a door installer to help you with the repairs, especially if you have several rotted doors. DIY repairs are recommended if you have proper tools and a rotted door frame repair kit.
How to Prevent Rot on Exterior Doorframes
Water is your worst enemy when it comes to maintaining wooden doors. The challenge is greater if the drainage system is poor in your home. The constant splashes on your doorframe invite mold to the frame.
Use a waterproof seal on your doors to prevent rotting. Repaint or restain the doors regularly and apply a sealant every time to protect the wood. In addition, choose quality paints or stains for maintenance.
Another important tip is to maintain your gutters and downpipes. Leaks from the roof and gutters are a leading cause of rotting exterior doorframes. Clean the gutters and seal all leaks before the rainy season.
Do not ignore gaps around the doors because they can lead to rotting. High-quality caulk is enough to seal the gaps and protect the wood. In addition, cracks in the paint or stain on the doorframes create room for moisture to penetrate the wood. Seal the cracks immediately with waterproof paint.
Conclusion
A repair kit makes the process of fixing a rotted door frame easy. The kit comes with a set of jambs that fit standard door frames and sills. You need additional tools to remove weather-sealing components and resize the new jambs.
The repair process is simple but requires accuracy in measurements. You also need to seal the seams after repairs and repaint the frame. Help from a qualified door installer is advisable if you lack the tools or expertise to install new jambs.
Timely repairs can save you the cost of installing new frames. However, prevention is better than repairs or replacement. Seal wooden frames and repair your drainage system to prevent water contamination.
- How to Fix Rough Concrete Floor? Best DIY Methods - July 10, 2023
- Rotted Door Frame: Repair Kit and Ways to Solve the Problem - June 5, 2023
- Granite Grip vs. SpreadRock: Comparison and Best Applications - April 28, 2023


