If you are about or just purchased a Dremel tool for wood carving, there are many things you should know. Knowing more about the tool helps you become familiar with its functions, features, and limitations.
Especially for letter carving, you can understand more about the different techniques to use. From risks to wood type to operation, this article will help you prepare yourself before you carve letters and signages on wood with a Dremel.
Letter Carving with Dremel vs. Hand Carving
When it comes to letter carving, nothing compares to the versatility of the rotary tool, Dremel. You can play with different fonts and styles on your wood piece with its wide range of attachments and bits. From carving bits to grinding attachments to sanding bits, a Dremel could help you achieve the style, design, and finish you like.
Here’s where a Dremel stands out from hand carving:
- A Dremel tool can help you carve letters with precision and control.
- A Dremel tool speeds up your work and eliminates the physical stress of manual carving.
- It is lightweight, ergonomic, and easy to use with practice.
- It helps you create consistent cuts with uniform rotation and controlled depth.
Although nothing beats the work of the hand, a rotary tool is a great time saver. With faster and more consistent carving, you can have more time to do other tasks or carve more wood art.
The Challenges of Using Dremel for Letter Carving
For first-timers, carving letters with a Dremel is a huge but exciting challenge. Imagine the challenge of achieving precise and controlled cuts. You have no idea. But when you unintentionally leave the burrs running on the wood for more than ten seconds, you might carve deeper on the wood than intended. What you need is a precise and light movement to control your hands.
Another thing you must practice before carving is getting to know the bits. Each bit has a carving function. You must know them to utilize your Dremel tool and bits.
Another challenge is achieving consistency when carving. Achieving consistency in sizes, carving depths, and shapes is crucial in following your design, especially when working on various fonts.
If you’re a first-timer, prepare for the wood chips and dust. It is going to be a rewarding mess.
Wood that Works Best with a Dremel Rotary Tool
If you’re starting out and still learning your Dremel tool, it is best to use it on low-density wood. They are softer and more forgiving to carve out. With a lower risk of tool slippage, carving letters on softwood becomes more manageable.
For beginners, check these wood out:
- Basswood
- Chestnut
- Pine
- Birch
- Limewood
- Balsa
- Cedar
- Silver fir
- Butternut
Now if you can do away with the bits, are more experienced, and can pull off carving techniques, you can carve letters on the hardwood. These wood can include:
- Cherrywood (best for Dremel)
- Walnut (best for Dremel)
- Oak
- Birch burls
- Olive
- Apple
- Maple
- Pear
When choosing wood for carving letters on Dremel, opt for woods that have already dried out. Although you can carve on freshly cut timbers. Note it has moisture and will dry out and shrink in size soon, which may affect your carved design.
If you do not have so much time, check out the dried wood in craft stores. They are ready for carving and need no preparation.
Dremel Bits for Letter Carving
The high-speed cutters are the most commonly used Dremel bits for carving letters. They feature a selection of tips that help carve, shape, hollow, and groove woods. They feature flat, rounded and pointed tips that help carve out letters.
Additionally, grinding burrs mostly have double-cut blades. They help in grinding, shaping, and sanding wood.
The engraving bits have sharp pointed tips that allow carving with intricate details and patterns and fine lines on wood.
And for finishing the wood, you can use drum sanders of different grits.
One thing you can get around with these bits is to practice and explore the different tips of Dremel bits for engraving and carving letters on wood.
- Cylinder
- Radius cylinder
- Tree shape
- Ballpoint
- Cone
- Inverted flat
- Tree shape
- Pen type
- Flat top cylinder
- Rounded cylinder
What do You need for Letter Carving with a Dremel?
If you’re already excited to use Dremel to carve letters on wood, prepare these materials:
- Pencil and pen
- Your design printout or stencil
- Carbon paper
- Your wood piece
- Lighting or lamp
- Wood clamp
- Sandpaper (coarse to fine grit) and sander
- Shop vac or compressed air
- Brush
- Dremel bits
- Dremel tool
- Paint, protective coat, or wood burner
- Safety goggles and a dust mask
- Tape
- Curved pointed file (optional)
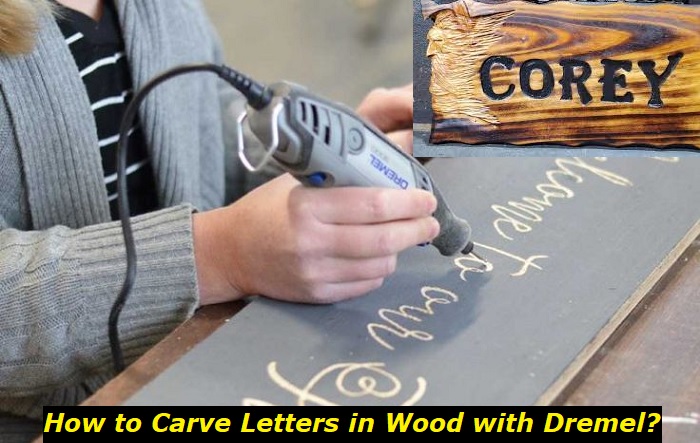
How Do You Carve Letters in Wood With a Dremel?
After preparing the tools and supplies you need, you can finally carve letters in wood! Make sure to wear your protective mask and safety goggles.
Step 1 Prepare your workplace.
Clear your area and ensure your work table is free from dirt and debris. Organize your tools and supplies. Put all the bits you’ll use in one spot so you will not misplace them. Provide adequate lighting and ventilation in your area.
Step 2 Prepare the wood.
If your wood piece is still raw from cutting, you can shape it to your liking. Depending on the design. I, myself, like to keep the bark of the tree intact because it adds authenticity and aesthetic appeal to my wood carvings.
Just sand the wood surface, starting from coarse grit to finer grit. After sanding, clean the surface with a shop vac or use an air compressor to blow them away. Power sanders usually come with a dust collector, which catches the mess while sanding.
After you have prepared the surface, secure your wood piece on the table with a wood clamp.
Step 3 Prepare your design.
It is either you prepare your design from the computer and print it or draw it on paper. Printing on the computer gives you more room for different fonts and allows you to scale up the letters according to your work area on the wood.
So take the space or dimensions the carved letters would take on the wood. Type those letters on MS Paint, Word, or Canva applications. The good thing about Paint or Canva is you can initially size up the printing page, so you do not have to scale and re-scale the letters because it affects the overall appearance when stretched.
After typing those letters, make sure to place the letters in the appropriate position. Print the letters.
Step 4 Transfer your design.
If you need to cut the template, do it and cut your carbon paper of the same size as your stencil or template. After cutting, tape the carbon paper below the unprinted section of the template. The inked portion of the carbon paper should face the surface of the wood. This only means that after taping them together, the printed part of the template and the inked portion of carbon paper should both face outwards.
Clamp the template on the wood with the inked portion of the carbon paper on the wood surface. This allows you to trace the printed design with your pen or pencil while the carbon paper imprints the traced design on the wood. Check if the template is secured on the surface and begin tracing the design. Trace it lightly and avoid rubbing the paper with your clenched palms because the wood surface will catch that portion with the carbon paper ink. After tracing, remove the template from the wood piece. You should see a raw image of your lettering design.
Step 4 Select your carving bits.
When choosing a carving bit, consider its size, the material, and the bit type. Most of the time, letter engravers use high-speed cutters with cylindrical heads to remove large areas and shape or carve the initial design. For creating fine lines, use small ball-shaped bits for adding details.
Step 5 Set up your Dremel.
Unplug your rotary tool. Attach your chosen Dremel bit to the tool. Most Dremel or rotary tools have variable speeds. For carving letters, you can set them from medium to high settings. It must be anywhere from 10,000 to 15,000 RPM.
Step 6 Start carving.
Turn the tool on. If it’s your first time, you can try carving on scrap wood to see how each bit works. Do not stress out your Dremel bit. Use fine ball shape heads for shaping your letters. Trace the lines of the font.
For removing wood chips and carving larger spaces, use cylindrical heads for edged areas. For curved areas, use rounded-tipped cylinder heads. Start with coarse grit and follow up with fine grit.
Step 7 Clean up dust wood in-between bit changing.
Use a brush, shop vac, or blow air to remove wood dust. This will help you see uncarved portions and imperfections in your carving.
Step 8 Apply techniques.
You can achieve many carving techniques when exploring Dremel bits. Try carving on different depths. Use different designs and patterns like relief carving or chip carving. After applying your desired techniques, clean the dust again and see if it’s the effect you are aiming for. Make final checking before you do the final touches.
Step 9 Make final touches.
Start refining the details of your letters. Inspect the finest details of letter strokes. Use diamond bits to refine and smoothen your carved letter surfaces and the spaces between edges. Use inverted tips for routing larger spaces and pointed tips for refining lines.
Sand the surface. You can use sander drums, but sometimes it won’t get to the smallest strokes. You can use a curved file for this job. Get a small piece of coarse sandpaper and fold it for initial sanding. For final sanding use finer grit sandpaper. Fold it to the smallest where its corner can reach tight strokes in the letter carvings.
Brush the dust away and clean them up. Inspect once more. And if it needs more sanding, do so.
Step 10 Enhance your design.
You can use a wood burner or torch to apply burnt effects on the edges of letter carvings. Or, you can seal your work straight away with protective coats such as varnishes. This will help preserve and protect it from rotting.
It’s that simple.
All it takes is some familiarity with your Dremel tool, the bits, and some creativity. They say, Master the art of wood carving to become your own master. And to do that, you must practice more and let your creativity flow. Get to know the engraving bits and see their potential. Explore. Practice. Who knows where this skill can bring you?
- Can You Unmix Paint: Techniques, Consequences, Alternatives - February 23, 2024
- Does Primer Need to be Mixed? Effective Primer Application - February 22, 2024
- How to Make Old Paint Usable Again: Retrieving and Preserving Paint - February 21, 2024


