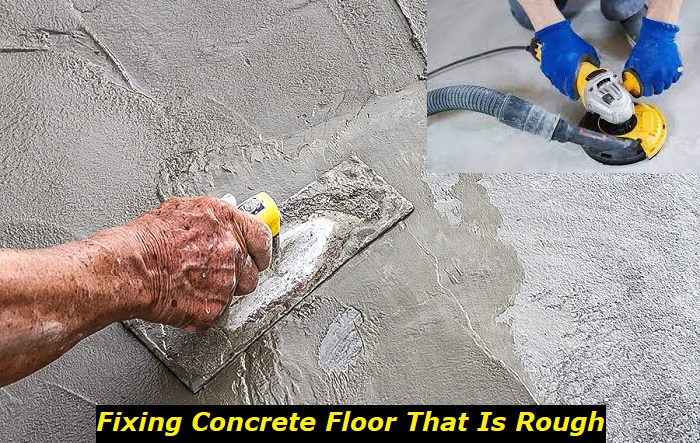
Nothing’s worse than walking on rough concrete every day. The sight of bumps, cracks, and flaking or scaling concrete is enough to give you a daily eye sore, not to mention the possible accidents or injuries from uneven concrete surfaces. You have no other way but to fix the rough concrete surface the soonest possible.
With the different types of damages, it does not mean that each repair type is applicable. And if you are a new DIYer, you probably have no idea about these methods. If you are anywhere in these situations, do not worry. We have prepared a definitive guide for fixing rough concrete floors that you can easily follow.
Patching
Patching is a fixing technique for minor damages such as small cracks, pitted, flaked, or chipped concrete. The repair involves patching or filling the damaged area, like holes and cracks.
Remember that repairing concrete cracks and holes will need specially-formulated compounds. The patching compound comes in powder or putty form and consists of epoxy polyurethane or cement-based mortars.
- Cement-based patching compounds contain cement, additives, and aggregates commonly used for basic concrete repairs.
- Epoxy-based patching compounds consist of epoxy resins and hardeners, making them suitable for repairing spalled concrete, filling deep cracks, and restoring structural integrity.
- Polymer-modified patching compound mixes cement with latex additives or polymers, making them suitable for leveling uneven surfaces and filling small pits, cracks, or voids.
- Self-leveling patching compounds are fluid patching compounds with higher levels of flowability. These patching compounds are more suitable for smoothening and correcting uneven surfaces and leveling substrates for floor coverings and coatings.
If there’s any drawback with the patching compound, you can see the patch visibly because of mismatching color. However, you can apply concrete paint or stain this portion to blend with the concrete.
How to patch concrete holes and cracks?
There are different ways you can apply a patching compound. You can patch concrete with a putty knife, inject it into the crack, mix it with mortar, or use a trowel. The application method will depend on the compound form you have on hand, the surface type, or the extent of the damage.
- Inspect the damage on the surface. Take note of the extent of damage and how deep the crack or hole goes into the surface. Also, check the surface type to select the best texture of patching compound to use.
- Once you have inspected the cracks or holes, decide the type of patching compound to use.
- Prepare the patching compound. Check the manufacturer’s instructions for this step.
- Apply the patching compound on the damaged area, slightly overfilling to compensate for possible shrinkage during drying.
- Level and smoothen. Use your trowel to level and smoothen the surface to ensure the patch flushes and blends with the surrounding concrete.
- Let the patching compound cure within the manufacturer’s recommended time. Avoid heavy loads and foot traffic on the patched area until it has cured.
- Once dried, sand the surface to finish and blend the patched area with concrete.
Overlaying
Overlaying is the application of a new layer of material over damaged concrete to repair, smoothen, and enhance its durability. This technique is often used for rejuvenating or restoring worn-out or damaged concrete surfaces. Concrete overlaying is your best option for floors damaged by extreme surface abrasion.
There are two types of concrete overlay: bonded and unbonded. As the name implies, the bonded concrete overlay adheres to the existing concrete slab, making it one with the surface. This type of concrete overlay is up to five inches thick and used for strengthening existing floors. Unbonded overlays are concrete layers placed above an existing concrete surface with an interlayer, so they separate from each other. It is about four to eleven inches thick.
Apart from fixing the rough surface of the concrete floor, overlaying corrects surface damage, improves structural integrity and skid resistance, and enhances the floor’s overall appearance.
How to overlay rough concrete floor?
- Prepare the surface by cleaning. Remove all the dirt and debris or power wash it if possible.
- Patch minor cracks as needed.
- Apply primer as needed. This extra step improves the adhesion of the overlay.
- Prepare and mix the overlaying compound according to the manufacturer’s instructions.
- Apply the mixture to the clean floor surface using a trowel, spray gun, or squeegee. Make sure to apply the concrete overlay mixture with the required depth.
- Smoothen and level the surface with trowels or floats. Do this step with precaution to ensure the finish is smooth and even.
- Stain, stamp, or use a stencil to apply decoration as intended.
- Keep the water moist while curing. Follow the manufacturer’s instructions in curing the newly-applied concrete overlay.
Resurfacing
Resurfacing is often confused with overlaying because both involve applying a new layer of material to concrete floors. However, they differ in some aspects. In resurfacing, the process involves applying a thin layer of compound to the concrete surface. The layers applied are about 1/8 to 1/4 inch thick. This thickness makes them unique from concrete overlaying, which could have a layer of four to eleven inches thick.
Often, resurfacing is the remedy for minor cracks, wear, and discoloration, but the existing floor still has a sound underlying structure. To sum it up, resurfacing involves applying a new form of floor finishing to improve the floor’s longevity, enhance the color and hide imperfections.
There are different types of materials used in resurfacing:
- Polymer flooring
- Epoxy resurfacing
- Hydrogel
- Cementitious flooring
Methods of resurfacing
- Concrete overlay
The most popular resurfacing method involves applying overlay material over an old concrete floor. The idea behind concrete overlay is to apply a new finish to correct imperfections, enhance durability, and improve appearance.
- Concrete Lift
Concrete lifting involves the removal of old concrete by breaking down a few portions up to an extent.
- Concrete chip and replacement
This method involves removing the old concrete and replacing it with a new one. This highly intensive resurfacing method is applicable for extremely damaged concrete floors.
- Hydrodemolition
Hydrodemolition involves using water jet equipment with high pressure to remove existing concrete surfaces.
Grinding
Angle grinders are must-have tools for concrete repair specialists. Grinding is one method of fixing unleveled surfaces, trip hazards, and concrete bumps. It prepares surfaces, removes coatings and adhesives, and exposes aggregates.
Grinding will require more steps to fix and finish some concrete repairs, depending on the extent of the damage. Also, note that angle grinders are dangerous tools. For this reason, you need to learn how to handle and get along with this tool.
Other concrete repair methods that work with grinding
Grinding is usually a preparation process for another concrete repair method. When you need to prepare cracks or holes that need filling or patching, angle grinders can do wonders to provide access to the compound.
It also smoothens rough spots on the surface and enhances adhesion before applying overlay compounds.
Indeed, grinding is a crucial step for correcting damages and smoothening surfaces before patching, overlaying, and resurfacing old concrete floors.
How to grind concrete?
- Prepare the surface. Clean the floor using a broom. Remove dirt, gum, debris, grease, or anything that may get in the way while grinding.
- Set up your angle grinder. You will need a diamond disc or cup attachment for grinding into the concrete. The grinding disc should be about four to seven inches in diameter. You may also need a dust shroud. Adjust the guard and handle to make sure they are secure in their places. Set the speed. Connect to the power source and test your grinder.
- Grind the concrete. Start at a slow speed and gradually increase it as you maneuver and become more comfortable with the tool. Use a circular back-and-forth motion. Overlap on your previous pass to grind the surface evenly. Keep your pressure consistent. Keep grinding until you achieve desired level and smoothness.
- 4 Inspect all the sections you passed through. If you find any imperfections, make another few passes to correct them.
- After grinding, clean the surface. Vacuum the area. Make sure it is clear for the next step of fixing concrete.
Skim coating
Skim coating is another process of fixing rough concrete, although this process is a more popular method for drywall damage. The process involves applying a thin layer of cementitious or polymer-based compound to hide imperfections and create a smooth and even finish.
Skim coating is more appropriate for minor cracks, spalling, scaling, and rough surfaces.
How to skimcoat rough concrete?
- Prepare the surface. Remove all dirt and anything that sticks to the floor. If necessary, pressure wash it until the surface is clean.
- Prime the surface. This additional step will improve the adhesion of the skim coat material to the floor.
- Mix the skim coat as advised by the manufacturer.
- Apply the skim coat. Dampen the surface for better adhesion. Using a trowel, apply the skim coat with a back-and-forth motion. You will need two coats. Use a trowel or steel float to feather or level, and smoothen the coat. Make sure to provide enough time for the first coat to dry.
- After the second coat has cured, sand or polish the newly skim-coated surface.
Final Thoughts
Like any material, concrete is also subject to wear and deformation. A lot of factors affect the level and finish of a concrete surface. They happen because of the quality of the concrete floor, external factors, and probably, aging.
Good thing there are less intensive ways to fix them. If you think your floor still has a durable structure, maybe you can fill up the pitted surfaces or replace the spalled concrete. It all takes an accurate assessment of the damage and proper fixing method to bring back your old concrete to life.
- How to Fix Rough Concrete Floor? Best DIY Methods - July 10, 2023
- Rotted Door Frame: Repair Kit and Ways to Solve the Problem - June 5, 2023
- Granite Grip vs. SpreadRock: Comparison and Best Applications - April 28, 2023


