House elevations are sometimes unavoidable in construction. When you try to achieve a design, you cannot help but have different floor sections and heights. And on these joint sections is where visual disruptions take place. For this reason, we aim to have a joining method that, if not that seamless, is at least tolerable.
However, not all of us have the creativity and budget to join two different level floors. Do not worry. We will share budget-friendly ideas to turn those intersections into part of the interiors.
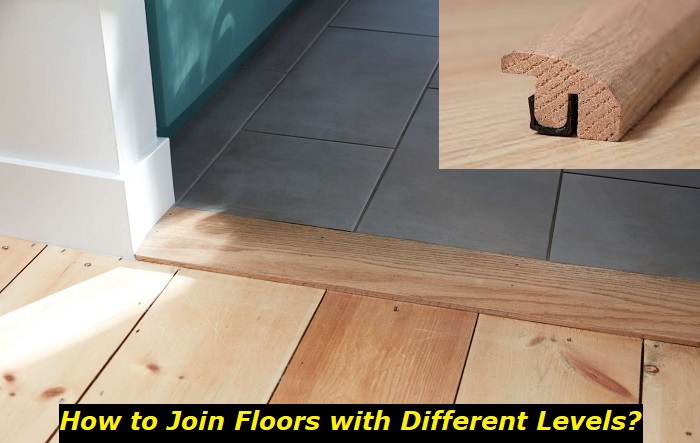
Use Transition Strips
Transition strips are probably the cheapest way to join two different floors, whether on the same level or not. Prices start at $1. You can have as many as you need to cover the floor intersection, and you still do not have to break the bank.
Transition strips are molded materials used to join two-section surfaces of a structure like homes and buildings. Not only it provides visual advantages for intersectional level floors, but it also provides safety for passers-by on the supposedly exposed edges.
While many types of transition strips are used to join floors from different sections of the home, not all of them are applicable for joining sections of floors with different elevations.
Types of transition strips for different level floors
- Square nose molding
For slight height differences, you can use a square nose molding. A square nose molding has a squared-off edge on one side while the other seamlessly joins the elevated and lowered-level floors. You can use these transition strips for gaps about ¼ inch thick.
- Stair nose molding
A stair nose molding strip transitions two different level floors with a higher height gap. Typically used for stairs, you can still use them for high-gapped steps between different sections.
- End bar
The end bar typically joins the hardwood and laminate floors where there is a minimum height gap of around ¼ inch. Also called an end cap, this transition strip has rectangular or square-shaped edges used to finish edges between two floors.
- Reducer strips
The most appropriate transition strip for joining two heights is the reducer or threshold strip. It can seamlessly bridge two different leveled floors with up to ⅕ inch gap. It creates a sloping or surface-reducing profile that does not show much of the heightened gap between the two floors. Plus, this transition strip takes care of the possible trips along the edges of the higher-level floor.
Repurpose Old Wood Flooring Materials
Storage sheds may have flooring materials you did not use or probably stored there. One thing you can do with them is to customize them for transitioning from the elevated floor to the lower floor.
Before you go to your storage shed or garage or wherever you store unused materials for home, take note of the materials on the two floorings. If they are switching from tile to hardwoods or tiles to carpets, take note of their design, color, pattern, and shade. From there, decide whether to go neutral, blend, or contrast transition.
List your options, then check the available materials. You can use scrap wood planks, unused tiles or vinyl, or laminate flooring. Gather the necessary tools for cutting wood, laminate, vinyl, or tiles in your toolbox. Also, prepare measuring and marking tools for this project.
From the materials you gathered, plan the design of the transition strip you’ll make. Measure the transition gap on the floor. Create a joining slot on the custom transition strip you’ll make. Use a pencil to draw into the repurposed material, apply taken measurements, and cut it with the proper tool. Be mindful of cutting blades because most powered cutting tools are not appropriate for every type of material. For circular saws, you need to use different cutting wheels to cut into wood or metal.
You can use material-appropriate glue or fasteners to attach the custom transition strip: PVA glue, epoxy, screws, L-brackets, or nails. Take note of the material type because not every adhesive or fastener is appropriate for the surface and your repurposed material-made custom transition strip.
Blend with a Decorative Step.
If the floors have different floors with a considerably larger height difference, why don’t you install a step or more to blend the two floors? In this method, you will install a few steps to make the level gap intentional. Or you can simply buy a few vinyl stair treads or custom-made ones and lay them near the edges of the floor intersection. Select a design that could blend the design and pattern of the lower and higher level floors.
You do not have to buy flooring materials if you can find a few wood planks in your storage. But just in case, they are not so expensive to buy. Check for materials to repurpose or salvage. Of course, check on building codes to follow, especially if it concerns safety and standards.
Create a Gradual Slope.
A gradual slope transition shows a natural progression instead of a disruption. With a gentle incline, the two different heights become more comfortable and safe to walk in and more visually pleasing.
If you do not have transition strips ready, you can make wood ramps or tapered transitions made out of wood. You can make transition pieces from scrap metal or PVC profiles you can find in your storage.
Or, you can create a sloping subfloor with plywood or OSB board. Make sure to seal them after installation.
Measure the gap in the intersection and custom-cut it to create a snug fit. Use construction adhesive for subfloors or screws to fasten them. For wooden ramps, you need a few framing to support the ramp. Fasten it with screws or nails. If there are any gaps or seams, fill them with caulk or filler appropriate for the material you chose. Sand and polish as needed. For wood, make sure to coat them.
Join the Floors with Furniture.
You can place your furniture strategically near the intersection so people can identify the kitchen and the living room sections. In most cases, your furniture already blends with your flooring. However, the placements can go unnoticed, and the edges could cause danger.
Try moving the furniture to make a distinct visual connection with the intersection. For example, placing dividers on the wall where the kitchen and living room floors meet.
The divider carrying your television and home entertainment can provide a distinction between these places. If you put your two-door refrigerator on the other side of the wall, it will create an impression it is part of the kitchen.
Aside from dividers, you can also place a tiered shelving unit or a stepped side table that can mimic the transition between the floors.
Probably the cheapest, but you can utilize area rugs that distinguish the steps on the transitioning floors. Choose rugs that will blend or complement the flooring.
Also, you can use elevated platforms working as seating, shelving, or decorative areas. They can create not just distinction but a seamless transition between the elevated and lowered floors.
Use Contrasting Flooring Materials.
In this method, you will focus on the floor materials for both instead of the intersection. You do not have to replace your entire flooring to emphasize the contrast between the floors.
There are different methods you can use to achieve contrasting patterns.
Try painting or staining a concrete floor to emphasize its patterns against a hardwood floor. Or, you can install vinyl or laminate plank borders to create a contrasting effect between the different level floors. Another way you can create a contrasting effect is to use area rugs or carpet runners on the transitioning floors.
Highlight the Floor Intersection
Highlighting the floor joint provides an effect or impression that the difference in the height of the floors is intentional. This method provides a distinction and a smooth transition between the surfaces. One of the most creative ways to join them is to use paint. Try a striking shade that shows the area is transitioning from high to low-level floors. If you are creative enough, you can paint or stencil art or mural on the intersection.
If you have extra self-adhesive tiles that have entirely different patterns or designs from the two wood floors, this is enough to highlight the area.
More tips for a budget-friendly joining of floors with different heights
- Explore DIY options that match your skills.
- Take advantage of reclaimed wood or salvaged tiles.
- Check out the newest deals.
- Determine the appropriate and creative technique for transition.
- Check your tools and possible alternatives. Otherwise, borrow.
- Plan your design ahead of time.
- Practice creativity.
- Consider your furniture and current flooring material design, color, texture, and pattern.
Final Thoughts
Joining two levels of floors is a challenging project, especially when you are tight on budget. But it doesn’t mean it is not possible. All you need is to be resourceful and creative. Take advantage of the sale or simply check your unused flooring materials in the storage. Sometimes you do not have to spend anything at all. Some of our recommendations in this list are attainable with the tools and materials you may have at your storage shed.
One thing to consider is safety not only during installation but the safety of your transition piece. The edges of the floor can be a tripping hazard. Cover it securely and join the floors smoothly.
Here are the significant things to remember when joining two levels of floors, always measure the height difference. Different materials have different expansion and contraction rates. For high foot traffic, make sure you are using durable materials. Set a budget and find out how to maintain them. This way, you can handle the joining of wood like an expert.
- Can You Unmix Paint: Techniques, Consequences, Alternatives - February 23, 2024
- Does Primer Need to be Mixed? Effective Primer Application - February 22, 2024
- How to Make Old Paint Usable Again: Retrieving and Preserving Paint - February 21, 2024


