When you get a brand-new car, one of the first things you want to do with it is to take it for a ride. You’ll probably also want to keep that car looking new for as long as possible. That’s where vinyl tops come in. Vinyl tops are an affordable and practical way to keep your car looking great for years to come. You just have to make sure you take good care of them so they last for as long as possible.
Installing a vinyl top on a car may seem intimidating and technical, but did you know that you can actually take a challenge and make it a DIY project? This requires proper preparation and the use of high-quality adhesive to ensure that the final finish looks pristine. In this article, we will give you tips on what to look for when it comes to vinyl top adhesives and show you how to install a vinyl top on your car.
First things first… What is a Vinyl Top?
A vinyl top on the car is a plastic imitation of a fabric top. It is not an actual fabric but a PVC coating applied over a plastic shell. A vinyl top for the car is a cheaper alternative to an actual fabric top. If you are looking to save some money and still get the look of a convertible with a fabric top, a vinyl top on the car is the way to go. A vinyl top is a great option if you want a convertible look on a budget because you can get one for as little as $150. The material is very easy to maintain and stays intact for years if you take proper care of it.
How to Install a Vinyl top on a Car?
There are various steps involved in installing a vinyl top on your car.
- Choose the right vinyl top – There are many vinyl tops on the market, and you need to select the one that matches the style of your car.
- Check the installation instructions – Before you buy the vinyl top, check the installation instructions and make sure you are capable of installing the vinyl top on your car.
- Remove the old top – If your car has a cloth top or a vinyl top, you need to remove it before installing the vinyl top. This will ensure that the new top does not wrinkle and that the adhesive totally bonds with the car metal.
- Prepare the car surface – Clean the surface of your car where you are going to install the vinyl top using a grease remover and a razor blade if there is prior glue on it. Later clean the top with hot water and soap, then dry it off using a lint-free cloth.
- Measure and mark the car frame and vinyl – Make sure that the vinyl top matches the frame of your car before installing it. The vinyl size should be bigger so that it can cover all the desired lengths.
- Apply the glue on the top frame – The glue should totally cover the area to be installed with the vinyl, that is, the whole top. Ensure that you also apply the glue on the vinyl top. We advise that you begin from the center of the top. Mark the center of the car top and the center of the vinyl and align them together. Tell your two friends to hold the vinyl on each side and pull the vinyl till it cannot stretch any further. Spray one half of the top and the vinyl, then once the glue is totally dried up, cover the top with the vinyl and use a roller to straighten out the vinyl. Follow the steps with the other side of the car ensuring that you do not leave any wrinkles or folds because if it bonds with the glue, it will not straighten up. You only have that one chance to do it the right way.
Kindly note that you should wait for the adhesive to totally dry up. You will know that the adhesive is ready when the color clears and it does not stick to your fingers when you touch it. The speed of the adhesive drying after it has been painted is directly proportional to the environmental temperature, this means that the adhesive dries slowly on cold days and much faster when the temperatures are high.
How to repair a damaged vinyl top
- Prepare the car surface – Clean the surface of your car where you are going to install the vinyl top using a grease remover and a razor blade if there is prior glue on it. Later clean the top with hot water and soap, then dry it off using a lint-free cloth.
- Measure and mark the car frame – Make sure that the vinyl top matches the frame of your car before installing it.
- Using a glue gun, spray the glue on the top frame – The glue should totally cover the area to be patched Ensure that you also apply the glue on the vinyl top. Wait for the adhesive to totally dry up. You will know that the adhesive is ready when the color clears and it does not stick to your fingers when you touch it.
- Install the vinyl top – After you apply the glue, patch the vinyl top on the damaged section. Let the vinyl rest for 24 hours before driving the car. This is just a precautionary step to ensure that it does not rip off as you are driving.
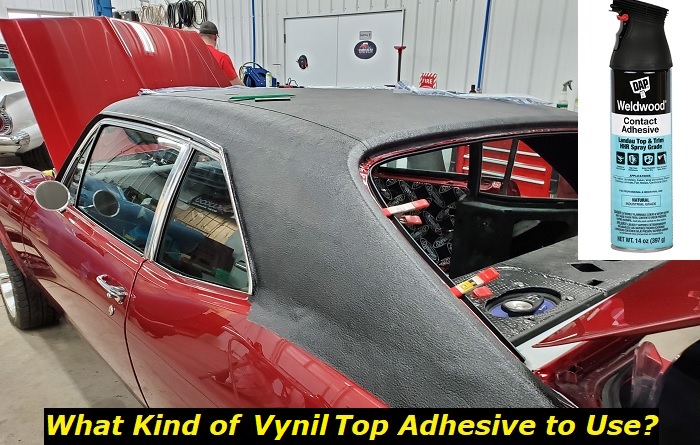
What adhesive to use
When it comes to automotive, using high-quality products is as important as doing the project itself. Using the wrong type of glue for a vinyl top can result in an awful outcome. Remember, different adhesives tend to be formulated for specific uses like high-end automobile use or indoor applications like upholstery, or outdoor applications like car roofs, or car bodies. This matters because various factors like temperature and humidity affect the adhesive’s ability to bond with the material.
When you are installing a vinyl top, you will likely want an adhesive with a high strength-to-weight ratio. The wrong adhesive can cause the vinyl to peel off, or worse, lead to a roof buckling as the adhesive does not hold it tightly. To avoid this, you need to find the right adhesive.
For vinyl tops, we recommend using contact cement. Contact cement is a type of adhesive that forms a permanent bond. It is often used for projects that require a strong bond. One thing to note is that contact cement is a temporary adhesive that can be removed when needed. It is made from a resin and a hardener that are mixed together and then applied to the surfaces to be joined.
Contact cement works by bonding surfaces together until the cement dries, at which point it will create a strong bond. They are made using synthetic resins and other additives designed to boost strength while keeping the weight low.
Use adhesion promoters to get better results
If in case you have tried installing a vinyl top on your auto and it has not worked, you may have applied the wrong adhesive. This may have caused the vinyl to peel off or the roof to bend due to an improper bond. To avoid this, you may want to consider using an adhesion promoter first.
An adhesion promoter is a product that helps an adhesive form a stronger bond. It is especially useful when you are using an acrylic adhesive to install a vinyl top. It can help the two materials form a stronger bond, reducing the chances of peeling or bubbling.
For example, 3M Adhesion Promoter can help acrylic adhesives form stronger bonds with the vinyl, improving the overall results you will get. It is important to note that not all adhesion promoters are the same. You should choose one that is meant for the adhesives you have chosen.
Conclusion
A vinyl top on the car is a cheap way to transform your car and give it a new classic look. A vinyl top is easy to install provided you follow the installation instructions carefully. The common pitfalls of vinyl tops are improper measuring, using the wrong adhesive, installation, and maintenance. If you follow the tips mentioned in this guide, you will be able to install a vinyl top on your car successfully.
Before you buy a certain type of adhesive to fix your vinyl top, it is important to know your vehicle and the vinyl top’s limitations. Certain vinyl tops are designed for use with specific types of vehicles. If you don’t know what these are, read the vinyl top’s packaging or consult a product guide.
It is okay to feel like choosing an adhesive can seem like a daunting task, especially if you are not a techie in auto revamping, but it is important to get it right. The wrong adhesive can lead to poor results, or even worse, the loss of your roof. Remember to find the right adhesive by knowing your product, knowing your vehicle and its limitations, and matching the product with the job that you are doing.
- Can You Unmix Paint: Techniques, Consequences, Alternatives - February 23, 2024
- Does Primer Need to be Mixed? Effective Primer Application - February 22, 2024
- How to Make Old Paint Usable Again: Retrieving and Preserving Paint - February 21, 2024