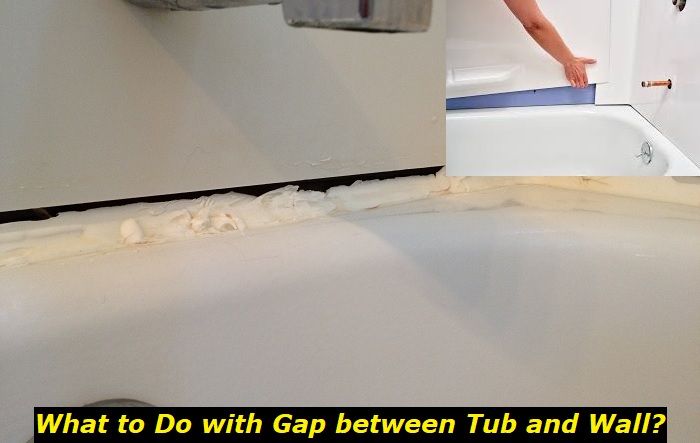
Have you noted a big gap between your bathtub and the wall? You probably weren’t happy when you discovered this and searched for all the possible ways to eliminate the gap. If the gap is small, you might be tempted to ignore it and continue enjoying your ‘me’ time in the tub. However, if the gap is 2 inches big, then you may need to work on removing it as the sight is not very pleasing, and there are other concerns to consider.
In our article today, we take a look at gaps that appear between tubs and walls. We will dwell on gaps that are as wide as 2 inches wide. In this article, we will explore ways to make the gap disappear while ensuring that the wall and the tub retain their appeal, if not improve it.
Why do gaps appear between a tub and a wall?
Like every other item or material that you can think of, the tub expands and contracts according to the weather or temperature changes it is subjected to. The tub moves, albeit in an insignificant proportion, when it’s filled with water, and you slide in. All these changes should be factored in when a tub is being installed.
Therefore, a gap between a tub and the walls is normal and planned for. The gap, referred to as an expansion joint, allows for the above-said movements between the tub and the wall to occur. The gap can be small and could even be ignored. However, big gaps between a 1/8″ up to 2″ can bother any homeowner.
As said earlier, the gap is designed for and should not be the reason for your worries. However, there are gaps that can be caused by a structural fault in the house or tub. In other cases, the gap can come about when the bath is incorrectly installed or when the contractor’s skills are not up to standard. In all these situations, you should rest easy knowing the gap can be dealt with and leave the bathroom looking elegant.
What are the ways to deal with the gap?
One can deal with a 2″ gap between the tub and the wall in several ways. Some methods are too easy and cheap, while others are a bit complex and not so cheap. But before you pick your remedy, it is critical to note that water and mold are a threat to the walls. Here are the best ways to deal with a large gap between the wall and the tub;
1) Tub flange
Normally, a tub comes with a lip around the edge. This helps cover the gap left between the tub and the wall upon tub installation. You may find some tubs that come without a lip, and the gap left between the tub and the wall can be substantial. The built-in lip of the tub will, in most cases, cover the gap sufficiently.
In case the built-in lip of the tub is insufficient or if the tub came without a lip, you can invest in a larger L-shaped flange that covers the gap quite easily. The flange should be easy to install, but the basic tip is to have the flange’s horizontal plane go against the tub’s edge. The vertical plane of the flange should go upwards.
After installing the flange, place the tub or the tiles on top. This hides the flange and gives the tub a very presentable and appealing look. There are instances when you may discover that the gap will be bigger than desired before installing the tub. In this case, attach a flexible tub flange. Once you have installed the flange, install the tub on top of it. Of course, when done, you should use caulk to give the tub a professional look.
2) Hardiebacker board
This is a ¼ inch thick cement board that is popularly used on floors and countertops. It is used to give tiles a better solid foundation and removes the risk of the tub getting into contact with the drywall. Having drywall in a wet area will almost always cost you dearly a few years down the line. This board is quite pricey, and you should seek the help of a professional to help you fill the gap using it.
3) Caulk
Caulk is a flexible material commonly used to seal cracks, gaps, and leaks. It is also used to seal joints and is a popular pick in many households. Caulk is mainly used to fill gaps or cracks of ¼ inch or less. It is also worth noting that caulk is waterproof, and that’s why it’s a popular sealant in building work and repairs. Caulk is best suited for stationary parts and materials, not moving parts, such as doors and windows.
One can opt for different types of caulk, including silicone, vinyl latex, adhesive, or fireproof-based caulk. Latex and silicone caulk options are the most common, though. Caulk is applied using a caulk gun if you buy the cartridge-packaged type. There is the tube option which is ideal for small projects.
How to use caulk:
- The first thing to do is to buy the right caulk for the job. Each has its advantages and disadvantages. The silicone caulk, for example, is good on gaps that contract and expand, while the latex or painter’s caulk works well on porous and nonporous material. It can be painted, while silicone might or might not be. In most stores, you will find ‘tub and tile’ caulk which is ideal for use on a tub.
- Invest in the right materials, such as paper towels or a clean rag. A putty knife and a spline or foam backer rod will also be necessary.
- Start by cleaning off the old caulk on the tub and the wall. It should be pretty easy to remove old caulk. Wipe off the remnants in readiness for the next step.
- As stated earlier, a single caulk bead will fill a quarter-inch gap. For our 2″ gap, some innovativeness is necessary, and this is where the foam backer rod comes in. When the caulk bead leaves a small gap, pushing it deeper into the gap with a finger is advisable. Do not flush caulk with the surface. Let the caulk dry, and apply a second bead to seal off the gap.
- If the gap cannot be sealed using caulk alone, you should use the foam backer rod, which is at times called a spline. You should buy the appropriate size of the rod to ensure that it fits in the 2-inch gap. Push the rod into the opening and make it go below the flush of the tub edge.
- Apply caulk on the rod and make it flush with the tub.
Tips on how to use caulk:
- Cut the tube at about 1/8 of an inch at a 45o angle to ensure you get the best results. This ensures the caulk is dispensed in a consistent, manageable bead, making your final work presentable.
- Apply a small bead on the gap you want to seal. It is better to add more caulk than to remove excess caulk. Removing excess caulk can be messy and will likely make your tub area look messy and unappealing.
- Every time you apply a bead of caulk to the gap, use a wet finger and slide it over the caulk to smoothen it out and also to push it deeper into the gap. This ensures the gap is properly sealed and the caulk is flush with the wall and the tub. Remove the extra caulk from your finger by wiping it on a wet rag clean cloth. If the caulk used is silicone, use paper towels to dry your finger, as silicone is not removable with water.
- Applying a lot of caulk at once makes it dry slowly, and it will have an unappealing final look as gravity pulls the excess caulk. It is advisable to always apply little caulk as you go.
- When applying caulk, it sometimes helps if you fill the tub with water or sit on the edge. Even though minimally, the movement of the tub when heavy will help increase the gap. When the caulk is applied, the gap will be larger, and once the tub is emptied, the gap reduces in size, reducing the chance of cracking. It is worth noting that this applies to some tubs and not all.
- Most people will do a pretty good job even if it’s their first time working with caulk. When you follow the instructions, you should eliminate the gap within a few minutes and be able to use the tub in a few hours. However, if you are in doubt or feel a professional might give you better results, go for a professional.
4) Re-installing the tub
Some gaps cannot be rectified by using a flange or caulking. You will need to remove the tub and install it afresh and professionally for the best results to be achieved. Even though a big headache for most people, re-installing a tub that leaves a huge gap between the wall is much cheaper than the eventual cost, you might incur in the long run when trying to repair it.
Conclusion
You now know the various routes and tricks you can employ to remove the gap that usually appears between the tub and the walls. It should be an easy exercise for a DIYer or a professional. Because we are looking for the best way to make the bathroom look elegant, it is advisable to consider hiring the services of an expert.
- Can You Unmix Paint: Techniques, Consequences, Alternatives - February 23, 2024
- Does Primer Need to be Mixed? Effective Primer Application - February 22, 2024
- How to Make Old Paint Usable Again: Retrieving and Preserving Paint - February 21, 2024


