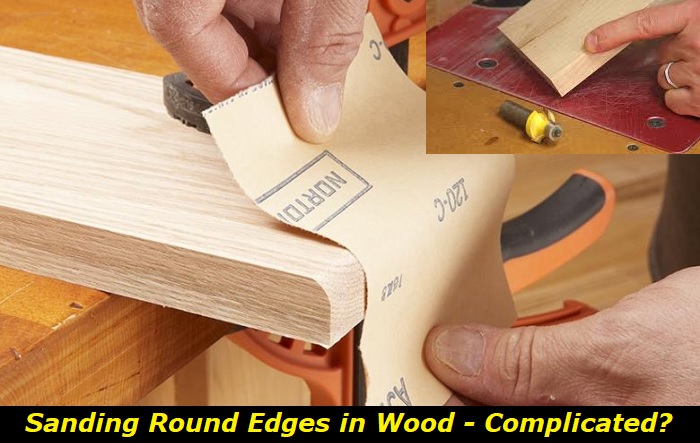
Sanding straight wooden surfaces is a straightforward process. However, when it comes to sanding round edges in wood, it’s a whole different ball of wax. It’s much more complicated, needs the right tools and techniques, and requires more attention to detail. This article will cover how to sand round edges in wood and the best methods to sand round edges in wood to give you the right knowledge to tackle your sanding project.

How Sanding Curved Surfaces is Different from Sanding Straight Surfaces
Sanding curved surfaces differs from sanding straight surfaces in that it requires you to be gentler. This is because curved surfaces are more delicate than straight ones.
It means employing excessive pressure or the wrong sanding tool might harm your furniture irreparably. When sanding curved surfaces, utilizing the proper equipment and methods to produce a flawless finish every time is crucial.
What are the Benefits of Round Wood Edges?
Rounded wood edges have several advantages that range from aesthetics to safety. Children or pets are more prone to injuries in homes with furniture with sharp edges and corners than those with rounded edges. Those with round edges are more dependable and less likely to hurt someone.
Rounded edges also lessen the likelihood of breakage by preventing splintering and chipping. Wooden objects have a softer, more elegant appearance thanks to their rounded edges, which makes them aesthetically pleasing.
Rounded edges also improve the usefulness and comfort of objects, making them easier to handle. This is especially true for objects like furniture, handles, and other wooden things that are frequently touched.
Which Tools Can You Use for Sanding Round Edges in Wood?
Not all tools used in sanding straight wooden surfaces are useful in sanding curved edges. This is because some of them cannot sand the hard-to-reach contours of the curved surfaces. Tools to use on curved surfaces also need to be flexible enough to conform to the shape of the round surface. One can use the following tools for sanding round edges in wood.
1) Sanding Contour Grips
The Sanding Contour Grips are best suited to sanding round edges and in confined spaces. The grips have a tough make, but that doesn’t mean they’ll scuff or scratch your furniture. With their flexible features, you can reach tight corners and crevices that would be challenging to sand otherwise by wrapping your preferred sandpaper around the various grip forms. They also have different designs to make it easier to hand-sand the various curves you often see on furniture.
2) Foam Sanding Pad
With the flexible nature of the Foam Sanding Pads, you can easily sand even the tightest radius. These pads are available in various sizes and are compatible with all types of power sanders, which can help you finish your sanding job more quickly. Additionally, you can sand even more fine details on your furniture using these pads by hand.
Any detail on your furniture may be easily sanded using this tool, whether you’re working on the corners of a table or the curved back of a chair. The risk of scraping or uneven sanding is decreased due to the pads’ soft foam structure, making for a smoother sanding experience.
3) Orbital Sander
The Q Sanding Technologies of the orbital sander allow easy and quick access to curved structures. With the help of the backing pad’s flexible edge and rounded form, you can sand curves and contours mechanically rather than by hand. The device allows you to swiftly sand any curves or shapes on your furniture without being concerned about uneven edges or cramping your hand.
4) Disc or Belt Sander
Curved edges can be sanded with a disc sander or oscillating spindle. The tools help to sand hard-to-reach curved contours. However, there are alternatives if you don’t have one of these tools. Consider employing a belt sander with one side perpendicular to the platen to smooth off rough, curved edges. You can start with belts that are 100 or 120 grit.
Preparation of a Round Edge Before Sanding
Before you sand your round edges, you may first have to round the corners of your table, plywood, or any other furniture edge you want to be rounded. You’ll require to have the right tools to create rounded edges. Some tools you can use to round an edge include hand tools like sandpapers, chisel, hand plane, surform, file or rasp, or power tools like Dremel, power sander, or jigsaw.
After rounding the corners of your furniture, you can then sand the surface to achieve a smooth finish. Start by looking for any inconsistencies or rough areas in the wood. You can remove any high areas or flaws with a chisel or sanding block. Next, ensure your workspace is tidy and orderly because clutter can obstruct the sanding procedure. To prevent movement during sanding, firmly clamp the wood piece in place.
What are the Sanding Techniques on Round Edges?
Maintaining an adequate grip and control of the sanding tool you’re using is crucial when sanding circular edges. You can maintain a relaxed but tight grip on the sanding tool, such as sanding contour grips, sanding sponge, or pad. To stop the tool from slipping or generating uneven sanding, exert even pressure with your hand. It’s also necessary to sand in the direction of the wood grain.to prevent leaving behind noticeable marks or scratches.
Use a circular motion with the sanding tools to smooth out convex round edges, such as the edge of a cylinder or dowel. Start by sanding lightly and gradually increase the pressure to sand the surface evenly. Going slow and steady will give you a consistent outcome.
Use a smaller sanding tool like a sponge when sanding concave round edges, such as the interior of a curve. You’ll need to apply consistent pressure as you wrap your fingers around the sanding sponge. Maintain an even rhythm while moving the sponge forward and backwards in the direction of the curve. Avoid using too much pressure, which may flatten the curvature or cause unevenness.
To sand spindles, legs, or other round edges, you can also wrap an abrasive paper or a strip of cloth around the curved surface and sand it from top to bottom by continuously pulling the ends back and forth. To effectively sand the heads and cross-grain of the wood, you should use a coarser grain of sand for this type of item than you would for flat surfaces.
The Sanding Process Using Sandpaper
The best practice for sanding is to start with low-grade sandpaper and work your way up to a fine-grit finish. You can use a flexible sanding block for more secure handling and control. It also ensures your knuckles are shielded from splinters and also offers a smooth and level surface.
Sandpaper is not the ideal tool for removing much material, though. A better approach would be using sandpaper after trying a different method. Start by sanding the curved wooden surface using 80-grit coarse sandpaper.
Follow this with 120-grit sandpaper as you move on to the 220-grit sandpaper for finer details. Sand over the edges that are even in long strokes being careful not to sand the surface unevenly. Continue sanding with 400-600 grit sandpaper until you get a smooth surface free of any flaws. Sand gently for a silky smooth finish.
Consider putting a suitable finish to the wood to improve its beauty further and protect it. Using a finish, whether a clear wood stain, clear varnish, or natural oil, may enhance the beauty of the wood and offer durable protection against wear and moisture.
Tips to Consider When Sanding Round Edges
The following are tips to consider when sanding round edges:
- Sand with light pressure to get a uniform finish and avoid producing inhomogeneous colors during the painting or dyeing phase.
- Ensure you work in a well-ventilated space or use a dust extraction device to reduce dust buildup.
- Use safety gear, such as safety goggles and a dust mask, to protect your lungs and eyes from airborne particles.
- Use a flexible padded foam block or gloves to protect yourself from injuries resulting from wood splinters when sanding. The padded foam’s stiffness should also prevent finger pressure points from leaving marks while providing comfortable and uniform sanding.
- Sand along the direction of the wood’s grain or the surface-marking effect or pattern. Refrain from sanding in a cross direction since doing so would highlight the scratches made and raises the wood’s grain.
- Sanding wet wood surfaces is not advisable. This is because the wood fibers with moisture can be easily removed during sanding. After all, moisture stops the fibers from standing up. Additionally, the created dust transforms into a paste that conceals the sanding tool preventing effecting sanding. That means you should wait until the wood dries before sanding.
- Use a tack cloth to clear the wood’s surface of any accumulated dust, especially between passes with different grits of sandpaper. The dust can cause scratches or flaws on the round edge.
Bottom Line
There you go–how to sand round edges in wood, best sanding methods, and tips to consider when sanding round edges for DIY enthusiasts and woodworkers. Using the correct tools and techniques, proper preparation, attention to detail, and enough practice can have you transform the rough round edges of your furniture into silky smooth surfaces.
- Can You Unmix Paint: Techniques, Consequences, Alternatives - February 23, 2024
- Does Primer Need to be Mixed? Effective Primer Application - February 22, 2024
- How to Make Old Paint Usable Again: Retrieving and Preserving Paint - February 21, 2024


