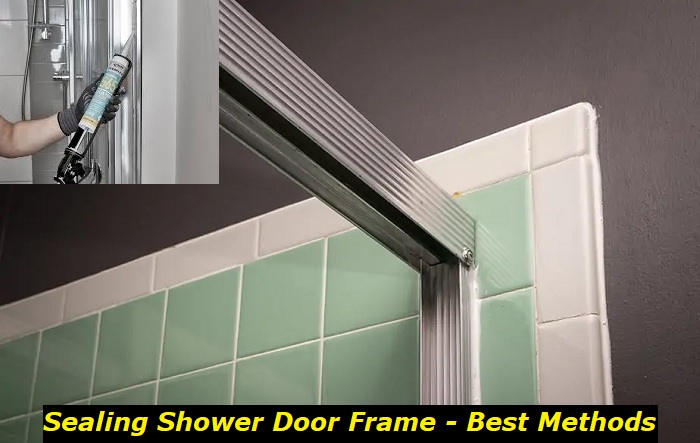
Are you planning to install a new shower enclosure in your home and you need help on how to seal the shower door frame? Or maybe you only just discovered water seeping through the door frame of your existing shower. Whatever the case may be, keep on reading this article to learn all you need to know about sealing a shower door frame.
Depending on which area of your shower door frame is causing the leakage, here is how to seal it tight:
- Replace old rubber piping between the glass and frame.
- Apply caulk between the door frame and walls or shower tray.
- Change worn-out bottom seals.
A leaking shower door frame can cause severe water damage to walls and floorboards which can be costly to fix. Not only that, but it can also make your home damp, smelly, as well as encourage the growth of molds and mildews. Most annoyingly, it can make a mess that could result in slippage incidents.
In this article, we will guide you through finding leaks in your shower door frame. We will also discuss how to seal the door frame of your new shower or an existing one.
Locating the leaking area of your shower door frame
For existing showers with a leaking door frame, you need to find out which part is affected before proceeding to seal. Although finding leaks can seem like a daunting task, doing so can save you lots of time and effort. The three major areas to check when investigating a leaking shower door frame are:
- The rubber piping:The rubber piping around the shower glass holds it firmly to the door frame to prevent leakage.
- The caulking:Waterproof caulks are used to seal the shower door frame and walls or shower tray to avoid leakages.
- The bottom seal:For framed shower doors, it helps if you use a drip rail at the bottom which helps to direct the flow of water back to the shower train. A seal is placed on top of the drip rail to prevent water leakage outside the shower.
Locating the leaks can be as simple as looking out for areas on the wall and floor with molds, mildew, and water damage. You need to pay close attention to the corner and edges of the shower frames and check for any openings or cracks. Examine the rubber piping between the frame and glass as old pipes can get brittle and broken thereby causing leakages.
Also, check for any obvious cracks and openings from the old caulk and wall. Finally, check if the bottom seal has fallen out of place or broken.
In addition to performing a visual examination to locate leaks, you can also carry out a water test. To do this, simply run the shower and see if water seeps out of anywhere outside the shower.
What to do next?
Having located the leaking areas of your shower door frame, you can proceed to seal them. But, how do you do that? Here is how:
- Install rubber pipes
- Install bottom seal
- Caulk
Installing rubber pipes
If you suspect that the leakages on your shower door frame are from worn-out rubber pipes around the glass, you need to change them. Also, if you are installing a new shower enclosure, sealing it with a durable rubber pipe will prevent leakage problems. Here is how to install rubber piping for your new shower and change old ones for existing showers:
- Remove old rubber piping
- Fixing new rubber piping
Removing old rubber piping:
- Pull out the old rubber piping. Using a knife or pliers can get the job done easier.
- Use adhesive remover or heat the adhesive with a hairdryer to soften it and wipe clean with a damp cloth.
- Leave the surface to dry out.
Fixing new rubber piping:
- Cut the right size of the piping to fit.
- Apply adhesive on the surface where the rubber piping is to be fitted. Place the rubber piping on the adhesive.
- Clean off excess adhesive with a remover and damp cloth.
- Give the adhesive enough time to cure and dry.
Installing bottom seal strip
Installing seal strips is essential for preventing leakages when fixing a new shower enclosure. It also helps restore the waterproofing integrity of your old shower when replaced regularly. Here is how to replace old seal strips for existing showers or install them afresh for new showers.
- Remove old seal strips
- Fix new seal strip
Removing old seal strips:
- With the help of a knife or pliers, remove the old seal strip.
- You can use a hairdryer to heat the adhesive so it can come off easily.
- Use spirits to dissolve the adhesive residue and wipe clean with a damp cloth.
- Let the surface dry out.
Fixing new seal strips:
- Whether you are replacing old seal strips or installing fresh ones for your new shower enclosure, here is how to do it right:
- Measure the length and width of your shower door or old seal to determine the size you need.
- Choose the right seal for use in the bathroom. It is also best to choose a self-adhesive seal for easier application.
- Cut the seal to the length of the door using scissors.
- Position the seal in the center of the bottom door rail and press it in place.
- Leave the seal to cure and completely dry out for at least 24 hours. During this period, avoid using the shower or opening/closing the door.
Caulking
To create a perfect watertight shower enclosure, you need to seal between the shower door frame, walls, and shower tray with waterproof sealant/caulk. Here are the steps to follow to ensure that your shower door frame is sealed/caulked to perfection:
1) Prepare the area for sealing
Before starting the sealing process, it’s important to prepare the area. Follow these tips to ensure the best possible results:
- Clean the area
- Let it dry
- Remove old caulk
Clean the area: The door frames in the shower are easily stained by soap scum, water, and residues from bath products. Hence, the first thing to do before applying the sealant is to clean the door frame, shower tray, and walls. To achieve a squeaky clean surface, use a mild cleaner and a damp soft sponge or washcloth.
Let it dry: After cleaning the door frame, adjacent walls, and shower tray, leave them to air-dry for a few hours.
Remove old caulk: To remove the old caulk around the shower frame, you will need a sharp tool like a chisel or knife. Use your knife or chisel to carefully cut out the old caulk bit by bit. You need to pay extra care not to damage the surface of the shower frame, walls, and shower tray. Use a vacuum cleaner to clean grits and loose particles of caulks.
2) Choosing the right sealant
It is crucial to choose a 100% silicone sealant due to its excellent waterproof quality and flexibility. Additionally, look for a sealant that is mold and mildew resistant, as it will help maintain a clean and hygienic shower environment.
3) Preparing the sealant
Once you have the sealant, it’s time to prepare it for application. Using a utility knife or a pair of scissors, make a 45-degree angle cut at the tip of the sealant tube. This will create a small opening that allows for precise control during application. Insert the sealant tube into a caulking gun, ensuring that it is securely in place and ready for use.
4) Applying the sealant
Starting from one end of the shower door frame, apply a thin, even bead of sealant along the edges where the frame meets the wall. To control the flow of sealant, hold the caulking gun at a 45-degree angle and push the trigger steadily. Maintain an even, continuous sealant line as you move the full length of the frame.
Use the sealant for the interior and exterior vertical edges where the shower enclosure touches the walls. However, at the bottom where the shower enclosure connects with the shower tray, apply the sealant only on the exterior.
It is not recommended to use the silicone sealant for the interior base of the shower enclosure. That’s because doing so can cause water to be trapped in the shower frame. Thereby, causing leakages from joints in the frame and from around the base of the shower enclosure.
5) Smoothening out the sealant
For a clean finish, it’s important to smoothen the sealant once it has been applied, you can do this with your finger or a caulking tool. To stop the sealant from sticking, wet your finger or the instrument with some water and dish soap. Then, gently run your finger or the tool along the sealant to create a smooth, even surface.
6) Cleaning up excess sealant
After smoothening the application, the next thing to do is to clean up the excess sealant from unwanted surfaces before it dries out. You can wet a cloth with alcohol to achieve a clean finish.
7) Drying out the sealant
The final step is to leave your sealant to dry completely. Because drying time might vary depending on which sealant you used, it is advisable to follow the recommendations provided by the manufacturer.
However, as a rule of thumb, you should give the sealant at least 24 hours to dry. During this period, the shower should not be utilized.
- Can You Unmix Paint: Techniques, Consequences, Alternatives - February 23, 2024
- Does Primer Need to be Mixed? Effective Primer Application - February 22, 2024
- How to Make Old Paint Usable Again: Retrieving and Preserving Paint - February 21, 2024


