In today’s article, we will be exploring how you can remove haze after wet sanding. Selecting the sanding method you need for either your furniture, wall, or car to be done carefully. When it comes to sanding metal or a car, wet sanding is the best option.
Choosing the dry sanding method for metals and cars can also lead to having so many paint corrections.
Accumulation of wax, rubbing of a compound or improper sanding can cause hazing, especially in automobiles.
That is why it is important that you remove the haze after wet sanding.
In this post, we will show you different ways to use wet sanding and how you can remove the haze after the whole process.
What is wet sanding?
Wet sanding is a process whereby an abrasive like sandpaper is used with water or another liquid to give smoothness to a material. The liquid or lubricant (usually water and soap) that is used during this process helps to remove grit particles that remain after dry sanding.
It also helps to prevent clogging which can cause deep scratches. Wet sanding is used during the early stages of buffing and polishing. It is also used during the last stages of sanding when repairing minor surfaces. Lastly, you can also wet sand when removing scratches on the paint.
During the process of dry sanding, some damage might have been done to the underlying material. Wet sanding helps to correct these damages. It is also a good tool that helps in fixing any defects or imperfections during paint correction. These imperfections could be an uneven paint job or the removal of particles and debris that got stuck in the paint.
The process of sanding can create little scratches. The continuous adoption of finer grits of sandpaper helps to reduce the scratches to the barest minimum till the desired result is gotten. During wet sanding, the sandpaper lasts much longer. It does not wear out easily.
The common application of wet sanding.
Wet sanding wood
Over the years, people have adopted the method of dry sanding several wood products to reshape the surface, remove splinters, or make uneven wood straight. Wet sanding can also be used on woodworks in homes e.g. cupboards, chairs, tables, or worktops to give them a glassy and clear appearance
Some wood products like violins, should not be wet sand with a lot of water. Wood gets swollen or wrapped when it absorbs water. The best method is to spray enough water and wipe it off as soon as the sanding is done.
Wet sanding metal
The process of wet sanding a metal gives it a perfect look. Minor defects are removed while improving the shine on the metal. A dull metal that has lost its luster can be revamped after wet sanding properly.
While wet sanding metals, water must be frequently applied to the surface of the metal and also the sandpaper to get a desirable result.
Wet sanding drywall
People use wet sanding for different purposes. It could be to either prepare a room for repairing a little portion or for the process of painting the entire room. Although using wet sandpaper takes a longer time than dry sandpaper, you can see the difference between the two. Sanding with a wet sponge to lubricate the wall helps to remove dust during the process and gives it a better feel after sanding.
There are abrasive sponges that are made for wet sanding but you can use a regular sponge to get your result.
Wet sanding a car
The process of wet sanding a car is commonly used in auto body shops. It helps to repair minor defects and deep scratches on the car. When painting a car, wet sanding helps to remove specks of dust and particles on freshly coated paint.
Other imperfections can also be fixed during wet sanding. A quality detergent, fine grit of sandpaper or sander, and water are best appropriate while sanding a car.
How to wet sand properly
The things you need to wet sand your car properly include
- Lubricant (water and soap)
- Hand scissors
- Sponges and microfiber towels
- Squeegee or pad
- Power buffer
- High-grade car wax
The steps to wet sanding are;
- Get the lubricant ready
A bucket filled with water and soap is ok
- Divide the sandpaper
Using a long strip of sandpaper will make sanding much easier when wrapped around a squeegee, so you can cut a sheet into 2.
- Soak the sandpaper
Dip the strips of sandpaper in the lubricant and leave it for not less than 5 minutes. also, leave a dry part of the sandpaper so that you can wrap that part around your squeegee
- Wash the area you want to sand
To remove dirt and dust particles, wash the area with soap and water. You can now dry it with microfiber towels.
- Start wet sanding
Fasten onto the squeegee and use the already wet sandpaper to sand the surface gently. Don’t apply too much pressure. You only need to continue to move it mildly in a circular motion.
When there is a lot of bleeding from the paint into the sandpaper, it shows that too much pressure is being applied.
- Continue to lubricate:
The sandpaper you are using must be wet throughout the sanding process. You can soak it over and over just to lubricate it. You can also keep pouring soap and water on the surface you are sanding. This will help to protect the paint from getting damaged
- Treat the surface:
You have to get rid of deep scratches with finer sandpaper such as 1500 and 2000 grit. This will help to remove any imperfection that is left.
- Rinse thoroughly:
After treating the surface, you will rinse it thoroughly. Using a hose with running water will help to remove the soap on the surface.
- Dry the surface:
Now, the car has a clean touch. You can dry it with a wool towel. Do not leave the car directly under the sun. It will cause watermarks to remain on the surface.
- Continue with final steps on your project:
After the sanding is done and the surface is dry, you can keep on with any other steps to treat the project. It may be clear coat, painting, polishing, etc. But make sure the process of wet sanding is completed perfectly.
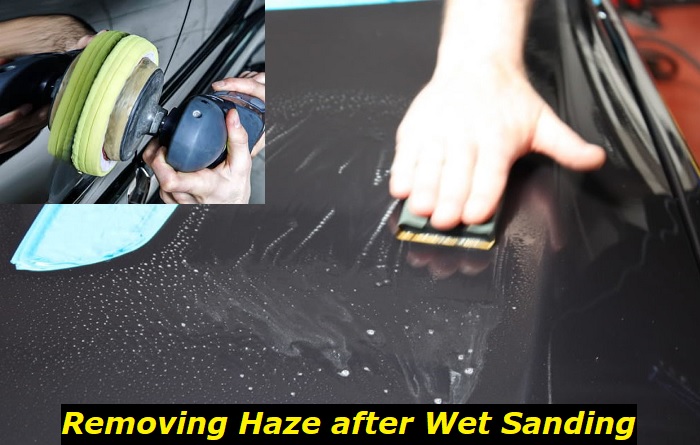
How to remove haze after wet sanding
Rubbing of compound, wax, and grime can accumulate on the surface of the car thereby creating hazing with time. This can make the paint unattractive. Several products on the market can help you remove hazing from the paint on your car.
To remove the haze, you will need the following
- Sandpaper (1500 and 2000 grits)
- Dupont compound
- Water
- Microfiber towel
- Dupont 7 polish
- Turtle wax
The steps you need to remove haze after wet drying are;
- If you use 1200 grit sandpaper for finishing, the result won’t be good enough. You should use 1500 and 2000 grit sandpapers. The use of 1200 grit sandpaper implies that you want to use a compound that is aggressive to remove a lot of paint just to remove deep scratches. To make the removal of haze easy and fast, you should use quality paper like Meguiar’s Nikken 2000 grit.
- Use a new 1-inch wool wheel on a Sioux buffer alongside the Dupont compound. This will help to remove cuts and scratches during the sanding process.
- To remove the compound residue, you can use a 50/50 solution that contains isopropyl and water. Dry the surface with a microfiber towel and run your fingers through the surface to be sure the haze is no longer there. If the haze is still there or the surface is not smooth, you might have to repeat the process till you get what you want.
- Use a 2 inches wool thickness wheel, also use Dupont 7 polish so that the beauty can come out. It will also remove marks made by wheels after compounding.
- Use a high-grade wax like turtle wax to further remove hazing. After waxing, wash your car and dry it very well.
The final output will be amazing. It should look like a polished glass with a deep shine
Note: Do not wax your car under direct sunlight. The heat of the sun can soften the paint and make it scratch easily.
Conclusion
Wet sanding or removal of haze after wet sanding should be properly done to avoid regrets. The processes must be followed meticulously and attention must be paid to details.
Experiencing haze after wet sanding can be disappointing. The process of removing it can also be stressful if the required steps are not followed well. You must take your time while working and be careful not to damage the car paint.
If you follow the process of wet sanding your car or removing the haze after wet sanding, you won’t find it difficult to achieve it.
Have in mind that you can always hire a professional to help you wet sand or remove the haze. It will cost you some money, but you won’t have to go through the stress or further damage the vehicle’s exterior if you are an amateur.
- Can You Unmix Paint: Techniques, Consequences, Alternatives - February 23, 2024
- Does Primer Need to be Mixed? Effective Primer Application - February 22, 2024
- How to Make Old Paint Usable Again: Retrieving and Preserving Paint - February 21, 2024


