Have you heard of the burnt wood finish and wondered what it is? We have all the answers. The finish is perfect for homeowners and interior designers looking for rustic and unique aesthetics. If you are a fan of DIY projects, it is impossible to read about the burnt wood finish and resist the urge to try it in your space.
This article provides the original names for the burnt wood finish and its benefits. You will learn how to achieve the finish on any wooden surface. We also outline the safety considerations and maintenance tips you need when applying this technique.
What Is a Burnt Wood Finish Called?
A burnt wood finish is also known as Yakisugi or Shou Sugi Ban. The Japanese technique has been used for centuries to preserve wooden furniture. The original process involved charring wood with fire.
The Japanese designers traditionally used the burnt wood finish to protect the wood from decay and pests. Charring also gives wooden surfaces a unique and attractive finish. The technique is used in modern interior and exterior designs for its unique aesthetic appeal.
The burnt wood finish is popular for its durability and low maintenance needs. You can go for decades without thinking about a retouch when you apply the technique properly.
The technique also protects wood from premature weathering and decay. In addition, the finish is eco-friendly, especially when applied in the original Japanese procedure. The wood requires no harmful chemical treatment to achieve and maintain the look.
Techniques to Get the Burnt Wood Finish
You can get a rustic finish on your wooden furniture through various techniques. Modern interior designs still apply the traditional Japanese technique of charring wood with fire. However, the method has higher fire risks than modern techniques.
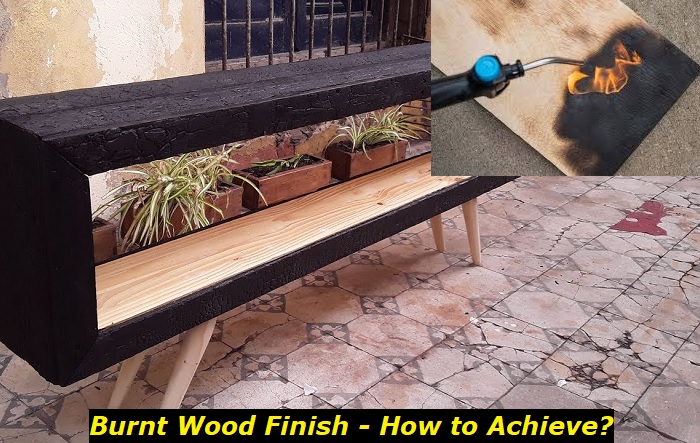
Modern techniques of achieving the burnt wood finish involve using propane torches and brushes to achieve a similar look as the traditional technique. You can use a weed or a plumber’s propane torch.
You have better control with a large weed propane torch. Its coverage is wider compared to a plumber’s torch. However, the weed torch is more expensive and can char the wood excessively.
A plumber’s propane torch is affordable but does not provide the same coverage and control as a weed torch. Choose the torch that suits your needs and budget. You can achieve a smooth finish with any torch.
After burning the wood, you will need a brush to remove the soot and char. You have the option of a wire brush or nylon brush. A soft-bristle nylon brush removes the char without damaging the wood or leaving marks.
The nylon brush takes longer to clean the surface thoroughly. The wire brush is faster but may leave large marks or scratches. The marks may be the different aesthetics you need for a unique finish.
Safety Considerations When Applying the Burnt Wood Finish
A burnt wood finish is beautiful and unique. With this Japanese technique, you can transform the look and feel of any space with wooden furnishings. However, safety precautions are a top requirement before you attempt the finish.
Fire Hazards
Any process that combines wood and fire has a high risk of starting a fire. You may burn down the furniture, room, or house by ignoring fire hazards. The first precaution to prevent fires is to learn the right technique.
We will outline the proper procedure for achieving the rustic and elegant burnt wood finish. You can follow the steps even as a beginner. It is safe to start with a small piece of wood and attempt the process outdoors.
You also need equipment to stop any fire. A full spray bottle is enough to stop a small flare-up. However, you need a large bucket of water or a connected garden hose to quench large flare-ups.
A fire extinguisher is a great alternative to water gallons. Test the extinguisher or its alternative before starting the process. The water should be within reach in seconds if a fire starts accidentally.
Personal Safety
Your safety is also a top priority in the process. Wear protective clothing that can withstand high temperatures. Wear gloves that do not melt or stick to the skin when exposed to high temperatures.
The protective gloves should allow you to maintain control when working with the propane torch. You also need a mask to protect your respiratory system from the char and soot.
Safety glasses are essential to protect your eyes from any sap in the wood knots. The soot and char may also enter your eyes when brushing the surfaces.
How to Achieve a Rustic Burnt Wood Finish
The type of wood, technique, and tools determine the aesthetics and durability of the finish. The technique works well for softwoods, including pine, cedar, and cypress. You can also apply it on hardwoods, but the results are different.
1. Preparation
The first step is collecting all the required tools and safety items, including the torch, brush, propane, fire extinguisher, and water. Choose a safe environment and surface for burning the wood and wear protective gear.
A metal workshop or spacious garage is a good environment to apply the technique. Place the wood on a flat and inflammable surface. Keep the surroundings clear of flammable objects or materials.
2. Burning
Load the propane torch and light it. Apply the flame on the wood in the same direction as the wood grain and maintain the pattern. Start with a light flame on a small section and check the results.
You can see knots and wood grains when burning with a light flame. Pass the torch once if you prefer this finish. A deeper flame is necessary for a deep-colored finish.
You can also alternate between a light and deep burn to create a unique character on the wooden surface. The wood may cup or warp if you pass the flame multiple times without breaks.
Spray some water in between to prevent warping. Keep burning the surface until every part is charred. You can apply any creative design, especially on wood with knots, for a deeper and more elegant look.
3. Brushing
Allow the wooden surface to cool for 10 minutes before brushing the wood. You can leave it longer if you have applied the flame multiple times. Brush the charred surface with a nylon or wire brush.
The wire brush will help you add more character to the charred wood. Use the soft-bristle nylon brush to maintain a consistent deep color.
Brush in the same pattern and follow the direction of the wood grain. Apply pressure depending on the color depth you desire. Brushing removes the char and makes the wood color lighter.
You can vary the applied pressure to create a color pattern. Be consistent with the pattern. Creativity, consistency, and patience will create a unique burnt wood design.
Use a damp cloth to wipe all the soot and char residues. Be thorough when cleaning, especially if you intend to apply a protective coat.
4. Coating
The burnt wood finish is enough. Charring protects the wood from damage through rot and pests. However, a protective coat can enhance the aesthetics and longevity of the new finish.
Choose a high-quality, transparent oil, wood sealer, stain, or dye. The finish should keep the burnt wood finish visible while protecting the wood. Check the manufacturer’s instructions for applying the protective coat.
How to Maintain the Burnt Wood Finish
Maintaining the rustic burnt wood finish is simple. The finish can go for decades without requiring a refinish. You will probably change the furniture before retouching the finish.
Applying a protective layer after brushing makes the finish and wood last longer. Apply the coat on frequently used indoor and outdoor furniture. The protective coat prevents ugly scratches and fading.
Clean the wooden surface with a soft cloth and avoid detergents or wood cleaners with harsh chemicals. In addition, avoid wood bleach spills. Harsh chemicals and bleaches will damage the finish.
Use a soft-bristle brush to clean the wood if dust or debris accumulates on the surface. After some years, you can re-burn the surface in different patterns to create a different outlook and hide flaws.
Avoid excessive weight and heat on wooden surfaces. Pay extra attention to outdoor furniture exposed to harsh weather, insects, pests, and weeds. Treat mold, infestation, and decay immediately and re-burn the affected areas.
Conclusion
The burnt wood finish is a Japanese technique of giving wood extra character and color while protecting it from damage by charring the wood with fire. The finish is popular in modern interior design for its unique aesthetics and durability. You can achieve the finish with a propane torch and brush.
Implementing the technique requires safety precautions because of fire hazards and health risks. Wear protective gloves, a mask, and sunglasses before burning. In addition, keep a fire extinguisher and water nearby in case of a flare-up. Apply the technique in a metal workshop or open garage.
You can create unique designs on each wooden surface by varying the intensity of the burns. Brushing removes the char and reveals a lighter shade as desired. Cleaning and applying a protective coat are recommended to maintain the finish.
- Can You Unmix Paint: Techniques, Consequences, Alternatives - February 23, 2024
- Does Primer Need to be Mixed? Effective Primer Application - February 22, 2024
- How to Make Old Paint Usable Again: Retrieving and Preserving Paint - February 21, 2024


