Any homeowner will find it unsettling to spot drywall seams uneven, bulging, or not flushed. The problem is there are too many fixes you can do, but you cannot identify which repair to use. But performing the wrong repair may not fix the problem and could result in wasted resources.
See, there are many causes why drywall seams are not flush. And the first step to addressing uneven drywall seams is to know these causes before performing necessary repairs.
To know more about them, read on.
Reasons Drywall Seams Are Not Flush
1) Improper Installation
The reason your drywall seams bulge, buckle, sag, or do not flush happens mostly during installation. From framing to joining of seams, installation mistakes likely cause the drywall seams not to flush accordingly.
Common Mistakes When Installing Drywalls:
- Improper spacing between the studs
- Under or over-driving fixings such as screws or nails
- Improper fitting or cutting
- Uneven joint compound application
- Insufficient drying time for the joint compound
- Improper bracing
- Wrong drywall thickness
Depending on the improper technique you used, you may have to reinstall drywall, reapply joint compound, or reinforce framing.
2) Incorrect Taping Technique and joint compound application
Incorrect taping technique refers to the improper procedure during taping and application of the joint compound. The process includes inadequate or too much application of the joint compound. Failure to use the tape correctly and improper smoothening of the joint compound may result in visible uneven seams.
Also, the joint compound needs an adequate drying time before sanding. It needs at least 24 hours to complete the drying time. In this case, check the label for the manufacturer’s recommendation. In some scenarios, you may have to remove them and reapply new tape or drywall joint compound.
3) Poor Quality Joint Compound
Poor-quality joint compounds will not adhere properly on the surface, and it may even create a textured and rough finish. When you use an old drywall joint putty, the surface may even result in cracking. Additionally, these compound types would result in shrinkage, the reason drywall seams do not flush properly. And lastly, this joint compound would be challenging to work with and spread evenly.
4) Moisture Exposure, Expansion, or Contraction
Humidity levels in the area can cause the drywall to expand, contract, warp, crack, or swell. These events can happen when:
- The drywall panels push against each other.
- The joint compound did not dry completely in-between coats.
- Humid environments
- Moisture is trapped between building materials and the drywall.
- Poor ventilation
- Drywall pulls away from each other in colder temperatures.
5) Uneven Framing or Poor Bracing
Framing needs to be level, even, and have equal spacing. If not, the drywalls will not rest aligned because some parts are raised. In these cases, you may have to reinforce your wall framing.
6) Wrong Drywall Thickness
Drywalls have varying thicknesses. The problem with replacing one part of the wall, you may purchase drywall with a different thickness than the existing wall. Even a little portion of an inch will show on your finished drywall seams like a glaring mistake. In this case, you must replace it to the correct thickness so the drywall seams will flush.
7) Settling
Settling occurs naturally, especially for homes in wet or unusually wet areas. This event happens when the foundations of the home compress to the ground gradually, probably when the soil has softened. This condition impacts the home foundation and not necessarily the building process of the structural framing.
If your house is settling, you will also see signs of cracking along the house’s foundation. You will also find gaps on the bottom of the drywalls or at the ceilings where it meets the walls.
You cannot DIY this problem. And you must seek help from foundation inspectors.
Ways to Repair Uneven Drywall Seams
Now that you know why drywalls do not flush, it’s time to look at the possible ways to fix them.
Method 1– Drywall reinstallation or replacement
Perform drywall installation after diagnosing uneven drywall seams that have formed from structural issues or deteriorating drywall seams. If you have installed incorrect drywall thickness, purchase same-thickness drywall for replacement.
You have to address the root of the problem before making any reinstallation or replacement procedures. Remove the existing drywall and find the cause of the uneven joint surface beneath.
Sometimes the drywall seams expand and swell because of absorbing moisture from the air.
If the deterioration includes your structural frames or studs, you may have to reinforce them too. Otherwise, with moist structures, your reinstalled drywall will also moisten or rot.
The key to successful reinstallation is finding the source of the problem. You may have to fix leaky pipes. Or use a dehumidifier in the room.
After removing warped or swollen drywall and addressing the issues beneath it, proceed with drywall reinstallation or replacement. Wait until the affected area dries completely before taping the joint and applying the joint compound. Apply the coat as necessary, then sand and finish.
Method 2- Installing shims
If you find a few uneven framing or wall studs, you can install shims to align the surface evenly. You will need a finishing nail, a level, and a hammer.
- Get your level and find the parts that have uneven surfaces.
- Nail the shims using a hammer. You need finishing nails because the shims are extremely thin. It may break apart with regular nails.
- Remove any protruding parts of the shims using a utility knife.
- Reinstall the drywall panels. Avoid overdriving or underdriving screws or nails.
Method 3- Installing furring strips
If there’s a widespread uneven framing or the drywall seams are too far from the wall studs, you can use furring strips to level the surface of the drywall. The size of the furring strips will depend on the length of your drywall.
- Measure and cut the furring strips according to the length of your drywall.
- Use a level or straight edge to ensure the furrings strip is level and aligned.
- Screw the furring strips into the wall studs.
- Once you have installed them, you can now reinstall your drywall.
Method 4– Hammer the drywall
Sometimes, the drywall just won’t fit into the wall surface because it is not rectangular or square. If the wall is arched or curving, the drywall seams will not sit properly on the wall.
You only need the help of a hammer to flush them in. However, you cannot hammer into the drywall alone because it may damage the surface. So, find a flat thick wood piece and lay it on the drywall seams. Hammer the wood piece until the drywall seams flush evenly.
Method 5– Replacing new tape
In most procedures above, you join the newly-installed drywall with drywall tape. But for drywall seams to form an even and flushed surface, you must apply the correct taping techniques. A lot of people who taped their drywalls have used improper taping techniques.
- Too much or lacking joint compound
- Not feathering the joint compound evenly
- Incorrect tools used
- Rushing the taping job
To replace a new tape and flush the drywall seams evenly, here’s what you need to do:
- Remove and cut the loose tape on the surface using a utility knife.
- Apply a generous amount of joint compound covering the entire seam. Do not forget to cover the existing tape.
- Embed new tape into the newly-wet joint compound. Feather it out to remove bubbles and wrinkles. Apply pressure to embed the tape firmly.
- Apply as many coats as needed to flush the joint compound evenly. Make sure to dry them completely.
- Once dried, you can sand the surface, starting from coarse grit to fine grit sandpaper.
- When smooth, paint and texture the surface to match the existing wall.
Method 6– Reapplication of new high-quality joint compound
If your drywall is uneven because of the poor-quality joint compound, you must reapply a new high-quality one. When the drywall seams have created gaps or contracted because of cold temperatures, fill them in with a new high-quality compound.
When you need to replace quality joint compound thoroughly, remove the old putty before applying fresh quality ones and embedding new tape with the steps on the taping method above.
Method 7– Reinforce framing
Sometimes, the studs are not enough to hold the drywall well. For this reason, the seams do not flush properly. For poor bracing cases, you need to reinforce the bracing.
To do this, remove the drywall. Add more blockings, bridging, or studs to support the drywall. Secure the reinforcements with appropriate fasteners. Reinstall the drywall, apply joint putty, and tape it as instructed in the above procedures.
More Tips for Fixing Drywall Seams Not Flushed
- Diagnose the cause of uneven drywall seams.
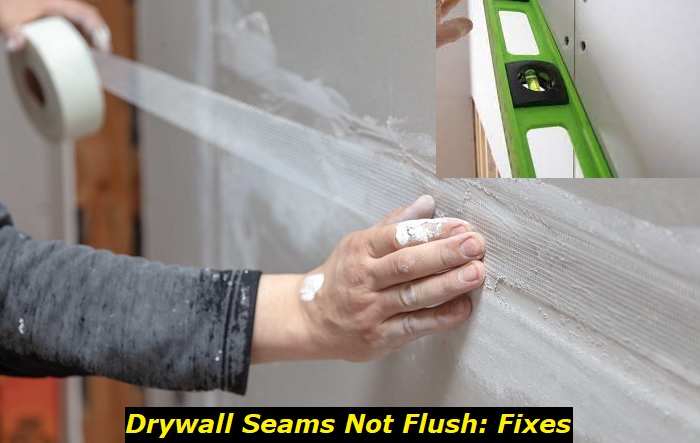
- Use a level to identify high and low points on the surface.
- Sometimes, you can just sand the bulge away.
- Feather the compound smoothly.
- Make sure the joint compound has dried completely.
Final Words
Now that you know how to fix uneven drywall seams, it’s time to find what caused those unsightly drywall joint surfaces.
Check for signs of cracking on the frames, the bottom of drywall, or ceiling meeting points. You want to ensure that your house foundation is not settling.
Additionally, ensure to use of high-quality and the right thickness of drywall. Do not use the old compound because it will crack and be hard to work with.
With the proper technique, you can fix this problem. And if you are still uncomfortable with this task, consult drywall experts to address drywall seams that do not flush.
- Can You Unmix Paint: Techniques, Consequences, Alternatives - February 23, 2024
- Does Primer Need to be Mixed? Effective Primer Application - February 22, 2024
- How to Make Old Paint Usable Again: Retrieving and Preserving Paint - February 21, 2024


