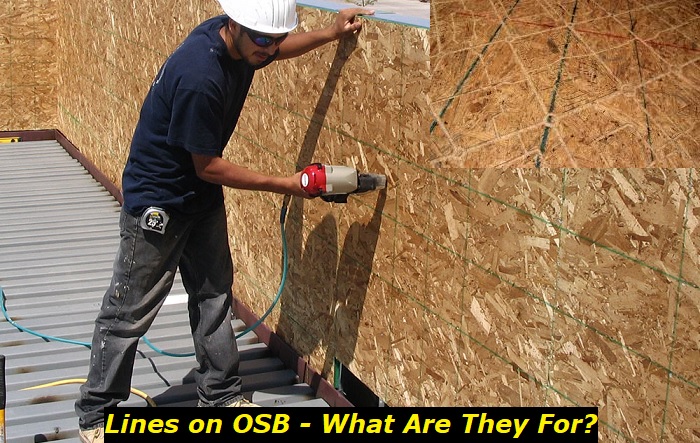
Have you noticed the lines on OSB panels? Do the lines mean anything or just a part of the aesthetics? The lines are a part of the installation instructions, as you will soon learn. We will also talk about the smooth and rough sides of the panels and provide additional installation tips for outstanding results.
The article also compares OSB to plywood. You can use the information to identify the best sheathing product for different construction projects. First, let us define OSB and outline its advantages and disadvantages.
What is OSB?
Oriented Strand Board (OSB) refers to engineered wood made from compressed wood layers. OSB panels are made using waterproof adhesives and wood strands. The wood strands are rectangular and in cross-oriented layers. The strands bond together under intense heat.
OSB panels are great alternatives to plywood because of their high strength and water-resistance properties. OSB is uniform, thick, and decay-resistance. In addition, you have many types of OSB to choose from for your project.
The types of OSB in the market are subflooring OSB, Zip OSB for walls and floors, and standard OSB for all roofs, floors, and walls. Your supplier can advise you on the best type to use for your project. Alternatively, you can order standard OSB for minor repairs or small projects.
The main challenge with OSB is that its edges absorb water and swell when soaked for a long time. Hence, you must be cautious of water sources in your construction project and storage facilities.
Why are the lines on OSB for?
You will notice lines on OSB panels after purchase. The lines appear at 16 and 24-inch intervals. The manufacturers add lines to guide constructors when installing the OSB panels. The lines indicate the location of rafters, studs, and joists.
You will nail each OSB panel easily when following the lines to locate the underlying frame. Ensure that each nail you drive through the panels ends up on a solid wood frame. Otherwise, the nails will go through the OSB sheathing and leave holes when you miss the wood frame.
The lines are useful when you match them with the underlying wood frame. Here is an additional tip. You can draw new lines on the panels if the pre-made lines do not match the location of the frame on the wall or floor.
Which side of OSB goes down?
Each OSB sheet has a stamp that shows you which to put down. The stamp appears on the smooth side and applies when installing the sheathing horizontally. For instance, if you use OSB as a sub-floor, you must place the smooth side down.
The same instruction applies when installing OSB horizontally on a roof. Placing the smooth side downwards exposes the rough side, which is safer to step and walk on than the smooth side. The roughness provides traction for your feet when installing the floor or roof.
The safety precaution helps companies reduce injuries at their job sites. The installation process is different when using OSB sheathing on walls or any vertical surface. The rough side goes in, and the smooth side out.
The reason for the interchange is that the smooth side resists moisture better than the rough side. Water bounces off the smooth side of the wall while the rough side absorbs it.
One tip to note when installing OSB on a floor or roof is that the rough side is not as attractive as the rough side. Hence, you may need to cover it with another aesthetic material if you do not like its appearance. Many constructors use OSB as a subfloor and use a different top floor for aesthetics.
OSB versus Plywood
OSB and plywood can be used interchangeably depending on the project. The two materials have nearly the same strength and durability. However, each type of sheathing has its best use. In addition, OSB is cheaper than plywood, depending on your location and dealer.
OSB may be cheaper than plywood but not the right choice for small DIY projects. The OSB panels are best suited for large projects, such as flooring or roofing a new house. OSB is recommended for roofs, sheds, and exterior walls.
Plywood takes all types of nails well and does not warp easily compared to plywood. Hence, you can use it for outdoor projects. The lines on the panel guide you into nailing directly to the joists and studs for a firm structure.
The downside when using OSB instead of plywood is that it lacks the natural appeal of real wood. The flaws are hard to cover with paint. In addition, creating neat joints with OSB panels is difficult because of its rough edges.
Plywood is versatile to use in both small and large projects. It is made of compressed layers of wood, giving it natural aesthetics. You do not need to paint plywood for aesthetics, depending on the grade. Lower plywood grades are not as appealing as the higher grades.
Plywood has its shortcomings despite its versatility. It has ugly edges comprising knots and voids. OSB does not have such imperfections. Another disadvantage is that the thin sheets of plywood are fragile. The sheets may tear out when cutting if you lack expertise in using plywood.
One advantage of plywood over OSB is that it quickly dries when soaked in water and resumes its original size. OSB tends to swell up and assume a new shape after waterlogging. However, continuous soaking causes the thin layers of plywood to separate.
Essentials Tips for Installing OSB Correctly
The rough texture of OSB should not deter you from using it in DIY projects. OSB is affordable and suits projects that require covered wood layers. For instance, you can use it for shelves, drawers, and subfloors. Here are additional tips to consider when working with OSB.
1. Consider the structure’s exposure to water
OSB is water resistant, especially on the smooth side. The resin or adhesives used to hold the compressed layers together are waterproof. However, the wood layers are not waterproof.
You expose the wood fibers to moisture when you cut OSB panels. If the fibers are soaked or exposed to water for a long time, they swell up and tear apart. OSB does not dry up when it is fully soaked inside. The layers separate permanently.
You need to store OSB in a dry place and avoid using it during rainy weather. In addition, consider covering the joints and edges with a sealant or paint to prevent water absorption.
OSB comes in different grades and types. Choose the right grade for outdoor structures that can withstand rain without absorbing and holding moisture.
2. Pick the right nails or use screws
Some constructors have difficulties driving nails through OSB. However, your experience with OSB will depend on your choice of nails. Mention to your hardware or suppliers that you are working with OSB for recommendations. Alternatively, use screws instead of nails.
Here is an additional tip for nailing OSB sheets. Always follow the lines and nail at least ten millimeters away from the OSB edge to avoid splitting.
3. Use thick and high-grade OSB for subflooring
If you have used plywood in previous projects, you will find OSB a bit flexible or bendy. You need to consider your project to pick the right type of OSB that will support the structure. For instance, thick or high-grade OSB is necessary when installing a new floor.
The floor may crack if the underlying OSB sheets bend. The standard OSB is not the right choice for subflooring. Pick subflooring OSB and get the best grade.
4. Pick the right frame for walls and roofs
OSB does not provide strength to your structure. Instead, the sheathing reinforces the frame underneath. Wooden frames are advisable when constructing roofs and walls. However, you need to choose long-lasting wood and treat it for insect invasion and moisture resistance.
5. Position the sheathing correctly
The shiny and smooth side should face outwards when installing OSB on walls. The rough side absorbs moisture easily when exposed and eventually rots. However, the shiny side should go under when using OSB subflooring.
6. Insulate before nailing
If you need to insulate your walls, install the insulation foam into the wooden frame before nailing the OSB sheets. In addition, cut the insulation foam precisely for professional-looking results.
Conclusion
The lines at 16 and 24-inch intervals on OSB panels indicate the location of rafters, studs, and joists. Hence, you can nail the panels precisely and avoid creating holes. The correct way to install OSB panels is to place the smooth side on the downside of floors and horizontal roofs for safety. The smooth side should face outwards when installing OSB on walls for water resistance.
OSB is a cheaper alternative to plywood, depending on your project. It is also as strong and durable as plywood. It is uniform, think, water-resistant, and decay-resistant. However, OSB panels swell and warp when soaked in water for a long time. In addition, OSB lacks the natural aesthetics of plywood.
- Can You Unmix Paint: Techniques, Consequences, Alternatives - February 23, 2024
- Does Primer Need to be Mixed? Effective Primer Application - February 22, 2024
- How to Make Old Paint Usable Again: Retrieving and Preserving Paint - February 21, 2024


