DIY projects can seem like a fun hobby – until you realize you have to wet-sand your drywall. This task haunts the dreams of beginners and professionals alike. While it isn’t the most challenging task in the world, it creates a surprisingly high amount of destruction. One way to avoid this is to wet-sand your drywall instead. But does this method truly work? And how do you execute it?
We’ll answer the following questions in this article:
- What does wet-sanding spackle mean?
- When should you use wet-sanding?
- How to wet-sand spackle effectively?
- How to clean the dust after wet-sanding spackle?
What’s the appeal of wet-sanding spackle and other drywall materials?
Many people have drywall in their homes. Made of gypsum, it is one of the best choices for lining your walls. However, it can be tricky to set up.
Installing drywall involves a lot of work mainly because you have to sand it. While sanding is a relatively straightforward process, it creates tons of dust. And we’re not exaggerating. You can expect dust to fly all across your room, covering most of your furniture. As a result, many people steer clear off drywall to avoid this nightmarish cleanup.
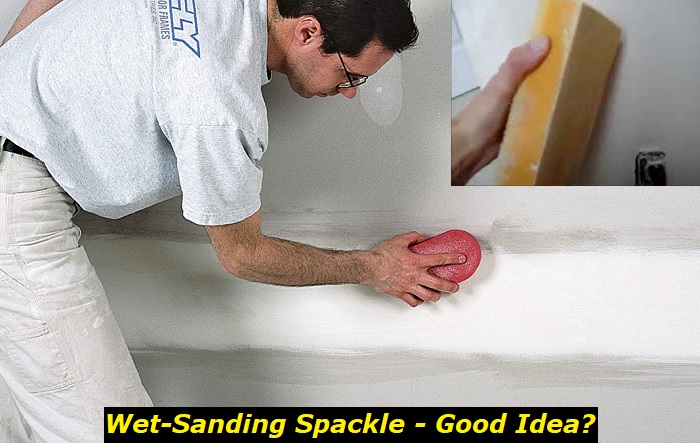
Luckily, you have a cleaner alternative – wet-sanding. While you’d need a sandpaper for regular sanding, wet-sanding relies on a special sponge. True to its name, you use this wet sponge to smoothen the spackle. The sponge absorbs most of the damp dust, leaving you with a small mess to clean.
When should you wet-sand spackle? 4 pros and cons
Although wet sanding your drywall is a valid alternative, it only suits some situations. Some projects are more compatible with others. Make sure you understand the highs and lows of wet-sanding before you opt for this method – you may end up unpleasantly surprised otherwise.
Here are 4 pros and cons of wet-sanding spackle:
Pro – it creates less mess
The main reason why people turn to wet-sanding is practicality. Spackle is a soluble material. Thus, your sponge picks up the dust as you move it over the surface. While the drywall will still create some dust, it will be less than if you used regular sanding. The dust will also be wet and, therefore, easier to pick up.
This quality makes wet-sanding the perfect option if you have a lot of furniture in your room.
Con – it’s not faster than regular sanding
Although wet-sanding is a cleaner option, regular sanding is faster. Since you’re working with a wet sponge instead of a sandpaper, it will take you a much longer time to finesse your drywall. Regular sanding is much faster than wet-sanding. It takes about the same time if you consider the time it takes you to clean the dust.
The slow speed means this method isn’t the best if you need to finish your project quickly.
Pro – it’s better for your health
The drawback of the dust that forms when you sand a drywall is about more than just about the mess. As the dust travels through the air, it can enter your lungs. Thus, it often causes irritations and even allergies. It’s not best for your skin either.
Wet-sanding produces less ‘free’ dust and is thus less likely to cause irritation.
Con – it’s not as effective
While wet-sanding might be faster, it’s less effective than regular sanding. The sponge tends to create a wavy pattern on the gypsum, which can affect the quality of your paint. It’s also easier to mess up. You can ruin the spackle if you press too hard against the surface, something we’re all tempted to do.
You’re better off sticking to regular sanding if quality is your primary concern.
How to wet-sand spackle effectively – 7 vital steps
Wet-sanding isn’t a complicated process once you grasp the essentials. It’s much like regular sanding – except it takes longer and produces less dust. This DIY guide will walk you through the principles. We’ve also included tips on what to avoid while sanding your drywall.
Here’s what you need to do:
1. Prepare your equipment
All DIY projects begin with finding the right tools for the job. In the case of wet-sanding, you’ll need a drywall sponge, a bucket of water, and protective gear.
While you can wet-sand spackle with any sponge, you’ll get the best results with a specialized product. The sponge should have two sides – one rugged and one smooth. Synthetic sponges work better than natural ones. They’re much stronger and scrape more product.
Since the method is called wet-sanding, you’ll naturally need water.
Wet-sanding produces much less dust than regular sanding. However, we still recommend wearing protective gear such as a mask and goggles. Doing so will minimize the risk of skin and eye irritation.
2. Wet-sand the spackle with the rugged side of your sponge.
First, you want to remove the larger hills and waves on your spackle. You’ll need to use the rugged side of your sponge to achieve this.
Dip the sponge into your bucket of water. Then, wring it out. The sponge should be damp but not soaking wet. A dry sponge won’t remove the spackle as well. On the other hand, a soaking sponge will disrupt drywall and ruin your project.
Rub the drywall with the rugged side of the sponge. Work in slow, steady motions. You may feel tempted to press hard on the drywall to speed up the process. But while many people give in to this temptation, it ruins your project. Instead, work slowly and rely on the motion of the sponge to remove excess spackle.
3. Rinse the sponge regularly
The purpose of wet-sanding is to reduce the amount of dust you have to clean. But that dust must go somewhere. Eventually, your sponge will become covered in layers of spackle.
Make sure you rinse it regularly. Otherwise, the results will be less thorough.
Change the water in your bucket if it gets too milky and cloudy to prevent the same issue.
4. Wet-sand the spackle with the soft side of your sponge
The rugged side of your sponge should remove most of the obvious deformities. Once you’re satisfied with the results, switch to the soft side.
You’ll want to change the pattern here. Move from the joints to the center of the drywall to smoothen out the finer deformities. Work slowly, and maintain soft, steady pressure while you wet-sanding the drywall.
Rinse your sponge as needed.
5. Let the spackle dry
Never wet-sand your drywall in more than just two layers. Too much water will peel away the gypsum and ruin the wall. You might have to reinstall it from scratch.
Let the wall dry after you’re done with the second layer. Turn on the heater and air-ventilate your room to speed up this process.
6. Check the quality of your work
Once the wall dries, check the state of the spackle. It ideally shouldn’t contain any rugged texture and correct it. Remember, you’ll have to do so via regular sanding.
7. Apply the final coat
Once you’re done wet-sanding your drywall, you can move on to painting it. Just make sure the wall is completely dry or it won’t hold paint well.
How to clean your drywall after wet-sanding spackle
Although wet-sanding produces much less dust than regular sanding, you’ll still end up with a huge mess to clean. This residual dust can make painting next to impossible. Thus, you’ll need to clean it.
Most of the dust will end up in your water bucket. However, some will remain on top of your drywall. You can remove it using a tack cloth. The cloth should remove most of the dust without damaging the drywall.
You can alternatively use a soft brush.
And finally, use a vacuum to clean the rest of the dust from the floor and furniture surfaces.
Our final thoughts on wet-sanding spackle
Wet-sanding is a popular alternative to regular sanding. This method captures most of the dust right during the process, leaving you with less mess to clean.
But while this method might be practical, it’s not ideal for all projects. Wet-sanding will take a long time, so be prepared to spend hours standing in front of your wall. It also doesn’t smooth the spackle as neatly as regular sanding does.
However, if you are okay with these drawbacks, it can save you a lot of tedious work. You’ll only need a sponge and a bucket of water wet-sand your spackle.
Make sure the wall is clean. Then, rub the surface with the rugged side of your sponge first. The sponge should be wet but not drenched – too much water can dissolve the gypsum.
Next, you’ll have to smoothen the finer imperfections with the soft side. Finally, run the sponge from the edges to the center. Work slowly and keep a steady pressure during the whole process.
Don’t wet-sanding your drywall in more than one layer – doing so will damage it.
Once you finish the project, allow the wall to dry before you apply the final paint.
- Can You Unmix Paint: Techniques, Consequences, Alternatives - February 23, 2024
- Does Primer Need to be Mixed? Effective Primer Application - February 22, 2024
- How to Make Old Paint Usable Again: Retrieving and Preserving Paint - February 21, 2024


