No one likes watching their furniture slowly lose its high gloss, satin, or matte finish. Forget how battered it looks; we all know the fading varnish leaves our wood vulnerable to heat and moisture. If the varnish on your wooden table is beginning to come off, it is wise to act before the situation worsens.
Join us for a brief discussion on everything you need to know about dealing with the varnish chipping off the table. This article will highlight the following:
- How to fix a table with damaged varnish
- How to prevent varnish from coming off your table
- Handy tips for prolonging your table’s varnish coat
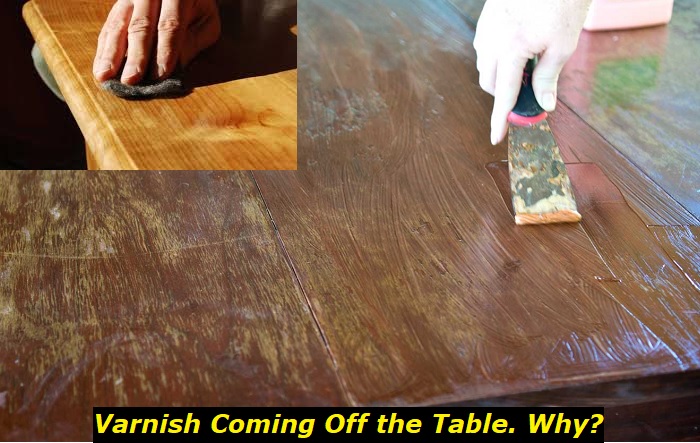
How to Fix Your Table’s Damaged Varnish
You likely chose to finish your table with varnish because of its durability and ability to seal off wood from the elements while enhancing its natural beauty. If your varnish is coming off sooner than expected, poor application techniques are likely the leading cause. We will discuss the causes of varnish coming off and how to prevent it later on.
Let us begin with the procedure for fixing the damage your table has suffered and restoring it to its original glory.
- You will begin by mixing water with a few drops of dish soap. Use soapy water and a soft cloth to clean the damaged area thoroughly. Once you have removed all the dirt, rinse the area with a clean, soft cloth. Ensure all the soap is rinsed off the surface by checking whether your rinse cloth water runs clear.
- While the table dries, you can use the time to determine the level of damage your vanish has suffered. Minor issues like small scratches can be repaired using uncomplicated touch-up methods. For extensive damage where the table has deep scratches or varnish coming off a large section, you may have no choice but to refinish the whole table.
- If the varnish damage had not yet advanced to calling for a whole refinish, five minutes may be all you need to fix the problem. All you need to do is purchase a touch-up varnish pen or marker and apply it to the damaged area. Be sure to pick a color that properly matches the one on your table; easier said than done. Try photographing the table for comparison when shopping. Apply the touch-up marker according to the manufacturer’s instructions and blend it into the surrounding varnish using a soft cloth.
- Where the damage is too extensive for a light touch-up, you must hunker down for complete sanding and refinishing. Use 150-grit sandpaper to gently sand your table surfaces along the grain. Do not get too enthusiastic with the sanding; it may damage your table’s grain. Use an even pressure to remove the varnish from the table completely.
- After removing all the varnish, clean your table with water and a soft cloth. Once you are certain no dust or debris is lingering on the surface, allow your table to dry.
- Once your table dries, apply a thin coat of varnish using a cloth or brush. Different varnishes require different methods to achieve picture-perfect results. Be sure to check the manufacturer’s label for more precise instructions.
- Once the first layer of varnish completely dries, you can lightly the first layer, clean it, and leave it to dry. This will take a much shorter time to dry than previous washings because you will not be wetting bare wood.
- After the first coat dries, apply another thin coat of varnish for good effect. Two coats are recommended to increase durability and improve protection against heat, scratches, and dents.
- Now that you are done applying the varnish, it is time for the most satisfying step – buffing and polishing. Use a polishing cloth or fine-grade steel wool to buff the table until it shines to your satisfaction. Ensure the entire table has a smooth and even finish.
Be warned that applying varnish requires wearing safety goggles, a mask, and gloves to protect yourself from the VOCs in these products. Applying varnish also requires a level of skill that may prove challenging to a DIYer without much experience. If you do not want to risk damaging your table, consider entrusting it to a professional furniture repair contractor or woodworker for expert repair and restoration.
How to Prevent Varnish From Coming Off a Table
Now that you know how to fix the varnish coming off your table learning how to prevent it from happening again is worth your while. Luckily, you do not need to bend over backward to keep your varnished wood in good shape.
- Do not allow your varnished wood to come into prolonged contact with very hot or cold items. Follow recommended protection measures, e.g., using coasters and place mats to protect the varnished table from heat and moisture damage.
- Do not clean the varnished table using abrasive materials or harsh chemicals. A soft damp cloth will do the job just right.
- Wiping up immediately after a mess is the best way to prevent liquids from seeping into your varnished wood. When moisture penetrates the varnish, it is guaranteed to crack or peel.
- Do not drag objects along your varnished table especially sharp or heavy ones. They are likely to chip or scratch the varnish. Do not be a drag – since friction is likely to damage to varnish, form a habit of lifting objects and placing them elsewhere.
- Ensure your varnished table is not set in a location frequently exposed to direct sunlight. The sun’s UV rays cause the varnish to fade or acquire a nasty yellow color over time. Your varnished table should be placed in a shaded area or one with a window covering to protect it from direct UV rays.
- Use protective rubber pads or adhesive felt on the bottom of items that are frequently placed on your varnish table, e.g., the centerpiece. These protective pads will protect the varnish from scratches if the item is dragged across the table.
- Frequent inspection will enable you to discover any signs of wear and tear before it gets too severe. If you discover the cracking or peeling varnish early enough, the damage may take less than five minutes to repair.
- Scheduled refinishing – your coat of varnish was not designed to last forever. Check the manufacturer’s instructions for how often you should apply a new coat and adhere to them.
How to Care for Your Varnished Wooden Table
Caring for varnished furniture calls for preventative protection measures and regular cleaning. How else do you keep the furniture looking its best? Try these handy tips to prolong the lifespan of your varnished table.
- Regular dusting prevents a layer of dust and moisture from combining on your varnished table to form a grimy substance. If this grime builds it, it can be notoriously difficult to clean without the types of harsh chemicals that are likely to scratch or strip away your varnish.
- Apply furniture polish regularly to keep the varnish well-protected and moisturized. Avoid using too much polish because it will leave an unsightly residue on the surface of your varnished table.
- All other maintenance tips equate to the preventative measures listed above. Caring for your varnished table includes keeping it away from direct sunlight, using coasters and placemats, cleaning messes as soon as they are made, using gentle products, regular inspection, periodic refinishing, and avoiding dragging things along the varnished table.
These maintenance tips will ensure your varnished table looks its best at all times.
Tips to Consider When Applying Varnish to a Table
With the right preparation and can-do attention to detail, there is nothing stopping you from painting your table like a pro. These tips will increase your odds of a flawless finish.
- Select the most suitable varnish for the type of wood and use you intend to put the table. While choosing between water-based, oil-based, and polyurethane-based varnishes, be sure to consider factors like ease of application, durability, and drying time.
- Apply the varnish in a well-ventilated area and, if possible, when weather conditions are hot and dry.
- Use a high-quality foam applicator or brush to apply a thin layer of varnish in smooth, even strokes along the grain.
- Do not overbrush because it causes bubbles, streaks, and brush marks.
- Sand lightly between coats of varnish
- When applying on a vertical surface like your table’s legs, watch out for runs and drips. They need to be smoothed out before they dry and cause the surface to be uneven.
- Adhere to the manufacturer’s instructions on drying time. Varnish that feels dry to the touch may not have cured properly yet. Applying the second coat prematurely will reduce the varnishes’ durability or, worse, result in an uneven finish.
Conclusion
Caring for your varnished table is much easier than repairing the damage. Once you have fixed the varnish that is coming off your table, take care of it properly to avoid a rinse-and-repeat cycle. We hope this article has helped you figure out what to do about the varnish that is coming off your table.
- Can You Unmix Paint: Techniques, Consequences, Alternatives - February 23, 2024
- Does Primer Need to be Mixed? Effective Primer Application - February 22, 2024
- How to Make Old Paint Usable Again: Retrieving and Preserving Paint - February 21, 2024


