When you are installing drywall, there are instances when the results can be uneven. Uneven drywall can make your house less attractive and lack that unique architectural appeal. Drywall installation is simple, but when done wrong, it can cause a lot of issues thereafter. The thickness of the drywall should be even, and one can only achieve this goal by doing the installation job right. However, when your drywall is uneven, there are cool tricks to correct it.
Our article discusses uneven drywall thickness, which is all too common in our homes and offices. In our article, we explore how one can rectify this issue. Among the options we shall look into is taping and how it can help you achieve impeccable results. We will also explore the different other ways one can employ to solve an uneven drywall thickness problem.
Uneven drywall thickness
This is a problem that arises when the drywall installation is not even. Different drywall panels offer uneven wall surfaces, which makes the wall unattractive. In most cases, a given panel will be slightly recessed or protruding than the rest, making it more conspicuous. One of the easiest ways to deal with the issue is to tape the uneven or raised edge of the drywall. Below are some common questions on dealing with uneven drywall thickness.
What is taping a drywall?
Taping the drywall is the process used to join two or more pieces of drywall into a single flat solid wall. During taping, one is required to use drywall tape and several coats of drywall compound to achieve the desired results. These coats conceal the drywall tape and screws and the uneven joint between the panels.
What steps should I follow when taping my uneven drywall?
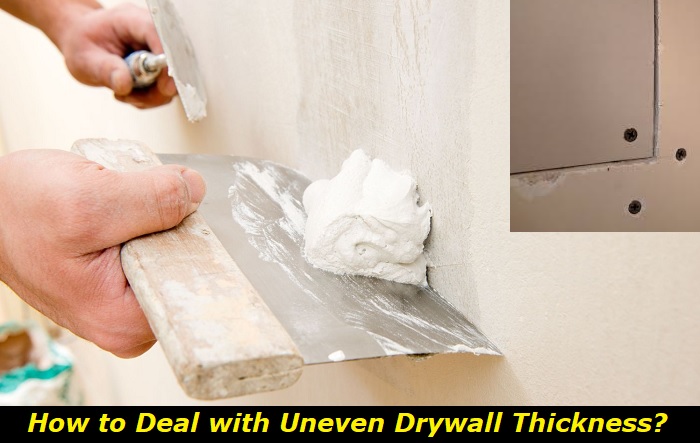
- The first thing to do is prepare the surface that you want to work on. If the drywall is old and the edges of the panels have started budging out, you should remove the protruding parts. The edges of the drywall will be protruding above the even surface because air has entered the drywall at the edges. Using a knife, cut the edges of all affected drywall at a 45-degree angle. This removes all bumps and will help the drywall compound sit well on the edges.
- Put the drywall compound in a pan. Using a 6-inch drywall knife, apply an even light layer of the compound and spread it over the joint. Extend the compound six inches on both sides of the joint you want to cover. Where the gap between the panels is wide, fill it with ‘mud’ by pressing the knife onto the seam and drawing it across the seam’s length.
- Apply the drywall tape on one end of the joint and press it over the length of the joint. The crease side of the tape should be facing toward the wall.
- Using an 8-inch drywall knife, apply light pressure to press the tape onto the joint. Apply some drywall onto the knife to make it run smoothly over the tape. Using this knife to press the tape, you are squeezing the compound out of the edges of the tape, making it lie flat on the surface. This also helps remove all bubbles underneath the tape while removing the excess mud beyond the tape. Perfection is not achieved at this stage, and you should not stress yourself here.
- With the same 8″ drywall knife, apply a second layer of mud or drywall compound. At this stage, feather the mud away from the joint as you apply it to the wall on both sides of the joint. Leave the compound to dry for a day.
- After the drying of the second layer, it is time to apply the third coat of mud. This time, the layer should be thicker, and the knife used should be 10″. While spreading the mud, start spreading from the high side of the uneven joint to the low side. You can regulate the amount of mud applied on the low side to make it harmonious with the high end. This helps smoothen out the entire joint and also during sanding. Using the 10″ knife guarantees a more even application of the compound. Let this third layer dry for a day also.
- Prepare the sander by installing a 120-grit paper. A sander will deliver a finer job than hand sandpaper. Still, you can sand using hand and get exceptional results. While sanding, apply light pressure. To test whether the surface is even, place a 12″ knife across the joint and rock the blade side to side. If you can rock the blade, you need to sand the surface some more using a sanding sponge.
- Once satisfied with the results, apply drywall primer. You should then touch up the texture before applying paint once the primer dries up.
What causes uneven drywall thickness?
Uneven drywall thickness can arise from a number of reasons, namely;
- Moisture entering the edges of the drywall, making them to be perforated, will make the wall look uneven.
- The drywall panels will be uneven when the framing underneath the drywall is uneven.
- Drywall panels can get damaged and warp, bend, or even crack, making your wall uneven.
What should I do when a bubble appears under the tape?
A bubble appearing beneath the drywall tape is almost guaranteed. A bubble will appear because you failed to apply enough drywall joint compound on the seam before placing the tape. The bubble will appear because there is nothing to hold the tape. Many people use fiberglass mesh tape to avoid bubbles when taping uneven drywall joints.
A bubble problem should be handled before you paint or apply texture to the wall. This is because it will show even on the finished wall. You are also likely to be forced to repeat the job a few months later. Here is what you should do when you discover a bubble;
1) Method one
This method is applied if you are still taping the drywall. The answer is to simply apply more mud underneath the part that is making a bubble. Where the bubble is close to the edge, lift the edge and apply mud underneath it. You should then scrape the tape onto the fresh mud and apply a coat of mud on the tape to firmly sit over the tape.
2) Method two
The other method involves making an outline in the fresh mud using the corner of the mudding towel.
- You should follow this by cutting the outline with a sharp knife. Grab the corner of the tape that you cut out and lift it.
- Where the bubble doesn’t extend over the joint, cover that gap with mud. The gap should go away after the second coat; if it’s persistent, the third coat should do the trick.
- Where the bubble has extended across the joint, you should cut the tape on both sides where the bubble appears and remove that piece of tape. Apply and spread a fresh coat of mud. Go ahead and apply a new tape over the joint and ensure it overlaps the cut edges of the existing tape by ½ inch. Apply another coat of mud once it has dried up, and apply a second and a third coat.
3) Method three
This technique is used when the drywall joint compound has dried up already. The solution to getting rid of the bubble involves the following;
- Chip off the section that has issues. Mostly, the affected section has cracked. You can do this using a drywall trowel.
- Using a knife, cut out the section of the tape that has developed a bubble. Follow this with a damp cloth to wipe down the joint. Remove the small chunks and chippings of dried mud that hadn’t come out.
- Start the procedure again. Apply a fresh coat of mud over the cut-out section and then lay a new tape. The new tape should overlap the old tape by an allowance of around 1/2″.
- Scrape the tape and ensure it is well embedded onto the underlying coat of mud. Apply a second coat and let it dry before applying a third coat.
- Once done, sand the repaired section flat using 120-grit paper. Apply drywall primer and a coat of paint for the final result.
What else can I do when I have uneven drywall thickness?
An uneven drywall, as mentioned earlier, can come about if the drywall panels are faulty. The panels can be warped, and taping may not give satisfactory results even with the best expertise on your side. If the underlying studs are good, then the answer to the problem would be to replace the drywall panels.
There are times when the drywall panels are in great shape, and still taping might not give you the desired results. In this case, check what is causing the uneven surface of the drywall, which in many cases has been seen to be bad framing. When a wood stud is out of alignment with the rest of the studs, you are likely to encounter an uneven drywall thickness. If the studs are accessible, remove the drywall panel and consider whether to plane the stud to align or hit it to be flush with the rest of the studs.
Conclusion
When you discover uneven drywall in your house, it is critical that you handle its repair with expert hands. This is to help prevent the recurrence of the problem or even the worsening of the situation. In our article, you have learned simple ways to solve this problem and even gotten more answers relating to the taping of uneven drywall.
- Can You Unmix Paint: Techniques, Consequences, Alternatives - February 23, 2024
- Does Primer Need to be Mixed? Effective Primer Application - February 22, 2024
- How to Make Old Paint Usable Again: Retrieving and Preserving Paint - February 21, 2024


