Have you ever thought about a cool floor design for your game room or home minibar? A space galaxy epoxy floor will do the trick. It is exactly what you need to give the room the finish that it deserves.
But space galaxy floor epoxy designs can look so complex that they appear too complicated for DIYers. “How do they make it?” is a common question that DIYers often ask.
This guide discusses the easiest, cheapest, and best way to get the best space galaxy epoxy floor.
Read on to know the tricks for upgrading the floor of that special room.
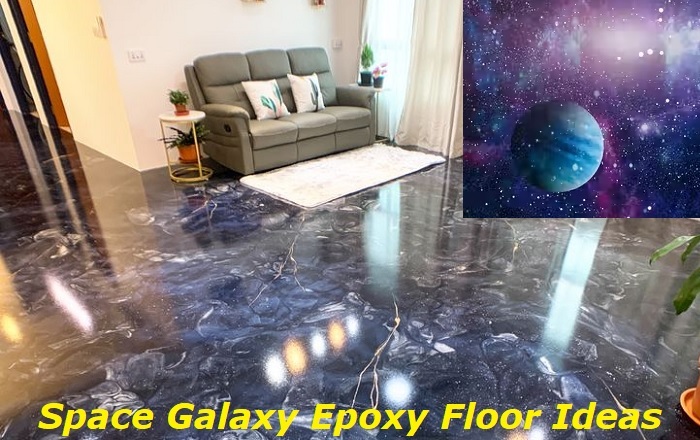
Space Galaxy Epoxy Floor
Space galaxy epoxy floors are the new deal. It is simply using epoxy products, some glitters, acrylic paint, and a few other products to make your floor look like a space galaxy. There are many designs, and each works well with different floor types; concrete, hardwood, and any other floor.
While some designs require big budgets and more sophisticated tools, here is a technique that gives the best result and is simple enough for any exploring DIYer.
How Do They Make It?
It is important to understand that the technique in this guide is the best and easiest way to approach a space galaxy epoxy floor project.
There are other techniques, but these other techniques require more sophisticated and expensive materials. Moreso, these other techniques are more complicated and do not give a better finish than the technique in this guide.
Follow this guide for the easiest way to achieve a perfect space galaxy epoxy floor.
You can start with the first stage: the pre-application stage.
Pre-Application Stage
At this stage, you must inspect the floor where you’ll apply the epoxy. Your goal is to make sure that the surface is even. If there are holes in the floor, you want to fill and seal them off so that they do not impact the final result of the epoxy floor job.
If you do not do the prep jobs required for a great finish, you are asking for trouble.
It would be best if you filled any holes or pockmarks. If you have control joints, you must fill them with a flexible caulk before the coating and allow it to cure before working on it.
It is also important to check the moisture content of your concrete floor. There have been many instances of epoxy coatings failing in areas due to hydrostatic pressure.
Most importantly, you want to clean the work area after filling and sealing. You want to clean off any debris and dirt. It would be best if you kept the concrete or hardwood floor as clean as possible. If there is debris, grime, or dirt on the floor where you intend to work on, it will affect the luster of the final result.
This pre-application stage is everything as it directly affects the final result of your epoxy job.
Application Stage
Step I: Spreading Your Black Primer
At this stage, you want to prepare your black primer. Remember to seal the crevices and holes in the concrete or hardwood floor with a good caulking material.
This will help make the application of the black primer easy. It will also prevent a nasty situation where your primer sinks into holes and creates a varying level of epoxy resin.
If you are working with a larger floor area, having as many hands as possible would be better since the working time is very limited.
For this project, you need a black epoxy primer. After mixing your black primer, you want to start from the corners.
Again, if there are many corners, divide them among workers so you can accomplish the task with the available working time. It would be best to start spreading the black primer from the corners all through inwards.
After you have finished spreading the black primer, you want to let it cure. The curing time for the black primer depends on the type of product you use, as each product may have a different curing time.
Tip: For this project, you can use Black Marble Epoxy Primer as a black background. It is important to mix it thoroughly for a satisfactory result. A good sign that you are doing a good job with the mixing is noticing swirls as you mix it.
Step II: Drawing Your Space Galaxy
Drawing your space galaxy is the second step after spreading the black primer. The black primer is the background for bringing out the space galaxy drawing.
At this stage, your objective is to draw the galaxy with some exterior acrylic polymer paint. There are several colors you can use. A great recommendation is to combine at least five colors: Blue, Navy, Purple, Pink, and White (in no particular order, but white comes last).
Since you will use a spray gun, it would be best to cover the walls with cardboard, tapes, or some other wrapper that works. This will ensure that the paint does not spill to stain the wall.
You want to spray the colors with a gun to bring the galaxy effect to life. If you have a favorite color you’d like to feature more than others, you can apply that color more. But it is advisable that the white be applied only in line with the recommendation.
Start by spraying your chosen dominant color first. When spraying, ensure that you do not cover all of the floor area with one color. That would be a mess.
You want to cover some parts of the floor with a particular color and then spray other colors at the other ends of the floor. You want to repeat the same process with the other colors except for the white color.
The goal is to bring out the galaxy effect; therefore, you want to pay attention to the thickness of the colors as you spray them on the black background.
There should be some gradient at the start. You want to follow it with mild thickness in the middle and a fade-out as you finish the spraying of a color.
You can have the colors in a snaky shape, a swirl, or even the shape of any galaxy you know to make it real.
While you can let some colors run into each other, you must give some curing time between. If you do not give the layers enough time to dry, you will get paint lumps.
So, it is very critical that you give the layers time to dry, even if it’s the same color, so you do not have a lump of paint on a spot.
For this step, a wireless spray gun is the best as it allows you to do the job without getting a sore arm.
But if you are working with a spray gun attached to a hose, you want to have an assistant help you hold the hose so that it does not make contact with the wet floor and ruin the job.
Tip: If you use the color combo recommended here, it would be best to start with the pink paint. Then make some gradient effect with the Navy, and Purple colors. Apply the Blue at the end of the Navy to give it a good fading effect.
You want to take a step back now and then to ensure to check out the whole image for a final touch. Keep making the gradients until you get the desired galaxy shape and effect you want.
Step III: Sprinkling the Stars
The next stage in the galaxy design is making the stars. But for this stage, you do not need a spray gun. You need a small stick to splash some white paint.
Splashing the white paint as dots will give the galaxy floor the perfect starry look it needs to be complete.
You want to ensure that the splashes are dots and thinly dispersed around to make them look like stars.
Too much will be too messy. So, you want to ensure that the dots are not much. You can always take a step back to appreciate your job. This will help you know how much white paint you have splashed, whether you are getting the right image, where to focus, and when to stop.
Tip: Shine Pearl powder will work great just as glitters will, too, if you wish to use real glitters instead of the exterior acrylic polymer paint for effect.
Step IV: Applying the Epoxy
The last step of this stage is applying the epoxy resin to give it a 3-dimension effect. Before proceeding to this stage, you want first to allow the galaxy paint drawing to dry.
Once the drawing is fully dry, you want to apply Marble epoxy. A great recommendation is to use clear Marble epoxy with a slight tint of blue pearl. Mix some Shine Pearl Colorants in your Marble epoxy.
Again, as with the primer coating, you want to start from the corners and move inward. The galaxy painting design will become much more vivid when you pour the galaxy your epoxy on top.
Tip: Mixing tiny bits of this colorant will give a soft shimmer to the clear.
Usually, 2mm – 3mm thickness of epoxy is a good depth for a great result. 3mm is better as it fully encapsulates the galaxy drawing and makes the galaxy floor last longer.
Giving more depth to your epoxy work will give you a better 3D effect as it raises the galaxy drawing off the floor. But a thickness of more than 3mm is not recommended because there is a great chance that it will make your epoxy job cloudy.
Final Thoughts
Other techniques involve just mixing the color in the epoxy and spreading it all over the black primer coat with a squeegee. This may be an easier approach, but the finish will not compare with the result of the technique in this article.
Give it a try today and be proud of a floor befitting for your room. A great maintenance tip is to wax the floor every three to four months to maintain its luster.
- Can You Unmix Paint: Techniques, Consequences, Alternatives - February 23, 2024
- Does Primer Need to be Mixed? Effective Primer Application - February 22, 2024
- How to Make Old Paint Usable Again: Retrieving and Preserving Paint - February 21, 2024


