Concrete is popular among constructors and homeowners for constructing buildings, bridges, driveways, footpaths, and parking spaces. You may have a section of your front or backyard made of concrete. Concrete’s high compressive strength attracts constructors.
Joining concrete slabs to create additional space involves creating a joint. You may need to create different types of concrete joints depending on the project. Let us discuss concrete joints and the best application methods to help you with your construction project.
Construction Joints
You need construction joints when joining concrete slabs at different times. For instance, a project may stall for several weeks or months. You may also change your mind about the size of the outdoor space that needs concrete slabs.
In this case, you need to create construction joints to join new slabs to old concrete slabs. The deal with construction joints is that you must predetermine where to place them before starting the project.
You can construct either the butt type or the tongue and groove construction joints based on the project. For instance, butt construction joints are recommended when joining two thin slabs.
Isolation or Expansion Joints
You can mold wet concrete into any shape. However, the mixture hardens and shrinks as it dries. Concrete develops tensile stresses as it shrinks when adjacent structures or supporting materials restrain the shrinkage.
Concrete’s tensile strength is low, which causes random cracks. You can use steel reinforcement to prevent cracking. However, the most common method involves creating joints between slabs.
A load can also cause dimensional changes in a concrete slab. An expansion or isolation helps in reducing cracks due to dimensional changes.
You can use an isolation joint to separate slabs from other parts of the building, such as footings, walls, light poles, or sidewalks. Placing an isolation joint between two slabs allows vertical and horizontal movements without cracks.
Contraction or Control Joints
Contraction joints are also referred to as control joints because they enable you to determine where cracks will occur on a slab. You may not prevent cracking fully, but you can create weak sections where cracks will form.
Constructors use reinforcement, granular fills, and structures to restrict shrinkage. However, the slabs shrink to an extent and eventually crack. You create a control joint but reduce reinforcement in a predetermined section.
How to Join Two Concrete Slabs with a Simple Joint
The descriptions of different concrete joints sound complicated. However, if you are down to it, you can reconstruct your space with concrete while following simple instructions. Do not shy off from asking for help along the way.
Here is a systematic guide to follow when joining slabs for lasting concrete structures.
1. Check the plan for spacing instructions
You need the project plan or design used to create existing slabs to add new slabs. The plan will show you the rebar spacing used. Your part is to follow the same spacing pattern for every new slab.
2. Mark the drilling points
Use the spacing instructions to make the points where you will create joints on the two slabs. Remember to create room for the dowel’s diameter when marking rebar spacing.
Most construction projects involve joining slabs of the same width and rebar spacing. However, you may come across projects or sections where the rebar spacing is different.
The rule for unequal slabs is to place the dowels in the middle of the new slabs. For instance, if the existing slab’s spacing is 18 inches and the new slab is 20 inches, place the dowel at 10 inches on the new slab.
Maintain the dowel spacing at the center of every new slab. It is easy to maintain the same width when joining many slabs such that marking the spacing is easy and consistent.
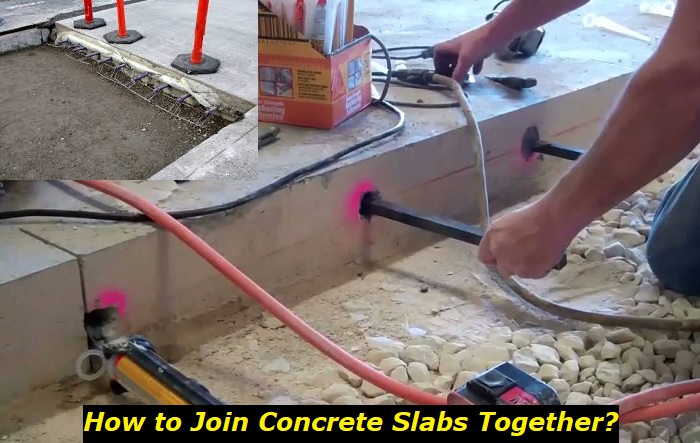
3. Drill holes
Use a hammer drill to make holes at the marked points while maintaining the same depth as the previous slab. Consider the width of the rebar dowel when choosing the hammer drill.
The diameter of the holes should be the same as the width of the dowels you intend to use. You can also make the holes slightly larger for an easy fix. Blow the holes after drilling to remove all the dust.
4. Add concrete epoxy
Concrete epoxy comes with a specific loading gun. Read the instructions to understand how the gun operates if you are using it for the first time. Load the gun and fill the clean holes with the adhesive.
The easiest way to fill the holes is to push the gun’s tip the furthest you can into the hole. Fill the hole as you remove the tip slowly. You will avoid the hustle of pushing the gun tip in and out of the hole.
5. Insert the rebar dowels
Insert the dowels immediately into the holes. Try to remove any trapped air by pushing the rebar dowels in and out several times. Push the dowel all the way to the end and allow it to rest for the recommended time.
Each concrete epoxy has a specific set time. Follow the instructions on the package to fix the dowel properly.
6. Create an expansion joint
The next step is to create an expansion or isolation joint. Apply the epoxy on the edge of the old slab. Spread the adhesive below and above the rebar dowels.
The next step is to cut two strips of the expansion joint. Measure the length and width of the expansion joint such that one strip fits perfectly above the dowel and the other below the dowel.
The strip should also completely cover the old or first slab’s length. Some of the materials you can use to fill the expansion joint include epoxy, silicone, wood, polyurethane, and vinyl.
7. Pour the new slab
The last step is to pour the new slab. Ensure that the rebar is off the ground when pouring the new slab. You can use chairs or improve with any supporting material to raise the rebar dowels.
The rebar must be level when pouring the concrete mixture. If you are joining many slabs at the same time, you may need to distribute the concrete mixture over the rebar grid. In this case, pour the concrete while the rebar grid is on the ground and then raise it when you finish.
Raise the rebar to settle at the center of the concrete before it settles. It is advisable to fill one slab at a time. The method allows you to use chairs to support the rebar and ensure that the dowels are centered in all slabs.
Important Tips to Remember When Joining Concrete Slabs
You can now easily extend your driveway or footpath by adding new concrete slabs. We have a few more tips for you to join the slabs like a pro and enjoy long-lasting results.
1. Clean the surfaces before creating joints
Clean the old slabs and drain any collected water before joining a new concrete slab. Masons also recommend that you wet construction joints before placing a new concrete slab, especially if the project is stalled.
2. Maintain the structure’s strength
The strength of the building and adjacent structure is an important consideration. We discussed different types of concrete joints because you may need to create different joints to maintain the strength of structures.
3. Use the right joints and reinforcements for each project
Shortcuts are expensive in construction projects. Choosing the right joint is important to strong structures and lasting results. It is okay to ask for help even in a DIY project if you are unsure about the joint to use in a section.
For instance, you can ask help from a mason to join new slabs of a parking space to the building or to determine the location of different joints. In addition, some projects require professional designs for long-term results.
4. Consider the vehicular traffic
Joining concrete slabs is a time-consuming task. You need to consider the type of vehicle that will use the space before adding new slabs. For instance, thin slabs are fit for human traffic.
If you own or plan to buy a large truck in the future, consider thick slabs with reinforcements to withstand the load. The traffic also helps you to choose the right joint when extending an extending structure such as a garage.
5. Choose the right joint filler
You will find recommendations for different filler materials for expansion joints, from epoxy to plastic materials. Some constructors recommend fiber while others recommend x-foam.
Most filler materials in the market serve the purpose and allow new concrete slabs to expand and contract without cracking. However, you must choose long-lasting filler that completely covers the spaces between two slabs.
The filler should not allow water to sip through the expansion or weeds to grow. In addition, the filler should level easily if you intend to paint the structure.
Conclusion
Joining two concrete slabs involves creating a joint. You need to pick the right joint depending on the purpose and location of the joint. The common types of concrete joints include construction, expansion, and contraction joints. Expansion joints are easy to create with rebar dowels, epoxy, and joint filler materials.
The method and type of joint that you choose should allow the new slab to expand or contract without cracking. The joint should be sturdy enough to withstand pressure or load. In addition, the building or structure should retain its strength after creating joints.
- Can You Unmix Paint: Techniques, Consequences, Alternatives - February 23, 2024
- Does Primer Need to be Mixed? Effective Primer Application - February 22, 2024
- How to Make Old Paint Usable Again: Retrieving and Preserving Paint - February 21, 2024


