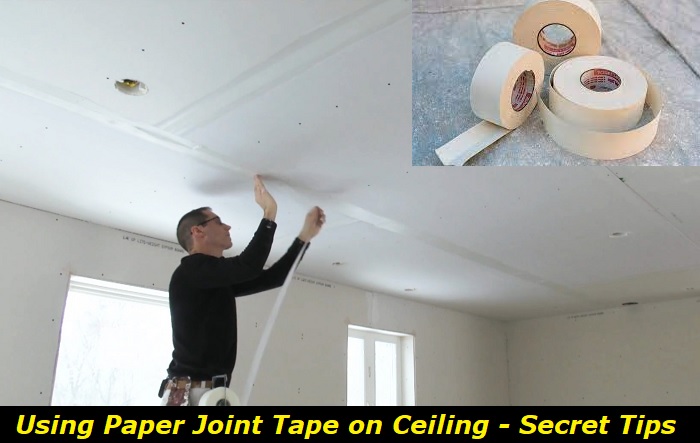
Paper joint tape is a versatile and easy-to-use material and it’s most preferred by most people. Usually, while installing a ceiling is straightforward, filling the joints can be tricky. For a great finish, you should fill and cover the joints to match the rest of the surfaces using a suitable material. Hence, paper joint tape comes in handy to cover those joints.
Areas, where you can use paper joint tape, include flat seams where two pieces of drywall meet or along the inside and outside corners. Mainly, after you have mounted ceiling panels, you should apply paper joint tape and ensure it holds properly by laying it correctly. Therefore, in this post, we will give a step-by-step guide for laying joint tape on any of these areas to smoothen and hide cracks.
What You Should Know About Using Paper Jointing Tape
Paper joint tape is strong and versatile to use, hence it can be used to tape different areas such as along corners or flat joints where two drywall sheets meet.
Also, the tape has a crease at the center, which makes it easy to fold and use even in corners in both new construction finishes work or repair works.
Mainly, you can use the tape where two drywall pieces meet on a ceiling or you can apply it to repair cracks on a ceiling since the tape holds tightly on surfaces.
Step-by-step Guide on How to Use Paper Joint Tape on Ceiling
Whether you are a beginner or experienced in taping joints, you need to follow the following steps, to lay and embed paper joint tape correctly.
1) Gather the Suitable Materials and Tools
When using the paper joint tape, you need the essential tools and materials, such as the joint compound, a drywall knife, and the tape. Therefore, before you tape the joint, ensure you have the following;
- Paper jointing tape
- Joint compound
- Sandpaper
- Tape measure
- Utility knife
- Paper joining tape
- Primer and paint
- Safety gear such as protective gloves, dust masks, and safer goggles.
2) Prepare the Ceiling
Dust of the plasterboard. To ensure the jointing compound adheres properly to the surface, dust it off. Also, ensure no screw heads are sticking out on the drywall.
3) Measure and Cut the Tape
Before applying the tape, ensure it’s cut and folded into the suitable sizes. You can measure the length of the joint and then cut the paper joint tape into the precise length.
4) Fill the Ceiling Joints
Usually, the joints where two pieces of ceiling panels meet should not be more than 1 mm. Therefore, sometimes, if the joints are larger than 1mm, you should fill them with mortar. By filling the cracks, you ensure the area does not crack and that the ceiling will last longer without the need for regular repairs.
5) Prepare the Joint Compound
Notably, the joint compound is available in two forms: the premixed jointing compound or powder. If you choose the powder, mix it using water into a thick paste with a uniform consistency and without lumps. Remove any lumps and bumps before you apply it to the ceiling seams. But, if you are a beginner, you can opt for the ready mixed jointing compound.
Notably, if you are using joint mud, to avoid wastage, it’s recommended you mix the powder in small quantities. The material is fast drying, hence mixing it in large quantities will lead to wastage since it will dry and become difficult to use.
6) Coat the Ceiling Joints with Joint Compound
Usually, the paper tape requires the base layer to ensure it adheres properly to the drywall. Apart from ensuring the joint tape adheres to the surface, applying the jointing compound before laying the jointing tape fills the gaps and minor imperfections.
Therefore, apply pre-mixed joint compound on the joint you want to tape over using a drywall knife. Importantly, ensure the joint compound layer is slightly wider than the paper tape.
7) Spread the Joint Compound
Spread the compound into a ⅛ inch thick layer using a 5-in taping knife and ensure the entire joint is adequately covered. To spread the compound properly, begin from one end of the joint, then drag the drywall knife with the compound along the joint length to ensure there is a thin layer. Importantly, ensure to smooth it out and wipe any excess compound.
Notably, if you are taping joints along corners, you can use a roller instead of a taping knife. Also, if you are using a corner roller, ensure the joint compound is slightly diluted for easy application. Usually, taping in corners is the same as taping flat seams. However, you must be more careful to ensure you don’t make any mistakes.
Notably, using a roller is preferable especially if you are highly experienced in taping. However, if you are a beginner, a drywall knife is recommended since, to use a roller properly, you need a bit of experience.
Importantly, you should clean the drywall knives after every application to ensure the compound does not dry on the blades and becomes difficult to use during subsequent joint compound applications.
8) Lay the Paper Tape on the Wet Compound
Lay the paper joint tape on the joint compound layer along the seam. Mainly, to properly lay the joint tape, center it over the joint or crack. Then, carefully press it into the joint compound layer. Continue unrolling and pressing the tape into the joint compound along the whole joining.
Start with the outer, pressing the tape into the joint from top to bottom.
Once you have laid the tape, run the drywall knife along the area and smooth it out. To quickly smooth the tape, begin dragging the drywall knife at the middle of the joint to one end in one stroke. Then, repeat the same process from the middle to the other end. That way, you will avoid accidentally peeling the tape.
Gently applying the pressure enables the release of air bubbles and any excess compound.
Notably, in case you have not measured and cut the paper joint tape to size, once you have covered the entire joint, cut or tear the joint tape. To cut the paper tape and get a clean tear, place the drywall knife across the face of the joint tape and then tear it. Usually, you should tear the tape along the straight edge of the drywall knife.
9) Wait for the Jointing Compound to Dry
Before you proceed, allow the taped surface to dry. Usually, you should leave the surface at least overnight. The material can dry within a day. However, the drying time depends on environmental conditions and the type of compound you have used. For instance, in cold conditions, the jointing compound can take days to dry, while in hot conditions, it can dry within 6 hours or slightly more.
10) Apply Two Layers of the Joint Compound, One Layer at a Time
Embed the tape using the taping compound by applying a thin layer of joint compound on the tape. You can use a taping knife to apply the compound, one layer at a time. During the application, ensure to cover the area surrounding the joint. To properly apply the joint compound, beginning from one end of the joint, drag and press the drywall knife along the whole joint length.
Importantly, it’s essential to follow the manufacturer’s instructions when applying joint compound. Therefore, apply the subsequent layer of joint compound, carefully spread it, and wait for it to dry.
Then, sand, clean, and apply another thin layer of joint compound on top. Use a larger drywall knife than the one you had used initially, load it with the joint compound, and spread it to cover the tape. Wipe off excess joint compound to ensure only a thin, smooth layer of joint compound remains. Also, ensure the joint compound does not stick up from the drywall.
Importantly, the final thin layer should almost be the same level as the surface of the drywall. Therefore, using the drywall knife, carefully apply pressure to the joint again, and ensure the edges are flattened and are not visible.
11) Sand and Clean the Taped Area
Once the jointing compound is dry, gently sand it to ensure a smooth finish. Make sure the joint compound layer is as smooth as possible. Wipe off dust from the sanded surface to ensure there are no loose particles.
12) Prime and Paint
After you have followed all the above steps, the taped surface is ready for painting. Importantly, you should paint the entire ceiling to ensure the taped surface matches the existing surface.
Therefore, once the taped area has dried, apply primer and paint it after the primed surface has dried.
Conclusion
Although it is difficult to get a smooth finish on areas where two drywall sheets meet the joints, you can tape the joints and get the desired results. Mainly, by applying paper joint tape correctly, you can achieve a perfect ceiling finish. The paper joint tape is easy to use and provides a strong reinforcement to joints hence preventing cracks and any visible gaps on ceilings.
Lastly, to prevent future issues of dealing with cracks, it’s essential to inspect the ceiling regularly and perform minor repairs when necessary.
- Can You Unmix Paint: Techniques, Consequences, Alternatives - February 23, 2024
- Does Primer Need to be Mixed? Effective Primer Application - February 22, 2024
- How to Make Old Paint Usable Again: Retrieving and Preserving Paint - February 21, 2024


