Although you can finish drywalls without taping, the joints will likely crack and require repair. Therefore, to avoid the cost of regular repairs, it’s recommended you do taping at the joint. Notably, while it’s straightforward to tape flat seams, it’s a little tricky taping drywall corners. Moreso, it can be more complicated when taping the corners using mesh tape.
Usually, most people prefer using paper tape instead of mesh drywall tape since the paper tape is easy to work with. But, in some instances, you can still use mesh tape in corners.
Although it can be a little more complicated when taping the corners using mesh tape, the process is almost similar to taping flat seams. However, you need to be more careful to achieve the best and durable results. Therefore, in this post, you are going to learn about the best tips on how to use mesh drywall tape in corners.
What You Need to Know About Mesh Drywall Tape
Usually, you can use mesh tape instead of paper tape. The mesh tape has adhesive on one side that makes it hold well without the need for a joint compound before taping. However, the mesh drywall tape might fail to hold well especially, when the surface is not properly cleaned.
Therefore, when using mesh drywall tape in corners, understand its features and apply it properly, for it to hold well and provide a lasting tapping solution.
The following are notable benefits of using mesh drywall tape;
- It’s easy to cut
- Easy to sand
- Conforms to irregular surfaces
- The mesh tape lets the compound pass through and bond appropriately with the drywall.
- The mesh drywall tape is coated with an adhesive on one side; hence, it can stick to the drywall surface without requiring a joint compound.
Best Tips and steps to Follow When using Mesh Drywall Tape in Corners
Some of the best tips you should have at your fingertips when using mesh drywall tape include;
- Apply the mesh tape directly on the drywall surface before applying the setting mud.
- Ensure the tape is centered and without wrinkles.
- Ensure the entire inside corners are covered with joint compound. There should be no dry areas, or unfilled gaps left.
- Work on one side of the corner at a time when applying the taping compound.
- Ensure the surfaces are clean and free of dust.
So, how do you use mesh drywall tape in corners? The following are easy-to-follow steps.
1) Gather the Required Materials and Tools
First, gather and ensure you have all the necessary materials and tools with you. Gathering the materials before beginning will make it easy for you to minimize unnecessary delays. During the application process, you shouldn’t stop midway to look for specific materials or tools you require.
Notably, getting the right tools before the actual work enables you to tape the drywall with great precision and more effectively. The tools and materials make the entire process easier and more enjoyable.
Materials and tools you need include;
- 4-in or 5-in taping knife.
- Setting mud
- Taping knife/corner roller
- Joint compound
- Mesh drywall tape
- Sandpaper
- Safety gear
- Scissors or a utility knife
- Paint
- Primer
- Paint brush or roller
2) Clean the Surfaces
Before the actual taping, you should prepare the corners. Applying the mesh drywall tape directly on dirty surfaces will make the adhesive not stick correctly. Therefore, the first step before applying the mesh tape is to clean the surface and ensure it’s free from dust and loose particles.
3) Prepare and Apply the Mesh
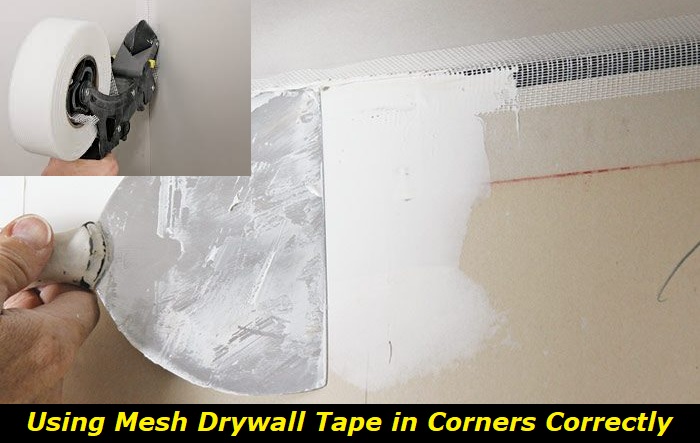
Usually, the mesh tape is self-adhesive hence you should apply it directly on the drywall before applying the jointing compound. Therefore, fold the joint tape into half along its length and ensure it folds equally into a ninety-degree shape. You can use corner beads for precision.
Then, gently press the tape into the corners and ensure it’s centered and free of creases. Also, carefully pull the tape tightly along the corner to avoid creases.
4) Prepare and Apply Setting Mud
Using a 5-inch drywall knife, apply the setting mud on one corner. Spread the mud evenly to create a smooth surface free of wrinkles or bubbles. Also, ensure the layer is thin. To avoid mess, load the mud on the left side of the knife blade and then apply it to the right-hand side of the drywall corner.
Once done, load the mud d on the right side of the knife blade and apply it to the left side of the drywall corner. Using a 4-in taping knife, apply and spread the taping compound.
Don’t leave too much joint compound behind. Ensure the compound layer is ⅛ in thick or less.
Importantly, embed the mesh tape carefully to avoid pulling the tape out and ensure the tape is free of wrinkles. Usually, when embedding the tape, going over it once is not enough. You should go over it at least two or more times to ensure the embedded tape is wrinkled-free. Therefore, in the beginning, while spreading the mud, apply a little pressure, then increase the pressure gradually in the subsequent strokes until the tape is properly embedded and wrinkle-free.
5) Allow the Taping Compound to Dry and Sand the Surface
Mainly, you should wait for the mud layer to dry before sanding. Notably, the drying time varies significantly depending on the environmental conditions and the quality of the taping compound you are using. Usually, it’s recommended you use setting mud instead of the usual joint compound. The setting mud is fast drying and suitable when taping using mesh drywall tape hence it will dry fast.
Then, to achieve a smooth finish, sand before applying any subsequent layer of joint compound. Lightly sand the surface while feathering the edges.
Importantly, before applying a subsequent layer of joint compound, after sanding, clean the surface to remove any loose particles and dust.
6) Apply a Layer of Joint Compound
Apply a layer of joint compound and spread it to create a smooth finish with feathered edges. Then, repeat step 5 before applying a second and a third layer of the joint compound.
Mainly, applying only two layers of joint compound is recommended, but, in some instances, you can add a third layer of the joint compound.
7) Feather the Edges
After applying the joint compound, you don’t want the edges to be visible. Mainly, at the edges, there should be no noticeable bump. Instead, you want to achieve seamless finishes. Therefore, feathering the edges is quite essential at this stage. Feather edges to create a smooth transition between the taped area and the surrounding untapped areas.
For feathering, apply the joint compound beyond the taped area. At the edges, gradually thin the joint compound layer out.
8) Sand and Clean the Surface
Mainly, your taping work does not stop when you have taped and embedded the tape. You need to go an extra step to ensure the corners look smooth. Therefore, after embedding the mesh drywall tape, you must sand the area into a smooth surface.
Importantly, to avoid inhaling dust during sanding, it’s crucial to wear a dust mask.
9) Apply Primer
To apply paint to match existing painted surfaces, apply the primer first. Applying a quality primer first enhances the paint adhesion and seals the drywall surface. Mainly, the primer prevents the underlying imperfections from bleeding through the paint.
Importantly, before you proceed to paint the corners, allow the primer to dry. Usually, the primer should be dry and ready for painting after a few hours.
10) Paint
After the primer has dried, painting the taped corners is essential as it enables you to have structurally sound corners and corners that look well polished, too. Mainly, painting enhances the overall aesthetics of the corners.
Therefore, once the primer has dried, paint the taped surfaces using a paintbrush or a roller. Importantly, to achieve the desired results, you may have to apply one or two more coats of paint.
11) Final Touch-ups
After the paint has dried, inspect the surfaces for any visible imperfections and do the final touch-ups for a flawless finish. You can lightly sand the areas with imperfections and repaint them.
12) Clean the Tools and Tidy up the Workspace
Once you are done taping, clean the tools you have used and store them properly for future use. To clean the used tools, you can use warm, soapy water. If you leave the joint compound on the taping knives after removing them, it will harden and become difficult to clean them later.
Also, you don’t want to leave the area you were working in dirty and untidy.
Therefore, ensure the area is neat and safe by cleaning the workspace and removing any joint compound spills.
Conclusion
Mainly, mesh drywall tape, when applied correctly, provides significant structural strengthening and resistance to cracking in corners. Therefore, for longevity and best results, you need to follow the above mesh drywall taping tips and steps.
Lastly, although paper tape is a go-to option for most people, mesh drywall tape is a great option too. You need to apply it in the right. Therefore, whether you are an experienced DIY taping enthusiast or a beginner, following the above drywall corner taping tips and steps will enable you to transform your drywall corners into a masterpiece.
- Can You Unmix Paint: Techniques, Consequences, Alternatives - February 23, 2024
- Does Primer Need to be Mixed? Effective Primer Application - February 22, 2024
- How to Make Old Paint Usable Again: Retrieving and Preserving Paint - February 21, 2024


