You spend hours looking for the perfect shade of paint, get your tools ready and start working on your surface, only to be disappointed by the finished results. Your surface looks nothing like what you had pictured. Where do you go from here? What steps should you have taken to ensure your painting was as picture-perfect as you had imagined?
This article will ensure the scenario above does not happen to you. We will discuss everything you need to avoid regrets. This includes:
- What causes patchiness
- Application techniques that prevent patchiness
- How to fix a patchy paint job.
What causes patchiness?
Painting is such an easy task that anyone can handle it. However, it can also be a tricky process that requires extra attention to detail. If one is not careful, they might cause their painting job to be patchy long before they place a roller on their surface.
Every single tool used while painting matters. High-quality tools will achieve a much more satisfying result. Pay attention to how you use your tools. Overloading a roller with paint will make some sections of your painting denser than others. Underloading your roller will make parts of your paint look patchy. Likewise, applying too much pressure might leave behind brush marks, while too little pressure will make your work look spotted. A dirty roller or surface could distinguish between your dream and a nightmare.
The paint chosen for a surface is also a vital factor to consider to avoid patchiness. High-quality paint will require fewer coats than low-quality paint to achieve similar results. Old darker paint will show through a light coat of paint if not done correctly. Painting over a surface with fewer coats of paint than it needs will also cause a patchy appearance on the finished product.
Lighting can change the whole appearance of your paint. Painting in areas of low lighting could impair your vision and make your brush strokes inconsistent. You might paint a surface only to realize that it needs more coats of paint when you view it under other lighting conditions.
Even the ventilation can impact the patchiness of paint on a surface. Paint applied on humid walls might bubble as it dries, leaving the paint job looking inconsistent.
How can you stop patchiness?
Whatever the reason for the patchy paint, follow the tricks in the steps below, and you will not have to worry about a bad paint job.
Step One: Get your tools ready.
You will need a tray, a frame, a quality roller, an extension pole, and paint.
When choosing a roller, it is wise to consider the size of your surface and the complexity of your job. Small rollers are easier for tight-fitting jobs or jobs with complex details. Larger rollers are best for larger surfaces, and they provide more coverage.
Consider choosing a small roller if you are a beginner. They will be easier to handle and allow you to correct mistakes.
A short-napped roller cover has no obvious seams and can paint smoothly over your surfaces. Longer nap roller covers are better suited for textured walls.
The paint you are using will also influence the type of roller you need. Pick the right roller for your job, for example, do not use a roller meant for water-based paints for a solvent-borne job. Make sure to ask for assistance in the store should you need it.
Clean your preferred roller before use. If you use water-based paints, rinse your roller using clean water. For solvent-borne paints, rinse using turps to remove any lint or dirt.
If you are using an old roller, ensure no particles of dried paint are on the roller. Place a drop of oil on its handle bearings, and it will be as good as new.
Step Two: Prep your surface.
Before you can start painting, identify all holes on the surface. Ensure that you use quality filler to patch them. When your surface has no more dents, find rough sandpaper and sand until it is even and flat. Remember to dust the surface before painting.
Make sure your surface is clean but do not use any cleaning agents that might react with your paint. Only start painting after the surface is dry to avoid bubbles in your drying paint.
Bring enough lighting into your room before you begin painting. You will be able to catch more mistakes this way, and you can correct them right away.
Step Three: Use your roller.
First, tape any areas where you don’t want paint getting in, such as window frames or electrical outlets.
On your clean rolling tray, pour paint to the indicated level. Overloading the tray makes loading the roller harder. It also increases the risk of unwanted spillages.
Carefully roll your roller into the paint on your tray. When using water-based paints, your roller should be damp to the touch. Use the grooves on the tray to drain any excess paint. Repeat this process until the paint soaks into the roller.
Start with the edges of your surface. Apply paint carefully over the corners and edges. Hold the brush near the end of its handle to give your hand more control over the movements of your brush.
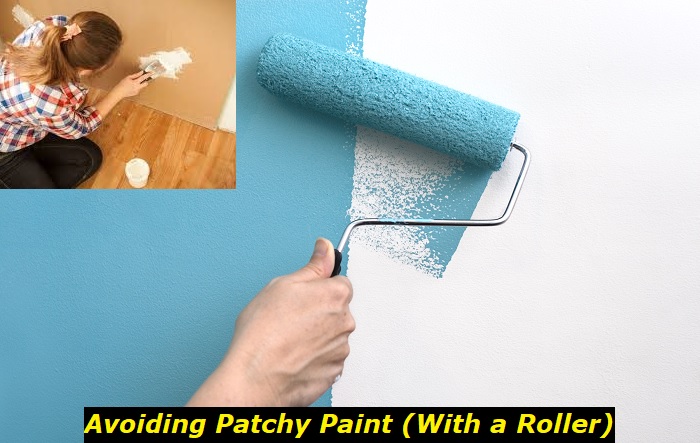
Paint around the taped areas. Bring the line of paint from the edges inwards. Roll your brush upwards after placing it on the wall, and move it across your surface in a rough zig-zag pattern. This helps cover large areas of your surface without too many streaks. Crisscross your strokes and finish up with long parallel strokes.
Exert moderate pressure on the roller to create a surface with an even paint consistency. If the paint leaves lines on the surface, you are using too much pressure.
Always make sure that every time you roll paint on your surface. Overlap new strokes of paint on wet paint to have less defined edges. Each roller load should cover at least ten square feet.
Drag your roller as close as possible to the edges of your surface. Once you have started on a surface, it is important to complete it to avoid roller marks. Taking a break in the middle of a surface can cause the paint to dry unevenly.
Allow a minimum of two hours before applying the next coat. Your room should also have adequate ventilation to ensure drying.
Step Four: After painting
If you want to take a short break from painting, stop at a point where it will be easy to resume, such as a corner. Insert your roller into the paint on your tray, then seal the entire tray with a plastic bag. Your roller will be ready for painting after your break, and you can resume as if you never left in the first place.
Wash your painter and rollers immediately after use. Squeeze out as much paint from your roller as possible, then rinse it until the water runs clear. You can also immerse it in a clean bucket of water and repeat the process until clean. Store it with the rolling sleeve upright to prevent your roller from flattening.
Fixing patchy paint
Sometimes, we may make mistakes even after our best efforts. You might have missed a step in the process, and now, despite your hard work, your paint has dried up all patchy. Fret not; there are ways to fix these mistakes.
- Suppose you notice streaks left on the wall after your brush strokes while painting; even out those areas with a fresh coat of paint from your roller. Hold your brush near the end of the handle and apply moderate pressure to the surface. Remember to coat your roller evenly, wringing the paint out to have just the right amount before painting.
- Streaks of paint and uneven protrusions of paint can be corrected using sandpaper and a bit of plaster. Sand out the surface until the area of concern is at the same level as the surrounding areas. Wipe the area down with a damp towel to remove dust and debris. After ensuring the surface is clean and dry, go over the surface with a new coat of paint.
- You need additional coats if the old color shows through the new paint coat. Ensure that your surface has adequate lighting illuminating it. After the paint dries completely, paint another coat over the process. Repeat the process until the results are satisfactory. Always let the surface dry before applying the next coat of paint.
- Drip stains occur when you load your roller with too much paint. Wait until the paint dries, and then scrape the drips to fix it. Wipe the surface, then sand the sections until they are smooth. Repaint these sections with the tips above, blending them with the rest of the wall.
- After painting, you might notice roller marks on your surface. These occur when you don’t maintain wet edges while painting. To correct them, sand down the surface until you have an even surface. Remove dust by using a damp towel. Prime the wall. Roll your roller on the surface using a zig-zag pattern and finish with parallel strokes. Check the surface from all angles to confirm that you have consistent coverage.
Following these tips is a sure way to ensure your painting skills improve whenever you do it yourself.
- Can You Unmix Paint: Techniques, Consequences, Alternatives - February 23, 2024
- Does Primer Need to be Mixed? Effective Primer Application - February 22, 2024
- How to Make Old Paint Usable Again: Retrieving and Preserving Paint - February 21, 2024


