You may need to remove your tile floor for several reasons. Maybe you’re renovating your home and want to replace the tile with something else. Or, maybe you have water damage or another issue that requires you to take up the tile.
Whatever the reason, it’s important to know how to remove the tile floor from the wood subfloor without causing any damage. Luckily, with the right tools and techniques, you can remove your tile floor quickly and easily, without causing any damage to your home.
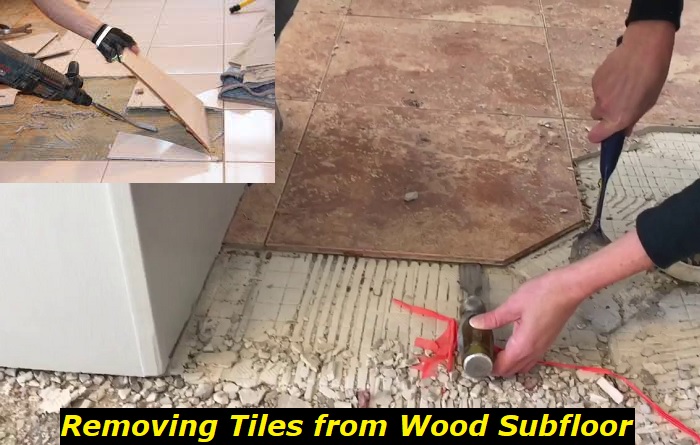
In this article, we will be looking at how to remove tile floor from wood subfloor. We’ll discuss the tools and materials you’ll need, as well as the step-by-step process for removing your tile floor.
By the end of this article, you’ll know everything you need to remove your tile floor without damaging your wood subfloor.
We will start by looking at all the tools and materials you need for the job.
Tools and Materials You Need for the Job
To remove your tile floor without damaging your wood subfloor, you’ll need the following tools and materials:
- A putty knife or another type of pry tool– When choosing your pry tool, make sure to pick a product that is not too harsh on the surface below. You don’t want to damage your wood subfloor as you’re removing the tile floor.
- A hammer– You’ll need a hammer to help you remove the nails or screws that are holding your tile floor in place. When it comes to choosing a hammer, the different options are virtually unlimited – as long as you do not use a sledgehammer, any type of hammer will work for this job.
- A chisel– A chisel can help remove tile that is glued down. In addition, a chisel will come handy for removing grout from between the tiles.
- A vacuum cleaner– This isn’t an essential tool, but it can come in handy when you’re trying to remove very small pieces of tile or grout. Keeping your workplace neat and tidy will make the job much easier.
- Safety goggles– Technically, you do not need to use a pair of safety goggles. However, I would still recommend wearing a pair of goggles – you do not want small pieces of tile, dust, or grout flying into your eyes.
- Gloves– Again, not a strict recommendation, but I would recommend wearing a pair of gloves while you work. This will protect your hands from the sharp edges of the tile. There are numerous times when I have accidentally cut myself when performing theoretically simple tasks like this.
Now that we’ve looked at all the tools and materials you need for the job, let’s move on to the step-by-step process of removing your tile floor from the wood subfloor.
How to Remove Tile Floor from Wood Subfloor with No Damage – 7 Steps
1) Remove all of the nails and screws holding the tile floor in place
The first step is to remove all of the nails or screws that are holding your tile floor in place. You can use a hammer and putty knife for this task. To minimize the risk of damaging the tile floor, you will want to resist rushing and work slowly and carefully.
Start by placing the putty knife under one corner of the tile. Then, use the hammer to gently tap on the handle of the putty knife. This will help to loosen the tile so you can pry it up. Once the tile is loose, you can use the putty knife to remove it completely.
Continue working your way around the room, removing all of the tiles in the same manner. Once all of the tiles have been removed, you can move on to the next step.
2) Remove the grout still sticking to the floor
Once you have removed the tiles, you will probably see that there is still some grout sticking to the floor. To remove this grout, you can use a chisel.
Place the chisel at the edge of the grout and start gently tapping it with a hammer. Again, the key here is to take it slowly and be careful not to damage the floor with hits that are too heavy.
For especially stubborn areas, you can use a power drill with a chisel attachment. This will make quick work of the remaining grout. And, while I am beginning to sound like a broken record, I want to emphasize that you need to work quietly and steadily. Avoid drilling too deep or you run the risk of damaging the wood subfloor.
3) Clean up any tile or grout dust
After you have removed all of the tiles and grout, there will probably be a lot of dust and debris left behind. This is where the vacuum cleaner comes in. Vacuuming the area is the best way to remove all of those super small and annoying pieces of tile and grout. With a vacuum, you will save a lot of time and effort and your cleanup will be much easier.
4) Fill in any holes or cracks in the floor
Once all of the adhesives have been removed from the floor, you may notice that there are some holes or cracks. These holes and cracks will need to be filled in before you can lay down a new floor.
You can use a variety of different materials to fill in the holes and cracks. Wood putty, caulk, and epoxy are some of the most commonly used materials. Simply choose materials that you feel most comfortable with and follow the instructions on the packaging.
5) Sand down the floor
After the holes and cracks have been filled in, you will need to sand down the entire floor to create a smooth surface. You can use a hand sander or power sander for this task.
Start with coarse sandpaper and then work your way up to a finer one. Be sure to sand evenly to avoid leaving behind any unsightly scratches or marks.
6) Clean the floor thoroughly
After sanding, you will need to clean the floor thoroughly to remove all of the dust that has been created. A vacuum cleaner and damp cloth should do the trick.
7) Start planning your next flooring project!
And that’s it! You have now successfully removed your tile floor from the wood subfloor with no damage. Now, all that is left to do is to choose your new flooring and get started on the installation process. Installing a new floor is a topic worthy of tens if not hundreds of guides, but that is a topic for another day. For now, just enjoy the fact that you have a clean slate on your hands and start planning your next flooring project!
Final words
And there you have it! With these seven steps, you’ll be able to remove your tile floor without doing any damage to the wood subfloor.
Many people who have never removed a tile floor are afraid of the job, but there is no need to be!
As long as you take your time and work carefully, the job is completely doable for everyone. So, do not spend hard-earned money on hiring a professional when you can do the job just as easily yourself!
I hope that our article was helpful to you. And as always, feel free to contact us with any questions, recommendations, and requests!
- Can You Unmix Paint: Techniques, Consequences, Alternatives - February 23, 2024
- Does Primer Need to be Mixed? Effective Primer Application - February 22, 2024
- How to Make Old Paint Usable Again: Retrieving and Preserving Paint - February 21, 2024


