Has the caulk on your bathtub turned brown? You can give your bathroom a new look by recaulking the bathtub and showers with simple DIY methods. This article discusses the simplest caulking methods you can try with the tools in your toolbox. We will also give you essential tips to help you achieve professional-looking results while at it.
How to Remove Old Caulk from a Bathtub
Clean the bathtub as usual with a brush and soapy water to remove any dirt on and near the caulk. It will be easier for you to see the old caulk. You also need to cover the drain with a piece of cloth to avoid clogging. Follow these easy steps to remove the old caulk
1. Collect the necessary tools
The process requires a scrapper, a sharp utility knife, and a nylon brush. You will also need sealant remover, alcohol, painter’s tape, a caulking gun, and a piece of cloth or paper towels. Wear protective glasses and rubber gloves before the process.
2. Soften the caulk
Spray the lift-off caulk and foam sealant remover along the old caulk to soften it. You can skip this step if you do not have the lift-off at home. However, softening the caulk makes it easy to cut and scrape off.
Leave the spray to work through the caulk for at least an hour. The process may take a shorter period, depending on the brand. The point is to soften the caulk. You can move to the next step after half an hour or less if you are in a hurry.
3. Cut and scrape off the caulk
Use a sharp utility or putty knife to cut the top and down the edge. Take your time with this process to avoid scratching the adjacent tiles or the bathtub. You may also hurt yourself if the sharp knife slips.
You can cut the caulk into small sections or move the knife in a straight line from end to end. Use the scrapper to remove all the caulk around the tub. A plastic scrapper or putty knife is advisable because it does not scratch surfaces.
4. Clean the surface
The nylon brush will help you scrape off any remaining caulk in the joint or hole between the wall and the bathtub. You can use an old toothbrush as well if you do not have a nylon brush. Pour a little amount of alcohol on the brush and use it to clean the joint.
Vinegar and baking soda are great alternatives if you do not have alcohol at home. Use a paper towel or a piece of cloth to wipe the surface after scrubbing with the brush. The bathtub is now ready for caulking.
How to Caulk the Bathtub
The first step is ensuring that you have the right caulk. We recommend 100% silicone caulk for long-term results. Manufacturers indicate the longevity of the caulk. In most cases, the supplier shows years of protection from mold.
The years may range from 5 to 10. You also need to buy quality caulk that will not chip off or discolor fast. You want your bathtub to look as clean as possible for the longest period possible. Let us now go over the steps to recaulk after removing the old caulk.
1. Tape the bathtub and tiles
Place a painter’s tape about an eighth of an inch from the point where the tiles or wall meets the bathtub. Put one strip on the bathtub and another on the tiles. The tape ensures that you do not spread the new caulk to other surfaces.
Use the putty or utility knife to trim the tape if you place it too close to the wall. You only need enough space to put a strong seal to last for at least five years or so. Another important tip at this stage is to maintain the same taping distance around the tub.
2. Prepare the tube and caulking gun
Remove the cap of the caulk tube and cut a small opening with a sharp putty knife. A small hole is easier to work with because you control the amount of caulk that pours out. The tube may also have a foil seal at the top.
Most caulking guns have a sharp needle or thin rod on the side that you can use to break the seal. Run the needle through the hole you cut with the knife several times to ensure that the caulk flows smoothly.
Place the caulk tube in the caulking gun and ensure it fits properly for a smooth run. It is important to keep your gloves on when working with silicone caulk. In addition, you need a roll of paper towels to wipe the tip as you apply the caulk.
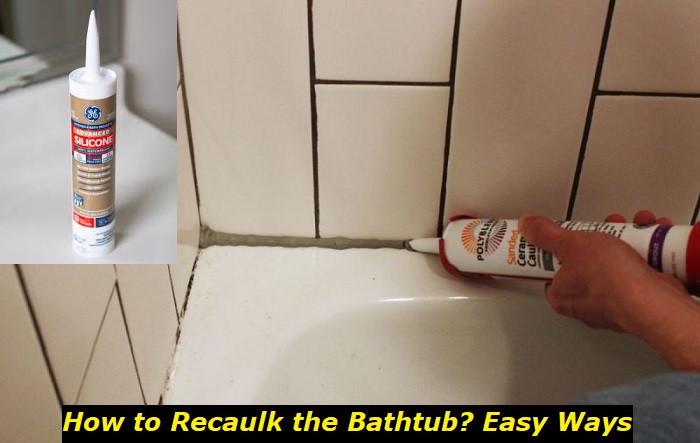
3. Apply the caulk
Press the caulking gun as you apply the caulk along the space between the two tape stripes you created in the first step. Release the pressure on the caulking gun as you approach the end of the tub to avoid waste.
It is easier to work on a large bathtub in sections. However, if you are repairing a small tub, you can apply the caulk from one end to the other with continuous press on the gun. When you get to the end, lay the caulking gun in a way that the tip of the tube rests on a paper towel.
The next step is to rub the caulk with the tip of your finger for a smooth spread. Keep spreading it out with your fingertip while wiping the excess silicone with a paper towel until you have a smooth strip between the two tapes.
You may add a little silicone caulk in uneven sections until you have the desired results. Repeat the process to all sections of the bathtub while the tapes are still in place.
4. Remove the tape
Remove the tape gently before the silicone caulk dries up. You can remove it as soon as you finish applying the caulk around the tub. Run your fingertip again on the new caulk strip to smoothen it out further. You may skip this step if the first run was perfect.
5. Inspect the corners and other joints
It is challenging to achieve an even application at the joints or corners. Your bathtub may also have taps attached to the wall. Inspect such intersections and corners after removing the tape. You may need to apply drops of caulk for a smooth finish.
Ensure that the caulk strip is as smooth as possible before it dries up. Correcting any mistakes after the caulk is dry is hard. You may need to repeat the whole process of removing the caulk and reapplying it.
6. Clean up
Close the caulk tube to avoid spills, and clean up when you are satisfied with the results. It is advisable to have a trash can nearby to throw all the paper towels and tape as you apply the caulk. Allow the caulk to dry before using or cleaning the bathtub.
Essential Tips for Recaulking a Bathtub
We know that you are set to go with the recaulking process we have described. Here are additional tips for long-lasting results.
1. Check the expiry date and warrant
The expired caulk does not hold. If you have tried this process before, check the expiry date on the tube before applying a new caulk layer. It is advisable to buy just enough caulk for the job. Remember that we are going for long-lasting results.
As mentioned earlier, some caulk brands give a five-year warranty for mold resistance. Other brands give a 10-year guarantee but at a higher price. Go for the brand with a longer warranty period and buy the size that suits your bathtubs.
2. Work in small sections
If you choose 100% silicone caulk, which is highly recommended, apply it in small sections. Silicone caulk sets in about 10 minutes. Hence, you need to smooth it out immediately after application for the best results.
Working in small sections also allows you to test the results. You can determine if you cut the tube properly and adjust the angle of the caulking gun if necessary for better results in subsequent sections.
3. Choose the right caulking gun
Pick a top-quality caulking gun that allows you to seal the corners without creating lumps or stopping. The thrust ratio will help you choose the right gun for the job. Experts recommend a caulking gun with a low thrust ratio for bathtub caulking projects.
A low thrust ratio means that the plunger releases the caulk at a low force when you press the trigger. The gun should also have a smooth rod for easy movement and a strong plunger. Caulking requires a steady application for the best results.
4. Warm the caulk
Holding the caulk tube is enough to warm it up for the job. You may also place it in warm water for a minute or so to raise its temperature. Warm caulk flows easily through the nozzle, enabling you to apply it in a straight, neat line.
Conclusion
You can change your bathroom’s aesthetics by recaulking the bathtub. The process starts with softening and scrapping off the old caulk. You will then use tape to mark the caulking line and use a caulking gun to apply the new caulk layer. Most of the tools required are already in your toolbox, and the new layer lasts for up to ten years.
- Can You Unmix Paint: Techniques, Consequences, Alternatives - February 23, 2024
- Does Primer Need to be Mixed? Effective Primer Application - February 22, 2024
- How to Make Old Paint Usable Again: Retrieving and Preserving Paint - February 21, 2024


