Few things are more frustrating than putting in hours of work on your project, only to run your hands over the paint job and realize that there are lumps, bumps, and blemishes in the base coat of paint.
Getting these lumps out of your base coat is vital to ensuring that the rest of your paint job is professional, beautiful, and worthy of your ride. In this article, we’ll give you several tips on effective and easy ways to fix rough base coat and pointers on avoiding rough base coat in future paint jobs.
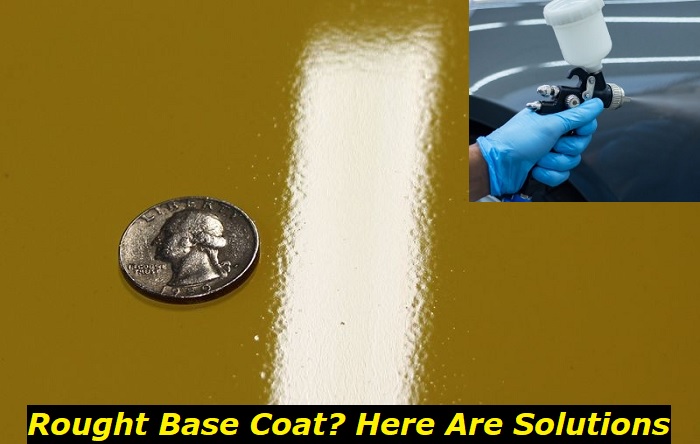
Rough base coat textures on vehicle paint jobs are caused by particles of dirt, debris, dust, or other impurities in the air which adhere to aerosol paint as it is applied or to the project and is subsequently painted over. These particles are trapped within and under the paint that you apply and can be felt as a pebbly or uneven texture when the dry paint job is inspected.
The rough base coat will affect subsequent layers of paint that you apply and can ruin the appearance of your surface.
The rough base coat can be prevented or corrected using the following methods:
- Preventive measures taken in the initial painting environment
- Correcting/sanding the dried base coat paint and repainting
- Adjusting your painting method
Painters who follow these steps during, before, and after applying base coat have a much better chance of ensuring an even and superior coat of base paint.
All of these methods can work well apart or in conjunction with each other. Let’s look at each method, break down for you how each works, and help you to paint more effectively.
Work in a Clean, Well-Hydrated Environment
One of the first steps in combating rough base paint is to make sure that you are working in an environment free of impurities and optimized to reduce particles in the air.
Make sure that your work area is well-ventilated and dust and dirt free. Remove the object you want to paint from the work area, and give your work area surfaces a good dusting and a hose-down with water before starting your paint job. This will clear surfaces of dust, as well as trap any remaining particles under the water, keeping them out of the air.
You’ll want to do the same with the floor of your work area, too. Sweep your workshop floor or any visible soil first. Next, hose down your shop floor with generous amounts of water, to trap dust particles in place.
Squeegee the excess water out, making sure to keep your floor damp. With the floor still wet, take your project back into your workplace and begin your paint job. This will ensure that the maximum amount of dirt and dust particles are now out of your workspace, or are trapped within the surface tension of the water on your floor.
Use Wet Sandpaper to Help Smooth Surface
This step helps ensure you’ve got a smooth and clean surface to paint on. Use wet 1000-grit sandpaper to sand down the surface you’re about to paint. Use this method when starting out on an all-new job and when correcting uneven base paint layers.
Using water along with the sandpaper application will similarly help to trap particles as you sand, and give you a smoother work surface overall. Check your work manually for texture and inspect the sanded area visually for particles or dust. Having a damp work area should help cut back on fine particles during this step, as well.
Adjust Your Distance to the Surface When Aerosol Painting
This step may sound a bit specific, but keeping a careful distance from the surface as you paint can be crucial in ensuring smooth base paint application.
The further away from the project you stand when you paint, the drier the paint can become before it hits your surface. This slightly drier paint can harden just enough to create tougher flecks which can, in turn, become the very particles you’re trying to prevent.
Wetter paint is far less likely to harden into solids or semi-solids, so the trick is to apply aerosol paint closer to the surface of your project to keep the material soft and even as it goes on.
Keep Your Application Method Smooth and Consistent
As you apply your paint, make sure that your hand and arm motions are smooth, deliberate, and graceful. Think of this as a form of art, rather than a simple paint job. The more care and focus you put into this job, the nicer your project will look at the end.
So, keep a consistent yet close distance, and keep your hands and arm relaxed yet steady as you apply the base paint. Keep an eye on the surface as you paint, so that you can correct any inconsistencies as you go. This will save you time and effort down the road.
Use the Paint-and-Wait Method
Once you’ve sanded the problematic area, apply your first coat of base paint. Allow it to dry completely before applying subsequent layers.
Wait 15 minutes, allow the layer to dry, and wipe the surface clean of any unseen particles that may have settled in the interim with a tack rag. Now, apply your second coat. This method will ensure a smoother paint job and a better-looking project overall.
Conclusion
Fixing uneven base paint on a surface is a combination of preventative methods and careful, consistent application. Make sure your work area is clean and well-watered down before starting. Use wet sandpaper to smooth your work surface or sand away the uneven base coat that you’re correcting. Work fairly close to the surface and apply the paint uniformly and carefully at a consistent distance.
Finally, wait between coats of base paint, and ensure that each coat is dry and free of particles before proceeding. If you follow all of these steps, you can ensure that uneven base coat is corrected and prevented properly.
- Can You Unmix Paint: Techniques, Consequences, Alternatives - February 23, 2024
- Does Primer Need to be Mixed? Effective Primer Application - February 22, 2024
- How to Make Old Paint Usable Again: Retrieving and Preserving Paint - February 21, 2024


