Vinyl plank flooring is an affordable and durable option for improving the aesthetics of any room in your home. The flooring is waterproof and easy to clean, allowing you to install it in the bathroom, kitchen, and other rooms. In addition, the installation process is DIY-friendly, with various installation methods for beginners.
The flooring has a downside. Hollow spots and warping are common problems with vinyl plank flooring. Luckily, the problems are easy to fix. In this article, we will look at the causes of hollow spots and the best ways to fix them to restore your flooring.
What Causes Hollow Spots under Vinyl Plank Flooring?
Most problems with vinyl plank flooring start from the installation process. Any mistakes when installing the floor will lead to uneven and hollow spots. For instance, a common mistake is to install plank flooring on an uneven surface.
The floor may appear perfect on the surface. However, you will notice a hollow sound when you step or knock on the part installed on an uneven surface. You must even out the subfloor before installing the vinyl flooring or any other laminate flooring.
Other mistakes to avoid when installing vinyl plank flooring include using excessive glue, dirty subflooring, and inaccurate measurements. In addition, keep the room temperature low to moderate when installing the flooring.
Temperature changes can also cause hollow spots, especially when the room accesses direct sunlight. Placing hot items or heat-generating equipment directly on the vinyl floor may lead to warping.
It is advisable to fix any defects on the flooring in time. Timely repairs will save you the cost of installing new flooring in the room. Read on for a simple DIY method of filling hollow spots.
How to Fix Hollow Spots on Vinyl Flooring
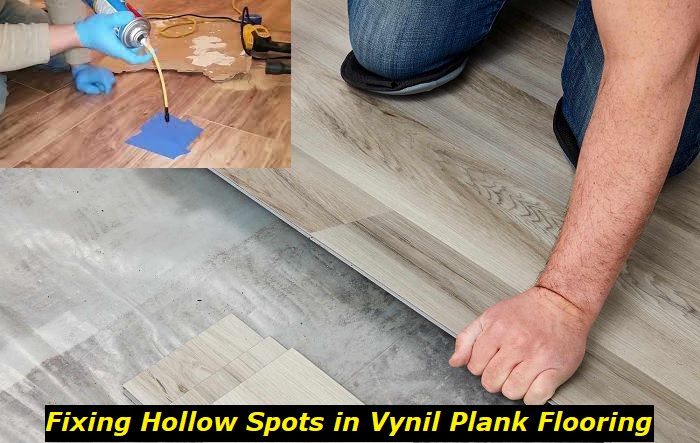
You will need a drilling machine, a marinade injector device, and caulk or glue for this process. Stretch glue is advisable for vinyl plank flooring because it allows expansion in the subfloor without creating air pockets.
Follow these easy steps to fix the hollow spots.
1. Locate and mark the hollow spots
It is advisable to fix all the hollow spots in a room in a day or a single session. Remove the furniture from the room and inspect each section at a time. Tapping the floor will help locate all the sections producing a hollow sound. Mark the soft and warped spots as well.
If you have vinyl flooring in more than one room, inspect all the rooms for defects. The areas near the entrances are susceptible to warping because of the constant expansion and contraction. Check the flooring near the windows, water sources, and sinks as well.
Use painter’s tape to mark the areas with hollow spots. Make sure you check the surrounding area while tapping the rest of the floor such that your measurements of the defective spots are accurate. Start from one corner of the room and tap the floor while marking all the hollow spots.
2. Prepare the injector and drill
The required tools are available in most hardware shops. If you installed the floor, contact the same suppliers for glue and drilling tools. Mention the intended purpose so that the suppliers can recommend a quality injector and drilling equipment.
The marinade injector device should have the same needle width as the drilling machine. If you get a set of needles, select one that matches the drill’s size for an easy flow of the glue or caulk. You can test the size on a separate plank to ensure you have the right measurements.
Drill a hole into the separate plank and try to insert the injector needle into it. You may need to cut the tip of the needle to get matching measurements. The injector should fit perfectly into the drilled hole such that the glue flows into the hollow spots without spills.
3. Drill holes
Drill two holes into the section with a hollow sound. Drill one hole at the deepest part where you will inject the glue and another hole near the end of the marked section. The purpose of drilling two holes is to avoid creating air pockets in the hollow part.
The air will escape through one hole as the glue flows into the space. Air pockets may cause new hollow spots in the surrounding areas if you do not create a way of escape.
4. Fill the hollow spots
Fill the injector with the caulk or stretch glue. The correct amount will depend on the type of marinade injector that you have. However, we recommend that you fill it three-quarter way to test its function and flow.
Press the plunger gently and check how the glue flows out on a different space or plank. You can determine at this point if you need to adjust the tip of the needle to increase the flow. Insert the injector needle into the hole at the deepest part of the hollow spots and fill it.
Take your time with this part to ensure that you cover the hollow part completely. Repeat the process as many times as you need until you see the glue overflowing in the other hole.
Here is an important tip for perfect results. Tap the surrounding areas with one hand as you fill the hole with glue. The frequent taps will clear air pockets faster. In addition, avoid stepping on the area under repair or placing any heavy object until you finish.
An overflow is a good sign that the hollow part is covered. In addition, the hollow sound you heard before will disappear. The filled part is firm and raised to match the rest of the floor. Leave the glue to set for three to four hours.
You move on to other hollow parts in the house as the glue sets. Experts recommend placing a flat, heavy object on the repaired part as it dries. The weight evens out the section and pushes any excess glue out.
5. Seal the holes
The drilled holes are unnoticeable from afar. However, you need to seal the holes to stop any flow and for aesthetics. You do not need special materials to fill the holes. Soldering iron and leftovers are enough.
Use the chips from the floor that you got when drilling the holes. An alternative is to cut tiny pieces from a leftover plank. Scrape off any excess glue from the holes and plastic weld the chips to seal the holes.
Caution is necessary in this step to avoid damaging the flooring. We understand the risks and adventures of DIY projects. Test the soldering iron before trying to melt the chips into the holes. Take your time to seal all the holes.
Essential Tips to Maintain Vinyl Plank Flooring
Fixing warped and hollow spots is a good start. Here are additional tips to keep the repaired vinyl plank flooring in its perfect condition.
1. Regular light cleaning
Sweeping and mopping the vinyl plank flooring is enough. Wipe any acidic spills immediately with a wet sponge to avoid discoloration. In addition, avoid soaking the floor with water. The planks are water-resistant. However, excess water can seep into the floor, causing warping.
The floor may also discolor if you leave stagnant water on it. Squeeze water out of the mop and wipe the dirt. Alternatively, use a spray bottle to moist the mop or directly on the floor and wipe immediately.
2. Pick the right cleaning supplies
Harsh chemicals and bleach will discolor the floor and damage the transparent coat. Baking and soda can remove any stains on the floor. Use mild detergents or vinyl floor cleaners for regular cleaning.
3. Avoid waxing
You do not need to polish or wax vinyl flooring regularly. The protective layer of the flooring is shiny. Polishing removes the natural shine.
- Protect the sections near water sources
You can install vinyl plank flooring in your kitchen and washroom. However, you need to protect it from accidental spills from sinks and taps. Place mats near the sinks to soak any spills.
5. Avoid scratches
Dragging furniture on the flooring when cleaning can leave ugly scratches on the flooring. Use felt pads on furniture to avoid such scratches. In addition, avoid vacuum cleaners with tough brushes. Avoid using steel wool or any brush with stiff bristles to sweep or scrub the floor.
6. Save leftover planks
You can tell from this discussion that leftover planks come in handy when repairing vinyl plank flooring. You can use the leftover planks to replace any warped planks instead of changing the flooring.
Conclusion
Vinyl plank flooring is a delight for many homeowners because of its low maintenance needs. The flooring is water-resistant, durable, and affordable. However, the flooring may develop hollow spots from installation mistakes. Temperature changes and flooding can also cause warping.
Hollow spots are easy to fix with stretch glue or caulk. You need a drilling machine to make holes into the hollow spot. You will then use a marinade injector device to fill the hollow part with glue. Avoid abrasive cleaners, waxing, bleach, and excess water to maintain the vinyl plank flooring in good condition.
- Can You Unmix Paint: Techniques, Consequences, Alternatives - February 23, 2024
- Does Primer Need to be Mixed? Effective Primer Application - February 22, 2024
- How to Make Old Paint Usable Again: Retrieving and Preserving Paint - February 21, 2024


