LVL stands for “laminated veneer lumber”. This is a manufactured wood product that consists of multiple lays of very thin wood that have been glued together into a thick plank. It can be considerably stronger than lumber and is a great choice for ceiling construction and for edge-forming material.
The LVL beam starts as a normal mature timber-grade log. The log, however, is chipped at an angle along the exterior of the bark on one side, and the entire log is peeled apart to resemble a scroll or a roll of paper. Just as the length of a roll of toilet paper will be far longer than the length of the tube, the length of the LVL beam will be far greater than that of a traditionally-cut beam of wood from the same log.
The LVL roll can then be dried and cut into smaller beams, all of which can be fitted on top of one another so that the grain is complimentary and much stronger. The adhesive and the resin that are also a part of this process lend even more strength, and the final product is of enhanced durability and density.
What are the Advantages of LVL Beams?
LVL beams are a combination of natural wood and man-made adhesive. They lack the natural knots and imperfections of genuine tree timber and are reinforced with many very thin layers of industrial glue. This makes them quite strong and suitable for building jobs where an immense amount of weight must be supported, or held together.
LVL beams can span up to 80 feet, though 24-44 feet is a more typical length. They can also measure up to 6 feet in width. This makes them ideal for sectional work in which especially long and strong materials are needed, as along the length of a house.
How Do LVL Beams Differ from Traditional Lumber?
Due to its manufactured nature, LVL beams are often much stronger, straighter, and denser than traditional lumber. Whereas natural wood has variations in thickness, strength, and integrity, LVL beams are far more uniform and solid in their density and durability.
This is because each layer of the LVL is applied in a manner that carefully lines up the grains of wood so that they are oriented in a complementary and unified pattern. Instead of variations of grains or knots as you’d find in natural timber, you have multiple layers of the same grain, all glued together. The combination of uniformity and adhesive makes for especially strong building material.
Natural timber beams are limited in length by the height and girth of the mature tree it was harvested from. But LVL can be manufactured to any desired length, up to 80 feet, with the same measurements throughout the beam, and the same durability, as well.
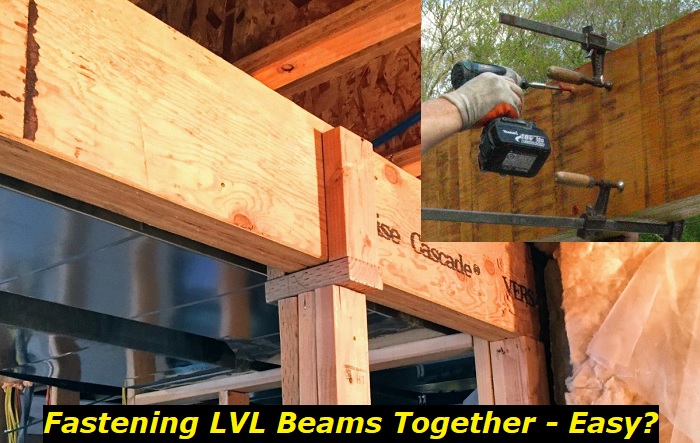
How Do You Fasten LVL Beams Together?
1) Post-to-Beam Connection
Post-to-beam connection is the securing of a horizontal beam on top of a vertical beam with the use of metal connectors called post brackets. The single piece of hardware is designed to straddle both the beam and the post with a unified piece of metal.
Post brackets come in a variety of shapes and sizes, so make sure that the hardware you buy is the right size for the job. Fasten with nails or wood screws as per the hardware’s pattern, and you’ll be good to go. LVL beams tend to be especially sturdy and should work well here.
2) Can I Use Adhesive to Join LVL Beams?
Adhesive can be used to join two LVL beams into a single, thicker beam, but adhesive should be used alongside nails. While you may see some claims that adhesive alone is enough, you can never be too careful with the integrity of wood in construction, and we don’t recommend using adhesive alone.
3) Fastening with Nails
Nailing LVL beams together with nails is the best option, but there’s a certain way to do it. The pattern used to nail the beams together will often vary based on the company or brand of beams, so be sure to check the website and any paper instructions that come with your LVL beams.
The key to success with any job like this is a uniform pattern and a careful nailing job. Work well, space your rows of nails carefully and consistently, and you’ll get a strong bond.
4) Nails or Wood Screws?
Both nails and wood screws work great with LVL beams, but for different reasons. Wood screws will give you more grip strength, that is, the ability to draw and hold two pieces of wood together firmly.
At the same time, the ability of nails to bend and flex a bit with pressure gives them more shear strength, allowing them to hold up to fluctuations in pressure and force without snapping. This makes them great for projects where the finished piece will have to endure side-to-side pressure well.
At the end of the day, both work very well and getting the strongest bond out of either nails or wood screws is really more about how you position and apply them than which type you use. Feel free to use either when you join LVL beams. So long as your wood screws or nails are hammered or screwed in carefully and professionally, they should hold just fine.
5) Making One Beam of Two
To nail two LVL beams together into a single, thicker beam, you’ll want to position the two beams so that the crowns of the boards oppose one another. You’ll get a slightly warped look at first, but clamp them together, and you’ll see that the final conjoined beam will be stronger and more durable. Nailing in 3 rows of 16d every 6-8” on center works well for this project, but be sure to check the manufacturer’s instructions.
Start at the two ends of the beams to nail them together. This way you’ll make sure your beams are flush and level before you get to work on the remaining interior nail rows. Nail one end together, and be sure to align the beams to nail in the other end of the beams. Gently hammering the beams into place works well to correct drift here. This will give you a perfectly level work surface for the remaining nail rows.
Make sure that you mark your distances within the interior of the beams for the rest of your nails. This will allow you consistent distancing and precise nail work and will save you time as you complete the job.
Remember that the LVL beams are going to be especially thick and tough, so you may need to use a combination of a nail gun and a hammer to get the nails in.
6) Joining More than Two Beams
When making one beam out of more than two LVL beams, you’ll have to use a specific pattern to ensure cohesion and durability, as well as the appropriate length of nails or wood screws for the job.
Alternating the nails from one side to another is recommended here for added strength and holding power across the entirety of the beams being joined. This ensures consistent and holistic stability and makes the thicker beam even safer to use and put weight on.
As always, be sure to check instructions from the manufacturer, and don’t just invent your method of nailing these things together. The manufacturer knows best how to safely join these beams, and you’ll want to follow their orders closely.
What Not to Do
There are some basic rules to keep in mind as you fasten LVL beams together to help keep you safe and protect the integrity of your structure.
Never drill through any load-bearing beam, or holding up weight within your home, or within a construction project. This can cause catastrophic and fatal structural failure and needs to be avoided at all costs.
Don’t rely on adhesive alone. While these beams are strong and tough, you’ll need more than strong glue to bond them together, especially if the beam supports weight or helps hold the structure of the home together. Nails or wood screws are key in fastening LVL beams, and you’ll need them for the added strength and permanence they offer.
Also, don’t assume that you’ll know the best way to nail two LVL beams together. Check with the manufacturer. There’s no shame in that, and making sure you’re spacing your nails right can save you a lot of headaches and money in the long run.
Conclusion
Fastening two LVL beams together into a stronger, thicker beam is a great way to add strength and durability to your construction project. LVL beams are manufactured beams of carefully unrolled wood logs, whose layers are then cut and re-adhered to one another with adhesive. They tend to be stronger and tougher than natural timber alone and work well as longer support beams in home carpentry work.
A standard pattern for nailing two LVL beams into a single thicker beam is three rows of 16D nails 6-8” apart. Be sure to nail both ends of the beams together first, and then mark your spaces throughout the interior length of the beams. As LVL is a bit tougher than traditional wood, you may need to use a hammer as well as a nail gun to get the job done.
Be sure to use nails or wood screws to join LVL beams, and don’t rely on adhesive alone. Check with the manufacturer’s instructions for nailing patterns, and be sure to avoid drilling through any beams that will need to endure pressure, or support a structure.
- Can You Unmix Paint: Techniques, Consequences, Alternatives - February 23, 2024
- Does Primer Need to be Mixed? Effective Primer Application - February 22, 2024
- How to Make Old Paint Usable Again: Retrieving and Preserving Paint - February 21, 2024


