Trim can make a home look more beautiful, and add character and a noble sense of age to an interior. The traditional method of securing trim to a wall is to nail the trim through both drywall and the underlying studs. But what do you do if the structure you’re working with has no studs beneath to work with?
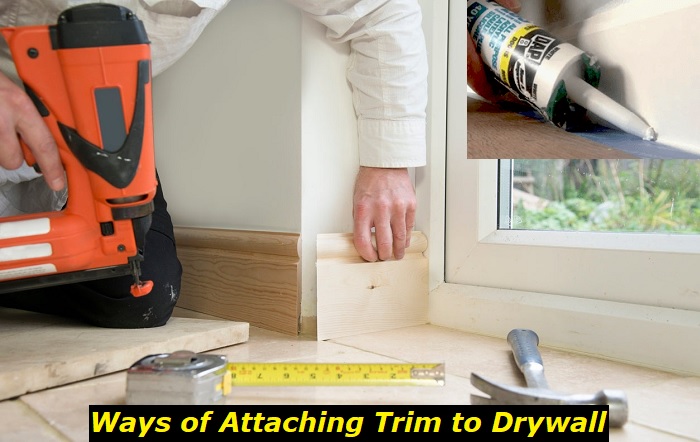
Trim can be attached to drywall using adhesive if there are no underlying studs. A variety of adhesives can be used on the top trim, baseboard, and even paneling on walls. Different kinds of products and methods can be used here, and we’ll review each method, and help you understand which would work best in each situation.
Keep reading to learn more about how to attach the trim to drywall without underlying studs, and the situations where these methods would work best.
Wall Studs
So, what are wall studs, anyway? Wall studs are the vertical wooden framework of a building’s construction, which function as the skeleton of a home or commercial structure. Over-the-wall studs drywall is plastered in place, and this drywall makes up the walls visible within the home into which you can hammer nails and which can be painted.
Wall studs are useful to secure trim within a home, as most trim is hammered through the drywall and through the studs to ensure that it stays in place, and is a more permanent part of the home’s interior.
But it is also possible to secure trim to drywall if you don’t have studs to work with. Though studs make the trim fit more securely into the wall, we have some methods that you can use if studs are not available beneath the drywall.
Caulking
Caulking is a simple and effective way to stick in your baseboard. Best of all, it comes off fairly easily, and removing it is far less likely to damage the drywall, should you want to change the look of the room.
Simply apply an undulating ribbon of caulk to the back of the trim you’re installing, and press it securely to the wall. You’ll want to use heavy and consistent pressure against the trim as it dries, as caulk is not the fastest adhesive available, and the pressure will be necessary to help it truly stick.
As a result, we recommend this technique for the base trim, as it is fairly easy to position a heavy block of wood against the floor trim to help secure the bond. 24 hours is the recommended time to keep the pressure on with caulking, as it tends to dry a bit slowly.
Two Layers of Adhesive / Glue
One method of applying trim such as baseboard to drywall involves using both caulking and fast-setting spray-on glue to help attach the baseboard. This method works great for smaller pieces of trim and is fairly easy and hassle-free.
Begin by spraying a layer of quick-setting spray-on glue to the top of the baseboard, as well as to the upper part of the wall section to be overlaid with trim. To keep your wall free of any excess glue, use a piece of cardboard or some paper to help protect the rest of your wall.
Then, apply a single squiggly/undulating line of caulk in the center of your baseboard strip, and stick it firmly to the drywall. It should adhere quickly and firmly, thanks to the combination of fast-drying glue and caulking.
Use this technique to adhere strips of trim anywhere along the wall. The layer of fast-setting glue will help to cement the bond quickly, eliminating the need for constant pressure.
Adhesive Plus Hardware
Drywall is a tricky substance to work with. It’s a type of plaster that tends to flake and crumble easily compared to other materials and isn’t great at gripping and retaining hardware in the way that wood is.
For this reason, there is an entire category of hardware meant to work better in drywall. Known as drywall nails and drywall screws, these pieces feature a ringed or barbed shank that digs in to the drywall better than plain nails and screws and gives you a much better hold.
You can definitely use drywall hardware along with an adhesive. While some do-it-yourselfers suggest thinner and lighter nails for this job, we find that drywall-specific tools work best and give you the best grip. Apply your adhesive to the trim, stick, hold, and then nail or screw in your metal.
For the best hold, drive your nails or screw at an “X” shape. This will help create an angled bond that will make up for the lack of a wooden stud behind the hardware job.
When using hardware with the installation of crown molding, so long as you hammer or screw the hardware in the top 3 inches of the wall, you won’t need to use or locate studs. Using an adhesive with this method will help secure the bond, and give you the extra hold that hardware alone can’t give.
Liquid Nails
Liquid Nails is a special brand of adhesive which works especially well with wood, or any other material that can be nailed in. It can be used as a substitute for nails in building and decorative work that does not require the strongest possible hold (such as structural support) but which would still be traditionally nailed in.
Liquid Nails is a favorite among do-it-yourselfers as it is tough, easy to apply, and works great for years. It’s also not that difficult to remove later, you’ll just need a ply bar. It’s a high-quality product that’s tested, true, and works very well.
You will need to keep pressure against the trim as the Liquid Nails dries, preferably with a strong wooden block. The Liquid Nails should take 15 minutes to dry, and up to 48 hours to firmly set. We, therefore, recommend keeping the pressure on for at least 24 hours after adhesion to make sure the bond is good and tight.
What Not to Do
Here are some tips on what you’ll want to avoid when adhering trim to drywall without studs.
Keep in mind that nails alone won’t be enough. The drywall is simply too fragile and flaky to hold nails properly, and if you rely on hardware alone, even drywall-specific hardware, you’ll likely experience some warping and pull-away. Always use an adhesive in addition to any hardware, and always hammer the nails in at an “X” shape for extra hold.
Another mistake many make is releasing pressure on drying adhesive too soon. If you’re using anything besides a fast-dry high-quality adhesive to secure the trim, you’ll want to keep pressure on the trim for at least 24 hours before releasing the pressure.
Best Conditions for Applying Trim
Something you may not have considered is the condition of the wall you’ll be applying the trim to.
If you’re painting both trim and walls and applying new trim at the same time, you’re going to want to paint the trim first, then the walls, and apply the trim on the dried, freshly painted walls.
Another tip? Make sure that the wall itself is dry, clean, and optimally primed for adhesive. Dust, debris, moisture, and humidity can make adhesive less effective, and ruin or complicate your trim job.
How to Apply the Adhesive
Applying adhesive incorrectly is another big mistake. Even the strongest adhesive needs to be applied consistently across the length of the trim piece to ensure the best bond to drywall.
Use an undulating or “river-like” winding pattern that stretches from end to end on the trim piece, and has equal distances of distance from the center throughout the trim. This method works great for caulking and Liquid Nails.
Quick-drying spray adhesive should be applied moderately on the top and bottom 1/5 of the trim piece, with the wavy line of primary adhesive running in the middle. This will ensure even bonding and the tightest bond where the trim is most likely to try to separate from the drywall; around the edges.
Conclusion
If you’re trying to attach the trim to drywall without underlying studs to hammer into, using an adhesive is the best way to accomplish this. We recommend a single adhesive such as Liquid Nails, or a combination of caulking and a spray-on fast-drying adhesive.
Any single adhesive will require a firm compression against the wall with a block of wood for at least 24 hours to make sure that the bond is secure.
Drywall nails and drywall screws can also be used in conjunction with an adhesive, when nailed or screwed in at an “X” angle, to help them secure into the drywall better. Nails and screws, however, will be insufficient alone and must be used with adhesive.
Make sure that the wall you’re working with is dry and clean, and if painting, paint the trim and then the walls before painting and attaching your trim. This will help keep both the walls and the trim looking beautiful, neat, and clean.
- Can You Unmix Paint: Techniques, Consequences, Alternatives - February 23, 2024
- Does Primer Need to be Mixed? Effective Primer Application - February 22, 2024
- How to Make Old Paint Usable Again: Retrieving and Preserving Paint - February 21, 2024


