When a structural engineer or other professionals advise them to install LVL beams and posts, many will ignore this since they do not see the need. To the naked eye, this might sound like an uphill task and a time and space-consuming activity. However, it would be best if you heeded professional advice to avoid a disaster.
The unit can cave in, which translates to loss and unending lawsuits. Some will install one for the sake of it, only to end up with a sub-standard unit that may never get the green light for occupation. If you must attach beams to a post, how about doing it right the first time?
To do this, a few considerations we are going to touch on below should guide your process:
- How to pick the right beams and posts
- What to use to attach the beams and posts for maximum support
- Considerations needed before installing one
- Regulations to adhere to
- Process of attaching the beam to the posts
- What you stand to gain with beams and posts in place
What is an LVL Beam?
LVL, short for Laminated Veneer Lumber, is a layer of wooden material laminated by moisture-resistant glue to form a single unit. These units are known as billets. The wooden sheets can be extracted from softwood trees such as pine, spruce, rubber, eucalyptus, and larch.
The logs from these trees are cut and peeled to reveal the veneer. The peeling process is done through a lathe with knives set at an angle of 23%. They are then dried to ensure the wood is easy to work with. Drying also helps prevent warping once the production process has been completed.
The veneers are subjected to hot air from the drying process through jet tubes. The air lowers the moisture level to 100C. The veneers are graded and used for different projects that are quality sensitive. Since LVLs are not so sensitive, you can use defective ones. These defects are easily covered up when clipped and glued together.
The glued pieces are subjected to hot pressure to improve their strength and guarantee adherence. This increases the grip and helps the glue dry to perfection. For a beautiful finish, the wood is sanded for shipping.
Unlike plywood, the veneers are aligned to fit the longitudinal direction of the finished lumber. The lamina is set parallel to the axis. This helps increase the thickness, width, and length. They are used as beams, trusses, or planks in a house. They are also used as rafters.
You can easily produce LVL beams at home. However, most people miss the hot pressure stage, which can compromise the beam quality. Before using them, have a professional vet them and give them the green light to use them.
Why You Need LVL Beams
1) Structural Strengthening Requirement
The main reason why you need LVL beams is for structural support. When you remove a wall from a unit, the weight it carries remains, and you need to find a way to distribute it. Installing beams and posts ensures that weight is equally distributed.
Unequal distribution of weight will compromise your structure. This can lead to cracks, roof carving, or even improper leaning of the unit. They do not have to be additional options, as some use them in the initial stage of construction when creating the framework. They are light and a perfect alternative to heavier options such as steel.
2) Wall Alternative
When looking for open spaces in a unit, you need something to support the weight of the structural framework. The beams become the perfect alternative as they offer much-needed support. Despite their installation, you need to know where to place them. Some spaces, when opened up, bring in light and helps increase the space’s appearance.
With the current trends where people are looking for ways to expand rooms or even make all units seem like one unit, you might need beams. However, in spaces with a lot of compromising traffic, avoid beams. Unnecessary force and accidents on the beams can compromise their stability, compromising your structure’s stability.
3) Cost Savers
Timber, steel, and other reinforcement are expensive to install. Items such as steel are sold on a weight and thickness basis. The thicker and longer they are, the more expensive they get.
They are also considered architectural beauty when exposed, making them serve two purposes. They accentuate the space while offering structural sturdiness.
During a fire, the beams only char, which might help reduce losses, as they remain intact. They do not rot or form mold when properly manufactured, making them a perfect alternative to other products.
They also utilize softwoods which are never considered as sawn timber. Softwood is cheap to purchase. It also takes a shorter time to grow and can easily sustain the demand. Additionally, an engineered product can be manipulated to meet the standards without increasing the costs or final sale price.
Considerations Before Attaching a Beam to Posts
1) The Foundation
Before installing the first beam and post, you must know the foundation’s state. The foundation determines how strong a unit is as it makes the skeletal part of any unit. For remodels, you need to know the effects of introducing beams and posts.
You also need to know the weight they are supposed to carry to keep your structure sound. Beams and posts are point specific, and you need to know exactly where each falls. The IRC shares guidelines to follow but a professional on-site would be more helpful.
Some guidelines can be adjusted despite being on paper. The soil type also determines which beam and post to use and, while at it, consider the size and width. Some require deep excavation, while others can easily remain on the surface.
2) Adjustments Needed
Beams are not designed on a one fits all basis. You can get custom-made beams depending on your structural needs. Some spaces need prior adjustment before you can install a beam and post. When installing one, you must figure out the space you must work with. In tight spaces, have the beams on site.
It would be best to consider how the beam affects the unit’s general or intended flow. It would be best if you also considered safety and the visual appeal it is likely to offer. In high-traffic areas, avoid sharp-edged beams. Go for those with sanded or even rounded edges to avoid cuts and bruising. Also, consider alternative positioning. Some beams can be slightly moved to create a whole different experience. You can also bring down walls or remove windows for them to fit.
Build temporary support walls or structures before inserting a beam and post. This helps distribute the weight until a beam is installed. If you need the beams on site before installation, find a safe and secure place to store them. Extreme weather can make them chip, warp, or even rot.
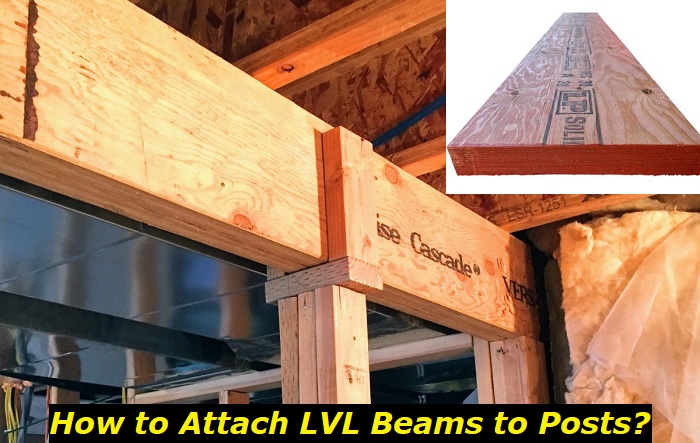
Process of Attaching the Beam to the Posts
1) Gather Your Tools
Before attaching beams to a post, gather the necessary tools first. Have your joining unit and fastening options on site. Have the beams and posts on the site too. Last-minute beam purchases will have you settling for poor-quality beams if that is all that is available currently. Protective gear is also a necessity. Beams are heavy and slippery and increase the risk when suspended above the air. Wear your protective gear to protect yourself from unforeseen accidents.
2) Mark Your Beam, Post, and Floor
To ensure the beam and post are attached correctly, you must measure where each post goes on a beam first. It would be best to mark where the drilling or fastening will occur on the post. This helps guide those making the installation. Measure out the depth of each post to the floor. This helps you ascertain that the holes dug fit, and you do not have to do a back-and-forth dig.
3) Choose the Best Installation Process
The installation process depends on the beam’s location, the strength needed, and the material used. When making an attachment based on the location, you need to know how each works. Beams in corners are attached through notching to ensure there is perfect bonding. However, when two or more beams use one post, the best way to distribute the weight is by creating a cleat.
The cleat lies horizontally across the post and is fastened. Simpson brackets make a perfect study attachment option since they hold the notched edges in place. Have washers and recess on each end to ensure maximum protection. You can also use post caps and hem bolts as an alternative when attaching beams and posts. Where pre-drilling is needed, consider verifying the size of those pre-drilled holes to avoid mistakes during installation.
Conclusion
Beams are your sure bet to a stable construction. With a few calculations, you can have beams installed when building a new structure or when remodeling a space. However, they also have limitations; a professional should help you determine this. Finally, ensure your build meets all the building codes to avoid flagging.
- Can You Unmix Paint: Techniques, Consequences, Alternatives - February 23, 2024
- Does Primer Need to be Mixed? Effective Primer Application - February 22, 2024
- How to Make Old Paint Usable Again: Retrieving and Preserving Paint - February 21, 2024


