Parquet flooring is a beautiful way of providing a sense of elegance and complexity to any home. However, it’s now seen a wider variety of uses in recent years.
Trying to restore worn-down parquet flooring is a challenge, especially if you want to avoid sanding to prevent dust from getting everywhere or if you just don’t have the proper equipment.
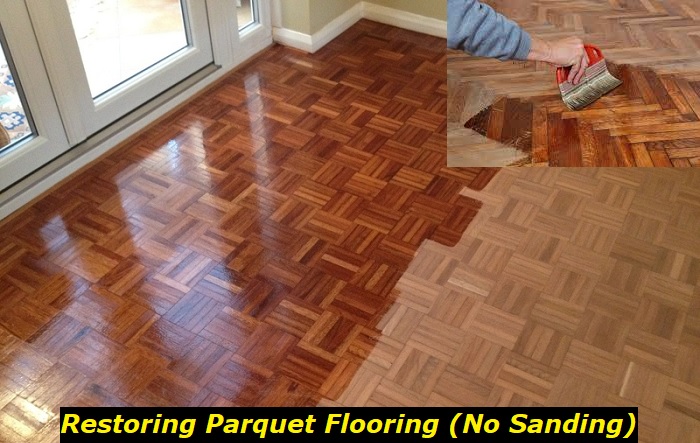
Thankfully, there are a few methods that you can use that don’t involve sanding the parquet flooring to restore its shine and beauty. The simple methods that a lot of professionals and amateurs use are the following:
- Use An Abrasion Kit
- Buff And Recoat With A Polyurethane Solution
- Apply A Revitalizer
Each method has its benefits and corresponding consequences. It all depends on how you use it and the overall condition of your parquet flooring. Continue reading to find out more details about each method, and at the end, you will learn some helpful tips and tricks when it comes to cleaning and maintaining parquet flooring.
Simple Methods to Use When Restoring Parquet Flooring Without Sanding
After a few years, the parquet flooring will see its fair share of general wear and tear. Most owners think that to restore the parquet flooring to its original glory, they will need to sand it down, stain it, and seal it once more. However, that’s not always the case.
Depending on how beat up the parquet flooring is, you can skip out on sanding it. For a few scratches and the occasional deep scar, the methods discussed in this section will work wonders.
1) Use An Abrasion Kit
This method is by far the most readily available that anyone who has access to it. You can easily buy an abrasion kit at your local home improvement store or order one online.
The kit comes with all the tools you will need to restore the parquet flooring’s original shine and luster. Do take note, though, that this method requires at least two people, so call over a friend for help.
This method uses a special chemical to etch out the old finish and get the parquet flooring ready for a new coat. By doing it this way, you eliminate the potential for dust forming because you’re scrubbing the surface of the parquet flooring with an abrasive pad and liquid before eventually cleaning it off.
Each abrasive kit comes with a manual that gives you detailed instructions on how to apply the chemical to the parquet flooring. Just remember that the abrasive liquid dries quickly, so you need to work fast.
2) Buff and Recoat with a Polyurethane Solution
Similar to the abrasion kit, this method requires you to prepare the surface of the parquet flooring before applying a new coat. The difference is that instead of using an abrasive chemical solution, you’re using a buffer to rough up the surface. If you don’t have one at home, you can always rent one at your nearest home improvement store.
The major downside to this method is that it produces a lot more dust as compared to sanding. However, it’s much safer than sanding, and you have more wiggle room when it comes to making mistakes since this method only affects the surface of the parquet flooring.
Just remember to lay out a plan first before renting a buffer to avoid wasting time and money. Additionally, this method requires a lot of elbow grease, especially in the corners where the buffer can’t reach. But the result is well worth the effort you will put into it.
3) Apply a Revitalizer
This method is by far the easiest among the three in this section. It doesn’t require any fancy equipment or chemicals to restore your parquet flooring. Simply apply the revitalizer evenly on the surface of the parquet flooring, and it will start looking like it’s brand new after drying.
But before applying the revitalizer, you need to make sure that the surface of the parquet flooring is clean and free from any dirt, debris, and gunk. To do this, create a water and vinegar solution and then lightly dampen a piece of cloth in it. From there, wipe away at the parquet flooring using controlled strokes to make it clean while preventing scratches from happening.
However, you can only use this method if there’s very minimal wear and tear on the surface of the parquet flooring. The revitalizer’s primary role is to give a glossy finish to the parquet flooring while filling up shallow scratches. Using this method with parquet flooring that has considerable damage and deep scratches and gouges will not achieve the same effect.
How to Clean and Maintain Parquet Flooring?
Maintenance is key to beauty, and that statement also holds when it comes to parquet flooring. As such, here are just some tips and tricks that you need to remember if you want the parquet flooring to retain its glossy finish for years to come without any sanding.
1) Vacuum The Parquet Flooring Regularly
Regular cleaning matters when it comes to keeping the surface of your parquet flooring looking brand new. Dust, dirt, and other various debris can easily form a thin layer over the parquet flooring, and over time, they can scratch and embed themselves into the wood.
The best way to prevent this from happening is by vacuuming the parquet flooring regularly. Make sure to use a soft brush attachment when vacuuming the parquet flooring to help remove the dust and dirt while preventing scratches.
2) Make Use of Rags and Mats
It can get tiring having to vacuum and brush all the dirt, debris, and gunk that can stick to the parquet flooring. This is especially true in the presence of heavy foot traffic where people come and go regularly.
One way to go around this problem is by implementing more rugs and mats in those areas. Choose ones that have rubber on the underside so that they won’t easily slide off the surface under pressure.
3) Immediately Clean Any Spills
Liquid stains are some of the worst damages that your parquet flooring can suffer. Not only do they make the flooring less appealing visually, but they can cause significant discoloration and rot when left alone for too long.
Before either could happen, use a clean rag to immediately soak and wipe any spills clean from the parquet flooring’s surface. For harder-to-remove stains, you will need a mild detergent solution to help clean them off. If necessary, dilute the solution with water if you think that it’s still too strong for the parquet flooring.
4) Keep Pets’ Nails Trimmed
It can be a nightmare keeping your parquet flooring free from scratches if you own any pets, like cats and dogs. They move around a lot, always running and jumping when you least expect them to. On top of that, you can’t always supervise them around the clock for an entire day.
That’s why you must keep your pets’ nails trimmed so that they won’t leave deep scratches on the parquet flooring. You can also have your pets wear cloth shoes as an alternative solution.
At the end of the day, you’re still getting a two-for-one deal. Not only are you preserving your parquet flooring’s appearance, but you’re also keeping your pets well-groomed. Additionally, the shoes will also make your pets even cuter to look at, which is a bonus to all of these.
5) Avoid Wearing Shoes If Possible
Last but not least, avoid wearing shoes when walking over parquet flooring. Admittedly, this makes more sense for parquet flooring at home.
For parquet flooring, you can opt to use shoes with rubber soles or place a protector underneath each to prevent any unnecessary scratches. Most of the time, however, the use of mats and rugs is much better and hassle-free.
To Wrap Up
What used to be reserved for only the interiors of homes now has a variety of applications. Parquet flooring is just one way to spice up the interior while showcasing your creative side. It helps provide a breath of fresh air from the usual interior designs.
However, it also requires the same amount of care and works as well as parquet flooring in homes. The three methods introduced to you today are meant to make your lives far easier when maintaining the beauty of parquet flooring, as they help preserve its visual appeal for a longer time without the need to replace parts of it.
So if you previously had any misgivings when it came to adding parquet flooring, then this article is here to show you that maintaining its beauty without sanding is not a hard task to achieve.
- Can You Unmix Paint: Techniques, Consequences, Alternatives - February 23, 2024
- Does Primer Need to be Mixed? Effective Primer Application - February 22, 2024
- How to Make Old Paint Usable Again: Retrieving and Preserving Paint - February 21, 2024
