An anchoring connector is a 3-prong receptacle that permits an earthing wire to be attached from the transmission line to the device. The earthing wire is attached to the plug’s third prong.
When a three-prong plug is inserted into a socket, the earthing wire is attached to the prong, forming an ongoing earthing connection from the gadget to the main switchboard.
Well, the earthing channel connected to the third prong serves as a safety means. Just in detail, suppose there is a short circuit or, by chance, any malfunction to the electrical circuit. Then the earthing channel works for your safety.
Most importantly, the earthing channel acts as a centerpiece. However, it is not pivotal for your electrical appliances to function. Conventionally, it doesn’t mean you do away with the third prong from your plug. Instead, it is slack to the 3-plug. Here are the basics we will touch on about the 3-prong plug wiring – green, white, and black:
- The 3-prong plug color codes
- Wiring the 3-prong plug
- What you will need when wiring a 3-prong plug
- What to consider when making proper screw terminal connections
- Safety precautions when wiring the 3-prong plug
- How to maintain proper polarity using a 3-prong plug
The Color-Codes Of the 3-Prong Plug- (Green, White, and Black)
The 3-prong receptacle has three main pins, namely, Live- “L,” Neutral- “N,” and Earth- “E.” On several occasions, the pin’s names will be replaced with colors, which you should be careful with when wiring the 3-prong plug.
Remember, color-coded electrical cables and screw endpoints make it easier to link each wire to the corresponding termination. However, this does not imply that color scheme is always a reliable indicator.
For instance, white wires are commonly used instead of black wires, and some items, such as switches and bulbs, can be plugged backward and still function. However, it could trigger an electric shock.
It is essential to grasp a few tweaks of electrical circuits and color-coding to aid you in comprehending how each electrical wiring works to prevent the inherent mistakes that arrive with wrong installations.
Always ensure the colors correspond when linking each color to the respective receptacles. Therefore, when wiring a 3-prong plug, ensure the black wire connects from the primary power source to the wall socket. Plus, the white neutral wire carries power back to the main switchboard, and the green wire connects the electrical system to the house’s earthing system. Even so, always ensure the wires are accurately wired to avoid casualties.
Look! There are several exceptions to the color-code rule. Some are legitimate and not-so-legitimate approaches to wire your 3-prong plug sockets. Nonetheless, never root your wiring to assumptions.
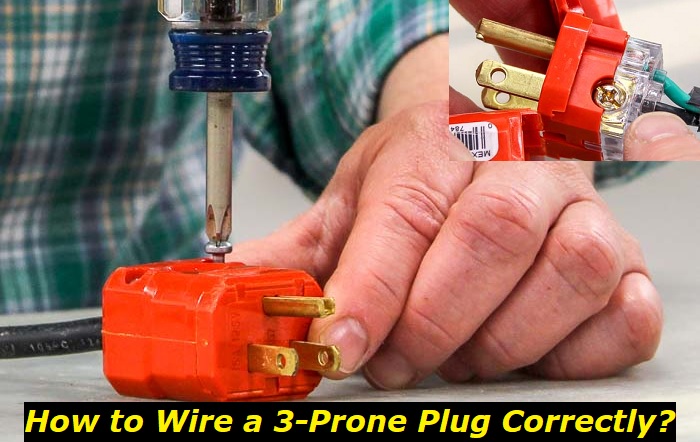
How To Wire The 3-Prong Plug
It would be best if you were cautious when wiring the wall socket with switches. Otherwise, faulty connections might be disastrous.
To begin, turn off the primary breaker in the main switchboard and ensure that the voltage level is turned off.
To modify an existing 2-gang 3-pin socket, unscrew the firmly inserted nut on the front side of the plug socket. It will aid in removing the rear cover from the connector box. This allows the socket to be removed from the mounting box with simplicity.
To link a new 3-pin dual plug, simply attach the “Earth” wire, which is green with a yellow stripe, to the “E” screw port (reflects the earthing cable.)
Attach the “Neutral” wire, which is blue, to the “N” screw terminal slot (reflects neutral).
Lastly, link the “Live” wire, which is brown, to the “L” screw connector (live.) Unscrew the Live “L,” Neutral “N,” and Earth “E” screw ends in the preceding socket and swap the corresponding wires in the current 3-pin wall socket (Brown for Live “L,” Blue for Neutral “N,” as well as Green or Green with Yellow stripe for Earth “E”).
Finally, tighten the nuts and reinstall the three-pin socket back shell. Ensure all the cables and bolts are wholly fitted, as a loose connection might create a severe fire due to flaring and scorching or even electric shock with severe injuries.
Furthermore, no wires or exposed fibers should protrude from the connector or screw connectors. Push the 3-pin socket plug back into the installation box, ensuring it fits entirely in the pallet slot. Remember to keep your power back on since you switched it off.
Safety Precautions When Wiring The 3-Prong Plug
All electrical appliances require precautions when handling them. If you fail to follow the guidelines to the latter, there are chances you will be exposing yourself to risks.
Turn off the power supply whenever maintaining, repairing, or replacing electrical equipment. Turn off the power button on the primary consumer unit or switchboard.
While fixing or installing, never stand on or grasp damp metal parts.
Observe the warnings and guidelines precisely and rigorously while performing this lesson or any other realistic electrical installation.
Constantly utilize the appropriate size cable and wire, plugs and switches, and fuses.
Never tamper with power (which is harmful and potentially deadly) without sufficient supervision and care. Perform maintenance work under the supervision of qualified individuals with extensive training and good knowledge of electrification.
Conducting your own electrical work is often prudent- (helps you cut on costs) but unsafe and, in certain situations, illegal. Before making any changes or modifications to electrical wiring, consult with a competent person or an electric power transmission operator.
What You’ll Need When Wiring A 3-Prong Plug
You don’t need much. But it is still essential to have some tools to simplify your work and reduce accidents. When handling a 3-prong plug, you should have a wire stripper, screwdrivers, and needle-nose pliers. Just like hooks and nets to a fisherman, so are these tools for your electrical installation and maintenance.
What To Consider When Making Proper Screw Terminal Connections
The screw connectors are generally situated on the edges of the gadget body and are indeed the traditional approaches for attaching circuit cables to a valve or socket. Moreover, there are still considerations that you will need to basket for the surety of your installation. Some of these aspects are;
1) Strip The Wire
Stripping the wires ensures the insulations are removed for proper electrical transmission. Notably, in some instances, the earthing wire might not be insulated.
2) Bend The Stripped Wire
Arguably, a bent wire makes sure it takes the shape of a hook. Moreover, it would be best if you used needle-nose pliers to achieve the desired hook.
3) Attach The Bent Wire To The Screw
Place the hook from every wire over the corresponding screw socket, with the cable’s end on the right-hand side of the bolt. Again, only the stripped part of the wire should come into touch with any component of the screw.
4) Close The Loop Using The Screw
It would be best if you employed the needle-nose pliers at this stage. Tighten the hook-shaped wire around the screw’s shank.
5) Tighten The Screw
Using a Philips screwdriver, tighten the screw clockwise. Or, you could use a square recess screwdriver. Nonetheless, employing a tool that is appropriate for the screw. Remember, the screw should always be properly fitted and firmly tightened- (to hold the wire underneath and the screw head in place.)
How To Maintain Proper Polarity Using A 3-Prong Plug
Maintaining proper polarity is never an uphill task, so it should be considered necessary when installing the 3-plug wall socket. During the maintenance or wiring period, link the black hot wire to one of the hot bronze-colored sockets to keep an appropriate polarity. Attach the white neutral wire to one of the silver-colored neutral endpoints.
When typical circuits are wired, both wires attached to the connector are hot. If neutral wires are in the electrical panel, they are easily linked together with a wire link to circumvent the control.
Link the circuit’s earthing wire to the device’s earth bolt with all controls and sockets.
Additionally, polarity ensures a proper flow of currents in the appropriate direction. However, when polarity is not achieved, it could lead to severe damage along the circuit’s connection, which might lead to a fire.
3-prong plugs are widely used in vast countries, and grasping the discussed basics would be ideal. However, if you don’t have a 3-prong plug wall socket, it might be time you rethink having it installed in your house. Notably, their safety when in use makes them suitable for a household. Therefore, it bears deeply rooted reasons for its consideration as a household plug.
Importantly, three-prong plugs are now the norm, and residences built after 2008 must have them fitted in all outlets. Nevertheless, you may still be utilizing the outdated two-prong outlets if you live in an older building and haven’t upgraded your electrical system.
Again, most gadgets and electronics these days are three-pronged, so having improved plugs are both safer and handier. Unfortunately, plugging a three-prong adapter into a two-prong outlet is unsafe and doesn’t solve any challenges that the two-prong outlet bears.
Moreover, you can’t even change a two-prong plug for a three-prong one because it could cause an appliance malfunction or a circumstance in which you or a loved one could get shocked. There is still no footing to safeguard the gadget or you from a surge. Earthing should be done at the power outlet itself, or it will be ineffective in securing you.
Conventionally, the basics tour you through every basic you might need to know about the 3-prong plug and the guidelines. Notably, adhering to the guidelines will likely solve most problems that sprout with carelessness and ignorance. Therefore, these basics will help you immensely and reduce your injury exposure.
- Can You Unmix Paint: Techniques, Consequences, Alternatives - February 23, 2024
- Does Primer Need to be Mixed? Effective Primer Application - February 22, 2024
- How to Make Old Paint Usable Again: Retrieving and Preserving Paint - February 21, 2024


