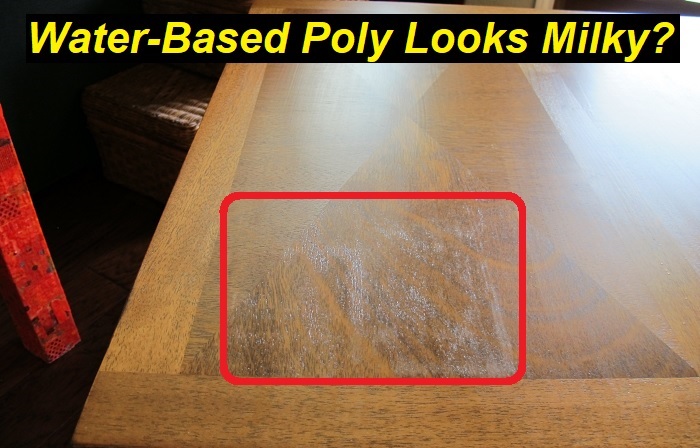
After you apply polyurethane on wood, you can see some white haze that makes poly actually look milky. Your natural reaction is to think that you did something wrong and now the project will look like this or you will have to redo the job. And the worst thing you can do is to get right into the action and start fixing the problem right away. You should never hurry up when you are dealing with wood.
Woodworking projects need time to look wonderful. Right after you apply any kind of materials on a wooden surface, they may look ugly. But over time, things may change. Today, we’ll tell you why polyurethane may look milky after you apply it. Sometimes, it’s just about the drying process. But in some cases, it may be the consequence of a poorly done job.
Here’s what we’ll discuss today:
- Drying process of water-based polyurethane.
- Why are white spots all over your poly-covered wood?
- What to do if milky spots don’t disappear?
- Can you avoid white milky spots on your project?
- Fixing bad milky spots on your polyurethane?
Let’s get started!
Water-based poly – how long does it dry?
You may have read on the can with water-based polyurethane that the drying time is only 1 hour. But be careful – you shouldn’t apply another coat so soon. If you do so, some parts of the surface will still contain some moisture and it will cause milky spots on your wood. Also, you can spoil the project, make it look shadowy, or something like that.
Water-based poly should dry at least for 8 hours before you apply another coat. Also, you should wait for 1 day before you continue working on your project. Otherwise, the final coat may still be a little wet and it can be prone to damage.
Here’s how water-based poly actually dries:
- once you apply polyurethane, it starts evaporating fast and curing;
- but the process is not immediate at all, it depends on many factors;
- thick coats will dry slowly, while thin coats will only take 15 minutes to dry;
- even though the polyurethane coat may not feel sticky, it doesn’t mean it has completely cured;
- you need to wait for some time (look through instructions for more details);
- after applying all coats, you should wait for 24 hours before making something else with your project;
- if you don’t obey the rules of applying polyurethane, you may spoil the project easily;
- the worst part is when you already have a milky spot or some spots and still apply more coats.
So, a milky or white spot on your polyurethane is basically a spot of moisture or water under the poly coat. It doesn’t always mean there is a problem. But it should make you think about what to do to avoid these milky spots or haze in the final project.
And here, you should not continue working on your project until you solve this little problem. If you just put another coat and then another, it will not save the project. It will only make things worse and will eventually make you redo the project and spend a lot of time on this.
How to deal with milky spots or haze on polyurethane?
Dealing with these problems is not easy if it’s a real problem and it can be super easy if the white spot is just badly dried poly. We wish you only had the second option.
So, if the white or milky spots are all about badly dried polyurethane, you will have the option to wait. This is the best strategy because things will not get worse than they are. But chances are things may get much better.
Here’s what happens:
- some moisture builds up under the cured layer of polyurethane and some haze appears;
- this moisture evaporates very slowly and you can’t see any changes in 15 or 20 minutes;
- but it still evaporates, and in 2-3 hours you will see significant changes;
- over time, the spots become smaller and they can just disappear in the end;
- then, you will need to put on another coat or just continue working with the project if this was the final coat.
This is our favorite method of dealing with problems in woodworking: you just need to wait and the problems disappear. Cool! But it doesn’t always work like that, unfortunately.
If nothing happens and you still have these white and milky spots or haze of your polyurethane, you should help them disappear. It won’t be very hard to do if the problem is with polyurethane. But it can be complicated if the problem is with poorly stained wood or with some spot that initially was on the wood surface.
So, here’s what you need to do:
- never apply mayonnaise or something like that – this is the worst tip we’ve ever heard;
- take a hair drier and use it on its max power to heat the spot where you have the milky haze;
- be careful to not overheat the spot, use it only where the cloudiness appears to be;
- dry the spot and you will see a much better situation with the milky spots on poly;
- after that, wait for 2-3 hours to let polyurethane harden a bit;
- use another coat of poly (it should be thin) to make the project look smoother;
- wait for 24 hours before you continue with any other actions.
So, these are the steps that will help you. Of course, if you have already applied one or two additional coats of polyurethane, you will not be able to dry the moisture with a hair drier. In this case, you can get a professional heat gun or something else that can generate higher temperatures and stronger airflow.
If it still doesn’t help, things are not so good. You will need to find some other ways to get rid of the problem. And if a heat gun doesn’t help you much, you probably have to deal with not moisture but some other problem.
What else can cause a milky haze on your polyurethane?
We can think of many possible problems. Mainly, it’s all about initial problems of preparation. You had to think about the preparation of the wood before you started covering your wood with poly. This is an important part of your project that is the most boring at times, but you still have to spend some time on it.
Mainly, it’s all about some defects on the surface. For example, it may have some white spots on it. Or the wood can have been initially wet. In these cases, you will have problems with white spots, haze, cloudiness, and other things in this area.
Also, some types of wood are prone to holding some amount of moisture even after you have prepared them. These wood types are not the best choice for covering them with polyurethane. It will still be milky in some spots.
Here are some reasons that could lead to milky haze:
- Moisture inside the wood. Wet wood shouldn’t be covered by any materials, especially water-based polyurethane. This moisture will come out once you finish your work. It may lead to white spots on your poly within the first 8 hours after you apply the material.
- Some problems with water-based poly. You may have encountered trouble with polyurethane. For example, it could have been an expired material. This might be the reason why water-based poly didn’t dry well.
- Bad conditions for drying. If your project was drying outside on a cloudy day or in a workshop with high humidity, your water-based poly could not dry completely or save some moisture under it. These spots became white or milky.
- White spots on the wood. Poly will not stain your wood. Yes, it will make it look better, but without changing its original color. That’s why applying dozens of layers of polyurethane in an attempt to hide the problems with milky haze is an insane idea.
- Some drops of water could be the reason for your problems. For example, they got onto the surface before you started applying polyurethane. This may have caused white spots but you can deal with them relatively easily.
Also, your problems may be caused by grease. You should degrease and clean the surface before putting the first coat of polyurethane. If some grease builds up under the coat of poly, you will have problems.
As you see, there are a lot of reasons why poly can seem milky or have some spots on it. You have to check all of them, but first, try to dry the haze with a hair drier. If it doesn’t help, go to this list and try to understand what was wrong in your case.
Final words
We know well that applying polyurethane is not a very hard task. You just need to follow instructions and avoid moisture build-up. If you have problems with milky haze, you should check possible moisture problems or just wait a bit until the surface completely dries. If it doesn’t help, read our article and think of what you can do. In some cases, you will need to redo the project to deal with all problems.
- Can You Unmix Paint: Techniques, Consequences, Alternatives - February 23, 2024
- Does Primer Need to be Mixed? Effective Primer Application - February 22, 2024
- How to Make Old Paint Usable Again: Retrieving and Preserving Paint - February 21, 2024
