In woodworking, achieving an even finish across a piece of wood is a common challenge, particularly when dealing with the end grain. The end grain tends to absorb more stain or finish compared to the rest of the wood, often resulting in a noticeably darker shade.
This issue is especially prominent in areas such as the stiles of door frames or the tops of rails. Understanding the nature of wood and the techniques to mitigate this inconsistency is crucial for any woodworking project aiming for aesthetic excellence and uniformity.
Deep Dive into End Checking: Understanding Its Causes and Implications in Woodworking
End checking is a critical concern in woodworking, characterized by the appearance of cracks along the growth rings of wood. This issue goes beyond mere aesthetics, potentially compromising the structural integrity and longevity of wood products. Understanding the causes and implications of end checking is essential for any woodworker seeking to maintain the quality and durability of their creations.
1) Causes of End Checking
The primary cause of end checking is the uneven loss of moisture from the wood, leading to differential shrinkage. This phenomenon is more pronounced in the end grain, where the wood fibers act like a bundle of straws, allowing moisture to escape more rapidly than from the face or edge grains. External factors such as humidity, temperature fluctuations, and exposure to direct sunlight can exacerbate this process.
2) Wood Species Susceptibility
Different wood species have varying levels of susceptibility to end checking. Dense hardwoods with tight grain patterns, like oak or maple, tend to be more resistant, while softer woods with open grains, such as pine or cedar, are more prone to this issue. Understanding the characteristics of the wood species being used is crucial for anticipating and mitigating the risk of end checking.
3) Implications for Woodworking Projects
End checking can have significant implications, particularly in projects where structural integrity is critical. In load-bearing applications, such as in furniture or architectural elements, unchecked end checks can lead to weaknesses and potential failure points. Additionally, in fine woodworking or decorative pieces, end checking can detract from the visual appeal and finish of the product.
4) Monitoring and Measuring Moisture Content
Effective prevention of end checking starts with vigilant monitoring of the wood’s moisture content. Woodworkers should use moisture meters to regularly check the moisture levels, especially during the drying and acclimatization phases. The goal is to gradually bring the wood to an equilibrium moisture content that matches the intended use environment, thereby reducing the likelihood of stress-induced cracking.
5) Technological Advances in Monitoring
Recent advancements in technology have provided woodworkers with more sophisticated tools to monitor and predict end checking. Devices that can track humidity and temperature changes over time can offer valuable insights into the drying process, enabling more precise interventions to prevent end checking.
6) Understanding and Mitigating Environmental Impacts
Environmental conditions play a significant role in the development of end checking. Woodworkers need to understand how factors like ambient humidity, temperature, and air circulation affect the wood during both the drying and storage phases. Strategies such as controlling the environment in storage areas, using dehumidifiers, or ensuring adequate air circulation can be effective in mitigating the risk of end checking.
By deepening their understanding of the causes and implications of end checking, woodworkers can take proactive steps to prevent this common issue, ensuring the longevity and aesthetic appeal of their woodworking projects.
Preventing End Checking: Strategies for Optimal Wood Maintenance
Preventing end checking is multifaceted and involves careful consideration of the wood’s environment and handling. Key strategies include:
- Moisture Management: Regularly checking the moisture content of the wood is vital. Woodworkers should aim for a moisture content that mirrors the eventual usage environment of the wood.
- Storage and Stacking: Properly stacking wood to promote uniform airflow can significantly reduce the risk of end checking. This includes leaving adequate space between stacks and ensuring a level foundation.
- Protective Measures: Wrapping the end grains in plastic or using other barrier methods helps in reducing rapid moisture loss. For woods prone to rapid drying, these measures can be crucial.
- Natural Drying Process: Allowing the wood to dry slowly and naturally, as opposed to forced drying methods, can help in minimizing the development of end checking.
Sanding: A Critical Step for Color Uniformity in Wood Finishing
Sanding is a fundamental aspect of woodworking, especially when it comes to achieving uniform color and finish in projects. This process is particularly vital for treating end grains, which inherently absorb more stain or finish than other parts of the wood. A meticulous and well-executed sanding process can significantly enhance the overall aesthetics and quality of the final product.
- Understanding the Science of Sanding
Sanding is not just a mechanical process; it’s a science that involves understanding the interaction between wood fibers, sandpaper grits, and finishing products. The end grain of wood, being more porous and fibrous, tends to soak up more finish or stain. This results in a darker appearance compared to the face and edge grains. Proper sanding helps in closing these pores, thus reducing the absorption rate.
- The Technique of Progressive Sanding
Progressive sanding, which involves starting with a coarser grit and gradually moving to finer grits, is crucial for end grains. This technique helps in uniformly smoothing the surface, removing scratches from coarser grits, and preparing the wood for an even application of finish. Each step in this progression lays the foundation for the next, ensuring a smooth, uniform surface.
- Impact of Sanding on Stain and Finish Absorption
The degree of sanding has a direct impact on how the wood will absorb stains and finishes. Over-sanding or using too fine a grit can burnish the surface, leading to uneven absorption and a blotchy appearance. Conversely, insufficient sanding can leave the wood too porous, resulting in excessive absorption and a darker finish. Finding the right balance is key to achieving a consistent color across the wood piece.
- Sanding Tools and Techniques for Optimal Results
The choice of sanding tools and techniques can greatly influence the outcome. Hand sanding offers control and precision, especially for intricate areas or delicate pieces. Power sanders, on the other hand, are effective for larger surfaces or more demanding sanding tasks. Regardless of the method, maintaining consistent pressure and movement is vital to avoid uneven surfaces.
- Integrating Sanding into the Wood Finishing Process
Sanding should be integrated thoughtfully into the overall finishing process. This includes accounting for the type of wood, the desired finish, and the environmental conditions of the workspace. After sanding, it’s essential to remove all dust and debris from the wood surface to ensure a clean, smooth base for finishing products.
- Sanding as a Skill in Woodworking
Sanding is an art that requires patience, attention to detail, and an understanding of the wood’s characteristics. Experienced woodworkers know that the time and effort invested in proper sanding are reflected in the quality of the finished piece. It’s a skill that, when mastered, can elevate the standard of woodworking projects.
Sanding is more than a preparatory step; it’s a critical element in achieving color uniformity and a flawless finish in woodworking. Through careful selection of sandpaper grits, appropriate techniques, and an understanding of the wood’s properties, woodworkers can master the art of sanding to achieve exceptional results in their projects.
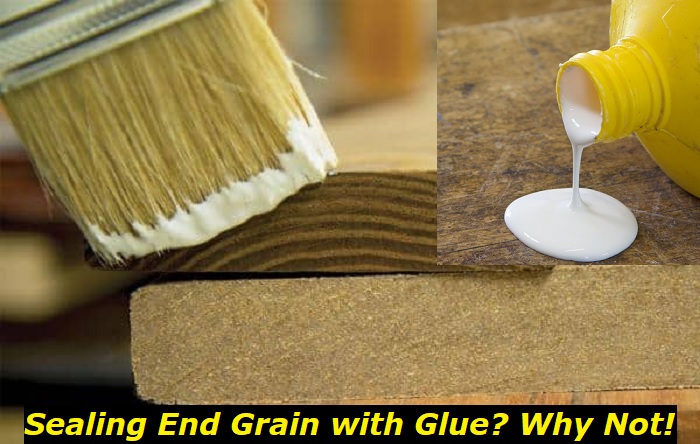
Glue as a Sealant: An Innovative Approach to End Grain Finishing
In the realm of woodworking, the use of glue as a sealant for end grains represents an innovative and increasingly popular technique. This approach stands as a testament to the evolving nature of woodworking methodologies, where simplicity and effectiveness are highly valued. The concept revolves around using glue to create a barrier on the end grain, thereby controlling the absorption of stain or finish and ensuring a more consistent appearance across the wood piece.
The rationale behind using glue as a sealant lies in its ability to penetrate and seal the porous end grain. Unlike the more time-consuming process of sanding, applying a layer of glue provides a quick and efficient means to reduce the uneven absorption of finishing products. This method is particularly beneficial in scenarios where the intricacy of the woodwork or the scale of the project makes extensive sanding impractical or unfeasible.
Selecting the appropriate type of glue is crucial for the success of this technique. The choice depends on various factors, including the nature of the wood, the type of finish to be applied, and the intended use of the finished product. For instance, PVA glue is often preferred for its versatility and ease of use, while epoxy or hide glue might be chosen for their durability and strength in specific applications.
The application process requires a delicate balance. The goal is to apply a thin, even layer of glue that seals the pores without forming a noticeable layer on the wood’s surface. This demands a careful and precise approach, ensuring that the glue covers the end grain adequately without overapplication, which could lead to issues with adhesion or the finish’s appearance. The glue should be allowed to dry completely before any sanding or finishing steps are undertaken, ensuring that the seal is effective.
Incorporating glue as a sealant into the woodworking process also brings forth considerations regarding the final finish. Woodworkers must account for how the glue might interact with subsequent layers of stain or finish. It’s essential to test the method on a scrap piece of the same wood to gauge the results and adjust the technique as necessary.
The use of glue as a sealant for end grains is not just a technique but a reflection of the ingenuity inherent in woodworking. It showcases how traditional methods can be adapted and refined, providing woodworkers with more tools in their arsenal to achieve the desired aesthetic and functional results. This approach has been embraced for its ability to simplify the finishing process while maintaining, or even enhancing, the quality and uniformity of the final product.
Best Practices for Applying Glue on End Grains
- Selecting the Right Glue: Choose a glue type that is compatible with the wood species and the intended use of the finished product. Consider factors like moisture resistance, drying time, and compatibility with finishes.
- Preparing the Wood Surface: Ensure that the end grains are clean and free from any dust, oils, or previous finishes. Lightly sand the surface if necessary to create a texture that allows for better glue adhesion.
- Applying the Glue Evenly: Use a small brush or sponge applicator to apply the glue. Aim for a thin, even layer that covers the end grain without over-saturating it. Avoid excessive glue that can seep onto adjacent surfaces or create a thick layer on the wood.
- Controlling the Application Area: Apply the glue precisely where needed. Use masking tape to protect adjacent areas from accidental glue application, ensuring a clean and professional finish.
- Allowing Adequate Drying Time: After applying the glue, let it dry completely before proceeding with any sanding or finishing steps. The drying time can vary based on the type of glue and environmental conditions, so refer to the manufacturer’s instructions.
- Testing on Scrap Wood: Before applying the technique to your main project, practice on a scrap piece of the same wood. This allows you to gauge the results and adjust your technique if necessary.
- Finishing Considerations: Once the glue is dry, proceed with sanding and finishing as usual. Be mindful of how the sealed end grain reacts to the finish, and adjust your application technique accordingly.
- Maintaining Tools and Workspace: Keep your tools clean and your workspace tidy. Proper maintenance ensures that the application of glue is precise and free from contaminants.
By following these best practices, woodworkers can effectively use glue to seal end grains, enhancing the uniformity and overall quality of their woodworking projects. This method not only improves the aesthetic appeal but also contributes to the longevity and durability of the finished product.
Conclusion
In summary, the practice of sealing end grains with glue in woodworking is a testament to the craft’s evolving nature and the continuous pursuit of perfection. This innovative approach offers a practical solution to the age-old challenge of achieving uniform color and finish, especially in areas prone to absorbing more stain or finish.
By understanding the nuances of wood behavior, mastering sanding techniques, and skillfully applying glue, woodworkers can elevate the quality and aesthetics of their projects. As with any technique, success lies in the details—selecting the right materials, applying them with precision, and adapting to the wood’s unique characteristics.
Embracing such innovative methods not only enhances the current project but also enriches the woodworker’s repertoire, paving the way for future creations that embody both beauty and durability.
- Can You Unmix Paint: Techniques, Consequences, Alternatives - February 23, 2024
- Does Primer Need to be Mixed? Effective Primer Application - February 22, 2024
- How to Make Old Paint Usable Again: Retrieving and Preserving Paint - February 21, 2024


