Lacquer blushing is a common finish problem when the lacquer doesn’t dry properly. The result is a cloudy, streaked appearance that can ruin an otherwise perfect finish. Blushing usually happens in humid conditions but can also be caused by using an outdated or poor-quality lacquer. Fortunately, you may follow a few easy steps to fix blushing and make your finish look smooth and streak-free. So, if you’re interested in keeping your woodworking looking its best, read on!
What is Lacquer Blushing?
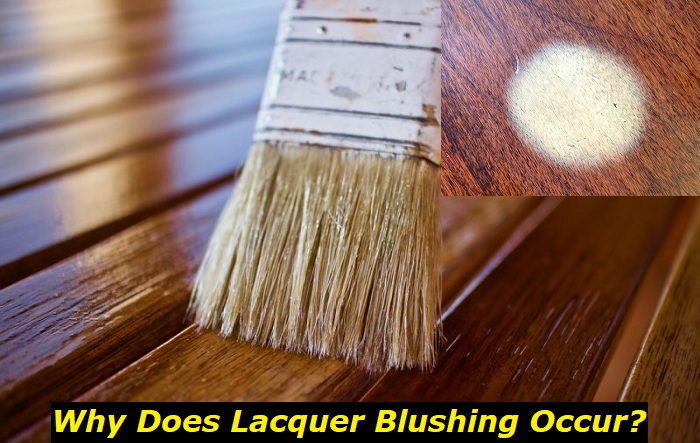
Lacquer blushing is a phenomenon that can cause finishes to appear cloudy or milky. It occurs when the lacquer fails to dry properly, causing a white, powdery substance to form on the surface of the wood. Lacquer blushing is often caused by high humidity levels, cold temperatures, or unclean surfaces.
It occurs when moisture in the air reacts with the finish, causing it to blush. Blushing is more likely to occur in humid or damp conditions or when finishes are applied too thickly. Lacquer blushing can be a nuisance, but it is relatively easy to fix. By taking some precautions and being mindful of the conditions in which you apply lacquer, you can avoid this problem altogether.
One of the coatings that dry the fastest is lacquer. It typically takes 12 hours to dry and 24 to 48 hours to cure. Because of this, most individuals use spray lacquer as a finish to get their desired appearance and level of protection.
However, the lacquer finish employs a rapid cooling action in combination with ambient moisture to dry quickly. As a result, moisture will occasionally remain underneath the lacquer layer as it dries. After the lacquer layer has fully dried, moisture will produce difficult-to-remove white patches and lacquer blushing.
If you use the incorrect technique while applying a lacquer finish to wood, the moisture will mix with the lacquer, and blushing will occur.
To correct this, the lacquer layer must be thinned, evaporated, or absorbed to eliminate the water particles. In the absence of moisture, clear lacquer will change into a milky white blush with sporadic white dots. Your expensive furniture’s stunning beauty will be destroyed by this.
How to Fix Lacquer Blushing
Any furniture refinisher knows the frustration of lacquer blushing. This phenomenon occurs when lacquer fails to properly cure, causing a cloudy white film to form on the surface of the wood. Fortunately, there are a few quick actions you can follow to fix this problem.
There are a few ways to fix lacquer blushing:
- Let the moisture evaporate
- Apply a thinner coat of lacquer
- Use a dehumidifier
- Use a lacquer retarder
- Sand down the affected area and reapply the lacquer
Here’s how each step should be completed:
- Let the moisture evaporate: One of the best ways to fix blushing is to let the moisture evaporate. This may be accomplished by pausing from lacquering for a day or two. The humidity will cause the moisture to evaporate out of the lacquer, and you can continue with your project.
- Apply a thinner coat of Lacquer: This can be done by applying a thin coat of lacquer and then letting it dry for a few minutes before applying another coat. Letting the first coat dry completely gives the moisture a chance to escape before it gets trapped beneath the second coat. You might need multiple light coats before the blushing is completely gone, but this method is usually very effective.
- Use a dehumidifier: Another way to fix lacquer blushing is to use a dehumidifier. By doing so, you’ll be able to eliminate moisture from the air, making it easier for the lacquer to dry properly. If you want to live in an area with high humidity. Whatever method you choose, ensure that you give the lacquer plenty of time to dry before applying another coat. Otherwise, you may end up with more blushing than you started with.
- Use a lacquer retarder: Lacquer retarders are additives that can be mixed with lacquer to help it dry more slowly and prevent blushing. By giving the lacquer extra time to dry, the retarder helps to prevent moisture from condensing on the surface. In most cases, a retarder can be added directly to the lacquer without trouble. However, it’s always important to read the manufacturer’s instructions carefully to ensure that you’re using the product correctly. With a little care, a lacquer retarder can help you achieve a perfect finish every time.
- Sand down the affected area and reapply the lacquer: When repairing Blushing in lacquer, you must first sand down the affected area. After sanding it down, you will need to apply a new coat of lacquer. The reason that you need to reapply the lacquer is that the old coat will not be able to stick to the new wood that you have sanded down. When you finish repairing the blushing, you should then lacquer the whole piece, so it has a consistent sheen.
How do you know if your project will blush?
Have you ever looked at a woodworking project and wondered how to tell if it will blush during lacquer application? Here are a few things to look for:
- First, check the wood grain. If the grain is raised or rough, it’s more likely that the lacquer will soak in and cause blushing.
- Second, take a look at the end grain of the wood. If it’s absorbent, there’s a higher chance of blushing.
- Finally, consider the temperature and humidity of your lacquer environment – these factors can affect how well the lacquer adheres to the project.
If you’re unsure whether your project will blush, it’s always best to test on a small area first. That way, you can avoid any surprises later on!
Top Tips to Avoid Lacquer Blushing
There are several things you can do to prevent blushing. Though it may seem difficult, some simple tips can be followed to avoid lacquer blushing.
- First, using a clean spray gun when applying the lacquer is important. Any dirt or debris on the gun will likely end up in the final product.
- Second, be sure to apply the lacquer in a well-ventilated area. The fumes from the lacquer can cause the finish to blush.
- Third, avoid using lacquer in humid conditions. Humidity can cause the finish to blush as well.
It is best to avoid working with lacquer finish over wet or humid conditions. For example, in humid climates, it’s best to store your clear finish and lacquer products out of the reach of children and pets.
You can also avoid cutting, sanding, and finished surface rubbing with little pressure on the wood surface itself. This can cause it to scratch or cut through the finish blushing it. Following these tips can help ensure that your lacquer finish will be smooth and free of blushing.
Step by Step Guide to Apply Lacquer Finish on Woodwork
The lacquer finish is one of the most popular finishes for wood. It’s durable and has a high-gloss sheen that makes the wood pop. Plus, it’s relatively easy to apply. If you’re thinking about lacquer finish for your next woodworking project, here’s a step-by-step guide to help you get the perfect finish.
First, sand the wood thoroughly. You want to ensure the surface is completely smooth before applying the lacquer. Start with coarse grit sandpaper and work your way up to fine grit.
Next, wipe down the wood with a tack cloth to remove any dust particles. Before you begin painting, it’s important to prep the surfaces you’ll be working on. That way, the paint will go on smoothly and evenly. For wood surfaces, that means giving them a good cleaning first. Start by dusting with a soft cloth or brush to remove loose dirt or debris.
Then, follow up with a tack cloth to pick up any remaining dust particles. By doing this, you can ensure that your paint job is successful and has a professional-looking finish. Now you’re ready to apply the lacquer.
Start by applying a thin coat of lacquer with a brush or a sponge applicator. Make sure that you evenly coat the entire surface. Before adding additional coats, let the first coat thoroughly dry.
Continue adding coats until you achieve the desired level of glossiness. Remember that each coat needs to dry completely before adding the next one. Once you’re happy with the final result, let the lacquer cure for 24 hours before using or handling the piece.
Final Words
Lacquer blushing is a common issue that can occur when applying lacquer finishes. The main cause of blushing is moisture in the air, which can cause the lacquer to become cloudy or white. There are a few ways to prevent blushing, such as using a dehumidifier or keeping the area well-ventilated.
If blushing does occur, you may use a lacquer retarder or sand the area down and reapply the lacquer to fix the problem. Proper care and attention allow lacquer blushing to be easily prevented or fixed.
- Can You Unmix Paint: Techniques, Consequences, Alternatives - February 23, 2024
- Does Primer Need to be Mixed? Effective Primer Application - February 22, 2024
- How to Make Old Paint Usable Again: Retrieving and Preserving Paint - February 21, 2024


