An excellent caulking job gives your home or office a clean finish after installing windows, doors, and other fixtures. Caulk seals any holes, cracks, and joints between fixtures and walls. The tight seal prevents moisture and dirt from infiltrating the walls and seals.
Good caulking also keeps bugs away from your home. However, caulk loosens over time. You must remove the old caulk layer before applying a new layer. In addition, excess caulk on walls is unsightly.
The good news is that you can remove old and excess caulk with tools and materials in your home. You also have several methods of removing caulk without damaging walls or attached fixtures. Let’s discuss the best methods of removing wet and old caulk.
How to Remove Excess Wet Caulk
The best time to remove excess caulk is while it is wet. Removing old caulk, as you will soon discover, takes effort and time. You also need the right tools to scrape it off without leaving streaks or marks on painted walls.
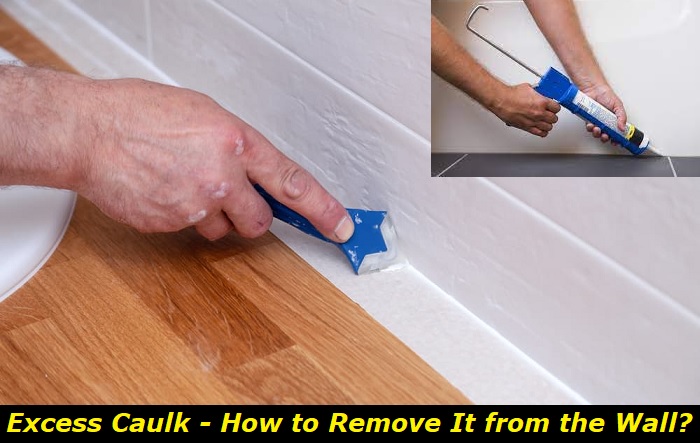
A sloppy caulking job is visible even from a distance. If you are reinstalling or reapplying caulk, wipe any excess acrylic caulk with a wet sponge immediately. It is easier to wipe the excesses as you go than to clean up after the installation job.
If the wet caulk dries up, you will need to soften it again before scraping it off. Have a sponge or rag and water by your side before you start caulking. In addition, learn the best application methods to avoid caulk residues. We will discuss more about this later.
Rinse the sponge as you wipe it to avoid leaving an ugly caulk film on the wall. A dry paper towel is enough to wipe excess silicone caulk as you apply.
How to Remove Excess Dry Caulk
Sometimes you cannot help but deal with dry and old caulk. If you allowed another person to caulk your walls or waited too long to clean the excess caulk, you must deal with the dry caulk. Old caulk may be stubborn depending on the type and application method used.
We have discussed different methods and tools for removing dry caulk residue below. You will definitely find one or more methods that will work for you.
1. Soften the caulk residue
The first step is always to soften the excess caulk as much as possible. Latex-based and acrylic caulk is easy to soften than silicone caulk. Before we talk about the methods, we need to emphasize that you must test a solvent on a hidden spot.
Some solvents may remove the paint or finish on your wall, depending on the type. Test the chosen solvent and allow it to sit for a few minutes. Wipe it off and check the result on your walls. You do not want a repainting job after fixing caulking mistakes.
Mineral spirits are the common solvents for softening caulk. You can find mineral spirits from any hardware store or order online. Mineral spirits are safe to use on painted concrete walls. A good alternative is denatured or isopropyl alcohol.
Some stores sell specialized caulk removers that you can spray directly on old caulk on any surface. Ask about the suitability of any caulk remover on your type of walls. In addition, consider the fixtures on the walls, such as wooden frames.
Some solvents may work on concrete or glass walls but damage wooden frames. Your safety is also an important consideration when choosing a solvent. For instance, WD 40 is recommended for tough silicone caulk.
Any solvent that works on silicone is too harsh for your hands. Hence, you need tough protective gloves and ensure that the remover does not spill on any other part of your body. Removing and reinstalling caulk may be a simple job, but you must protect yourself.
Another method of softening old caulk, especially silicone caulk, is with a heat gun or blow dryer. Turn on the minimum heat on the blow dryer or heat gun and run on the caulk strip you want to remove for 30-60 seconds.
It may be necessary to repeat the heating process if scraping does not remove all the layers. When using a liquid solvent, spray it and leave it for 3-5 minutes to seep through the caulk layers.
An alternative softening method is to wet a piece of cloth with the solvent and spread it on the caulk strip. Leave the cloth there for a day or two. Removing the caulk will be much easier than trying to scrape it off immediately.
It is worth your time and patience to allow 3-5 days to clean your walls. Several years will pass before you need another caulking job if you do it right the first time.
2. Cut and scrape off the soft caulk
The excess caulk strip is now soft and easy to remove. You just need a sharp putty or utility knife to cut and remove the strip. Precision is advisable here to cut a straight and neat strip.
If you do not have a sharp knife, you can use a plastic razor blade to slice the caulk. Use needle-nosed pliers if your walls have several layers of caulk. Peel the caulk strip as you cut. Alternatively, you can use a caulk scrapper to remove the strips.
Some stores sell specialized scrappers for cutting and removing caulk. You can order such if you do not have the alternative tools recommended here. Sometimes you need a tougher method to cut through several layers of old caulk.
A hammer and chisel can help you with thick layers of dry caulk. Keep the chisel at an angle that peels the caulk without chipping the walls. The hammer and chisel method takes a long time if you do not allow the caulk to soften enough.
An alternative way of working through tough caulk is to peel it in layers. Soften and peel the first layer and apply the solvent repeatedly until you reach the bottom layer. As mentioned earlier, you need to allocate this process enough time for a neat finish.
3. Clean up
The last step is to clean up after scraping or peeling all the excess caulk. A thorough cleaning process is necessary to remove all the dirt and residues. You also want to protect your walls from mildew.
Dampen a piece of cloth or rag with a cleaner or bleach and use it to brush the area. Pick a cleaner or bleach that works with your type of wall, paint, and caulk remover. Manufacturers give specific instructions on how to clean up caulk remover residues.
Follow the instructions carefully. For instance, bleach may damage wooden walls depending on the amount and application methods. However, you need bleach to kill any mildew or mold in the area. Check the manufacturer’s instructions to protect your walls.
Allow the bleach to work for a few minutes before rinsing it with water. Use a clean cloth and water to wipe the area thoroughly. You also need to dry it up to prevent mold or mildew from developing.
The intense cleaning process is also necessary, even if you intend to apply a fresh layer of caulk. Another important tip is to apply a protective clear coat on a painted wall after bleaching and cleaning. Use the same coat on the rest of the surface for consistency.
How to Avoid Excess Caulk on Walls
You are probably reading this to correct mistakes you made in a DIY caulking job. You can avoid the hustle of chiseling excess caulk by improving your application technique. Here are some tips to help you when applying a new caulk layer.
1. Open the tube properly
The problem with messy DIY caulking jobs sometimes starts when opening the tube. Cut a small opening at the tip to control the amount of caulk. It is easy to manage the flow and avoid excesses with a small amount of caulk flowing.
You can increase the opening slightly if the amount is too small but avoid a large opening at all costs.
2. Use painter’s tape
Mark the area that needs caulk and then tape the surrounding area carefully. In case you press the tube forcefully or spread the caulk in the wrong direction, the excess caulk will rest on the tape instead of the wall.
3. Keep the tube steady
Use the same amount of pressure when squeezing the tube, and keep it steady as you apply. You can take breaks to adjust your grip. Irregular pressure or force may cause caulk to build up in one area instead of spreading in a uniform layer.
4. Wipe off any excess caulk immediately
Do not wait until the caulk layer dries up to remove the tape. Remove the tape carefully while the caulk is still wet. You may find a few patches of caulk beyond the painter’s tape. Wipe the excess caulk immediately.
Conclusion
Removing excess caulk from walls is easy when the caulk is wet. A wet sponge or dry paper towel is enough depending on the type of caulk and wall. However, you need to soften dry caulk first before cutting and peeling the excess.
The solvents to soften old caulk are locally available. You can use isopropyl alcohol, mineral spirits, and a caulk remover. You may also heat up the caulk layer with a heat gun or blow dryer. Cutting and peeling the soft caulk layer is easy with a utility or putty knife.
Always bleach, clean, and dry the area after caulking to prevent mold and mildew. You can also paint the area with a protective wall coating.
- Can You Unmix Paint: Techniques, Consequences, Alternatives - February 23, 2024
- Does Primer Need to be Mixed? Effective Primer Application - February 22, 2024
- How to Make Old Paint Usable Again: Retrieving and Preserving Paint - February 21, 2024


