Nothing beats the subtle elegance of a crystal-clear tabletop in your lounge, kitchen, or dining room. Whether paired with the rawness of wood grains or poured into delicate pieces of art, the layer of translucence is a tool where you can boldly show off the magnificence of any tabletop design.
However, the beauty of making clear tabletops come with a price. The entire process is also a gateway to several crafting failures, like creating bubbles, future yellow stains, and future cracks.
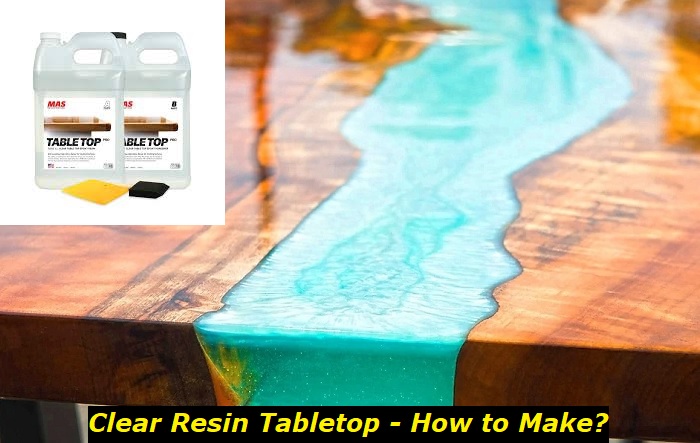
And considering those with experience in creating resin art pieces, not everyone has mastered the art of creating clear resin, especially for large-volume projects such as pouring on a tabletop. And if you’re a beginner, the simplicity of a clear tabletop does not mean a simple mixing-and-pouring process.
For these reasons, we made a comprehensive guide about the different methods of creating clear resin tabletops.
Step 1 Choose a Method and Design
Before we gather the materials, you must decide on the method to use for your tabletop. Will you pour it above an existing tabletop? Will custom-made a tabletop? Or will you create a tabletop from scratch?
There are many design options where you can top up crystal clear mixed resin. You can make round coffee tables with pressed flowers, stones, or pebbles, geometric or swirling patterns. Unleash your creativity, even if you are using clear resin.
Method 1 Pouring the Resin Over an Existing Tabletop.
The pour-on technique is the easiest and simplest method to restore an existing tabletop, especially for wooden tables. In this method, you prepare the surface and create a dam around the table edges. From there, you can pour the resin mixture into thin layers one after the other However, you need to dry each layer before pouring a new one.
Method 2 Using a mold.
Creating a clear resin tabletop using a mold involves capturing the desired shape with a made-up mold from silicon, wood, or metal. The mold consists of strong base support and bracing to hold the weight of the resin. Often, crafters apply release agents to prevent it from sticking into the mold and help in demolding. After creating the mold, you can pour the mixed resin layer by layer.
Method 3 Coating Resin
A thinner way to apply resin on a tabletop is by coating. In this method, you use clear resin as a finishing layer to enhance the tabletop’s appearance, durability, and protection.
Step 2 Measure the Table’s Area
Before gathering tools and materials, you need to identify the dimension of your desired table size. It will help you get the area of the tabletop and the volume of resin required to fill this tabletop size.
To get the volume, multiply your tabletop’s length, width, and depth. This measurement is expressed in cubic inches.
Just a reminder, the mostly allowed pour depth resin is ⅛ to ¼ inch. This depth is enough to cure the resin and avoid unnecessary reactions from heat or oxidation. However, some manufacturers have dedicated deep-pour epoxy resin that you can pour up to two inches deep and use for creating river tables, charcuterie boards, coffee tables, or bar tops.
Meanwhile, getting the volume of irregularly shaped tables requires multiplying the length and width by the widest point and desired depth. If you have embedded designs inside the tabletop, measure the dimensions of the objects and subtract them from the volume you initially calculated. And, of course, add at least 10 to 20% more of the needed volume of resin.
After getting the needed volume of resin, check the technical data sheet and see how many gallons you will need. Manufacturers usually put the equivalent volume per gallon of quartz in the sheet.
Step 3 Prepare the Tools and Materials
Before starting your project, you need to obtain and prepare materials
Materials:
- Clear resin
- Hardener
- Mixing containers
- Stirrers
- Gloves
- Heat gun or torch
- Spreader or brush
- Sander and sandpaper
- Release agent
- Spirit or bubble level
What kind of resin to use for a clear tabletop?
The most appropriate resin for tabletop is clear epoxy resin. Aside from providing a crystal clear finish, it is self-leveling, adheres to scratches, and is resistant to damage and UV rays.
Also, you may come across labels such as casting and tabletop epoxy resin. Casting epoxy resins are more applicable for thicker pours up to two inches, while tabletop epoxy has a maximum depth of ¼ inches.
You will need more applications on a tabletop epoxy, making it more suitable for existing tabletops and tabletops with penny and resin artwork. If you tend to make a river table, use the casting epoxy, and you will need longer curing time because of its depth.
If you consider using polyester, remember that this resin tends to discolor over time. Although it cures faster, it may not provide the depth required for your project.
Step 4 Prepare the Surface or Mold
1) For an existing tabletop
If you are restoring an old tabletop, clean the surface by removing dirt, stains, and dust. If there are minor cracks or holes, fill them with wood putty or filler.
Sand wooden tabletops with old varnish or coats. This procedure will help provide good adhesion for the epoxy resin. Remove wood dust carefully using a brush and tack cloth. When the surface is clean, check the tabletop for evenness using bubble or spirit level.
2) For pouring into a mold
Mold comes in different shapes and designs. In general, you must choose a material that can house a master pattern or the tabletop of your choice. The mold box must contain and support the tabletop and resin. Most craftsmen use wood, metal, or fiberglass to create the mold. After building your mold box, seal it with tape or clay. Packing or duct tape is good to seal the edges of the resin tabletop.
Step 5 Mix the Resin
Check the technical data sheet of the resin and hardener. If you use deep-pour resin, you may have to mix resin and hardener in a 2:1 ratio. If you use a tabletop resin, the usual measurement is 1:1. However, you still should check the datasheet to avoid wasting materials.
Use separate clean containers to measure the resin and hardener. Use a separate container for mixing the ingredients. Pour the contents into the mixing container. Mix thoroughly with a stirrer. Scrape the sides. Avoid mixing in a whipping motion to prevent incorporating bubbles. Create a mixture for one layer because you must dry it first before applying the next one.
Step 6 Pour & Spread the Resin.
As much as possible, pour the mixture into the mold or table evenly in thin layers. Pour it slowly so you won’t disturb existing designs that may detach from the process. Use a spreader or brush (if you are coating finish on an existing table). Start from the center with light pressure going outwards.
Step 7 Level and Remove the Air bubbles.
Most epoxy resins are self-leveling. Use a heat gun or butane torch to remove air bubbles formed on the poured resin. If you’re using a heat gun, set it at least six inches distance from the surface. If you’re using a butane torch, maintain at least ten inches away or more from the surface.
Keep a sweeping motion to avoid heating and focusing on one spot longer. Avoid damaging or touching the surface. Check for levelness.
Step 8 Let the Epoxy Resin Dry.
For your first coat, let the surface dry for about four to eight hours before applying a new flood coat. The surface needs to create a solid and tack-free surface for stronger adhesion. Many things can happen when you immediately put the second layer while the resin is still wet. Also, the wet surface will cause delamination or separation between the layers.
Step 9 Add More Layers as Needed.
Ideally, pour the next layer when the heat dissipated and the resin is still gel. But if you want to harden the surface before adding a new layer, sand the surface between another pour. Sand it with 120-grit sandpaper. Vacuum the surface and wipe it.
Multiple coats need ⅛ to ¼ inch depth only. If you’re using the clear epoxy resin as a coating finish, apply thinner coats. You may need two to four layers.
For deep pour resins aiming for 2 inches depth, it may be necessary to divide the layers by ½ or 1 inch per layer. Read instructions because most deep pour resins can take two to four inches per pour. However, remember that deep-poured resins take longer to dry. For 2 inches pour, it may require 12 to 48 hours to dry.
Step 10 Let the Resin Dry and Cure.
For thin layers, each layer may dry for four to eight hours.
For deep pour layers, it may take 12 hours at least to dry.
However, not only the depth influences the drying and curing time of the resin. Other factors that affect the drying and curing time aside from depth are ambient temperature, humidity levels, and formulation. Most of the time, you can find these in the technical data sheet.
For ¼ inch epoxy, the curing time can start at 24 to 48 hours. For 2-inch deep epoxy resin, curing time can go from 72 hours up to several more days or weeks.
To Sum It Up
Truly, creating a clear resin tabletop is a rewarding project. It can add a touch of elegance to any room. With the techniques and tips we shared above, we believe that even beginners can pull this project off with pride. Whether you plan to enhance or restore an existing table or build one from scratch, the key is to know the appropriate process and understand how resin works. This way, you can use clear epoxy resin in different applications to create a crystal-clear tabletop.
- Can You Unmix Paint: Techniques, Consequences, Alternatives - February 23, 2024
- Does Primer Need to be Mixed? Effective Primer Application - February 22, 2024
- How to Make Old Paint Usable Again: Retrieving and Preserving Paint - February 21, 2024
