Pine wood can be prone to splotching and uneven coloring on the application of a finish since it contains a dense grain and absorbs moisture unevenly. However, following the right preparation and application of Garnet Shellac on Pine can prevent splotching and other defects from producing a beautiful and even finish.
This article will cover the different methods, tips, and concerns to consider when applying Garnet Shellac on your Pine antique furniture. But first, let’s look at what garnet shellac is.
What is Garnet Shellac?
Garnet shellac is a natural resin that creates a reddish-brown finish in antique furniture restoration. It’s also known as Cherry Shellac and comes from the female lac bug, which secretes the resin on trees. After the resin is scraped from the trees, it’s processed to produce orange or light brown flakes. Since the finish is dark brown, you can use it in combination with other shellac types of lighter colors to prevent the final finish from becoming too dark.
Garnet shellac is considered one of the most aesthetic finishes due to its depth, clarity, and gloss. This makes it suitable to highlight wood types such as walnut, mahogany, cherry, and rosewood, which have darker tones creating an aged effect and enhancing the character and natural grain of lighter wood types such as pine.
It is also easy to apply, and you can use it on wooden floor surfaces apart from common furniture surfaces. Garnet shellac is available in a homemade version which consists of flakes that you can easily dissolve in solvent alcohol or methylated spirit before application as either a sealer or finish coat or a premixed version suitable for beginners. It’s also available in waxed(natural) or dewaxed formulations.
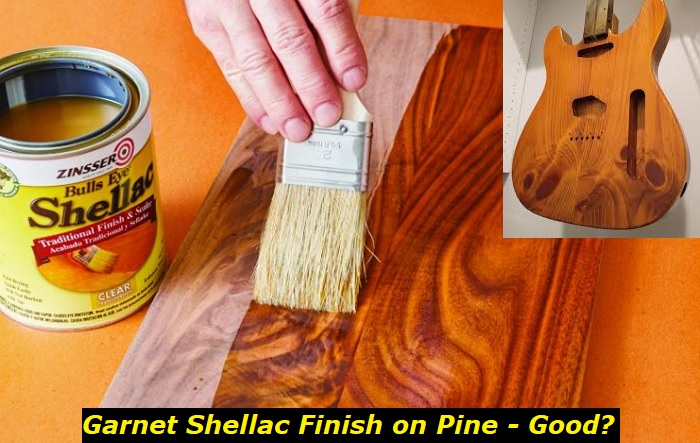
Methods of Applying Garnet Shellac on Pine
Some methods of applying garnet shellac on pine wood are using a brush, pad, or air sprayer. But first, the Garnet Shellac and the surface to be painted on need proper preparation before application. Let’s look at the preparation process.
Preparation for Garnet Shellac Application
If you buy shellac in the form of flakes, buttons, or cuts, you need to mix it with denatured alcohol in the right ratio. This depends on whether you want to use it as a sealer coat under some other type of finish, or a finish coat. It’s sold in 2-pound, 3-pound, or 4-pound cuts.
The mixture ratio determines the thickness of the shellac’s coat. A higher shellac ratio produces a thicker mixture suitable for a finish coat. In comparison, a higher alcohol ratio comes up with a thinner mixture proper for a light sealer coat before staining.
Most woodworkers prefer the shellac sold in flakes since it’s in the original state, is high quality, and can be mixed to the preferred consistency. However, if you don’t have the time or skills to use the homemade shellac, the premixed version, which is ready for use, comes in handy.
The dissolved shellac is denoted by its concentration. For instance, a 1 lb cut of shellac consists of dissolving 1 pound of shellac flakes in a gallon of alcohol, and a 4 lb cut consisting of 4 pounds of flakes dissolved in a gallon of alcohol.
You can use the 1 lb cut in pre-stain finishing and French polish finishing, the 2 lb cut in prefinished sealing, the 3 lb cut in floor finishing, and the 4 lb cut in sealing tough knots, sap streaks, and stains. You can use a weighing scale to measure the shellac flakes and a measuring cup to measure the denatured alcohol to create a mixture of the right proportion. After obtaining the right mixture, let it sit for 24hrs to completely dissolve and blend.
The mixture’s container also needs to be sealed and frequently shaken to obtain a homogenous mixture. To ensure you remove any impurities present in the shellac, such as lac bug residues, strain the fully dissolved shellac through a fine mesh cheesecloth, a paint filter, or cotton wool.
Preparation of Pine Wood Surface Before Garnet Shellac Application
The first step of preparing the pine wood surface is sanding and conditioning. This involves sanding the wood’s surface with 80-grit sandpaper if the wood surface is bare and you want to apply the garnet shellac as a sealant.
An alternative will be to use 120-grit sandpaper if the wood surface has an existing finish. Rough up the pine wood surface in a circular looping motion to remove any raised beats. The next step would be to smooth out and level the surface with 150-grit sandpaper.
This helps remove any course marks or scratches on the surface and prevents blotching when you apply the shellac. After sanding, use a soft and damp cloth to wipe off the sawdust and debris from the pine wood surface and also open up the wood’s pores.
Methods of Garnet Shellac Application
1) Brushing on Shellac
Brushing on shellac is the most common among the application methods. It has an edge over the others in that you can apply it on a surface with tight corners and edges. You can use the method to apply premixed or homemade shellac. This method needs a good-quality brush with fine natural bristles and a chisel tip.
When using the brush to apply the shellac over the pine wood surface, dip the brush’s bristles three-quarter way into the shellac and remove the excess shellac by pressing against the container’s rim. Apply the shellac on the wood’s surface in long, smooth strokes along the wood’s grain from dry to wet areas. Avoid blotchy areas and drips since shellac dries quickly and doesn’t allow enough time to rectify the areas by overbrushing.
Hold a separate dry brush at a slight angle to lightly stroke the surface with shellac. This helps create an even and smooth surface while removing the brush strokes. Application with a brush can also be used in combination with a rag or a pad.
2) Padding on Shellac
Using a pad to apply shellac helps to create a smooth finish, avoids splatters and drips, and can reach more areas, such as corners and edges. Its downside is that it’s inconvenient to use on large surfaces since it takes longer and requires frequent reloading.
You can either purchase a paint pad or improvise to make a homemade one using a clean sock and lint-free polishing cloth on a 12-inch square. Apply a small amount of lubricant, like mineral oil, on a pad before applying the shellac. Use the pad to apply the shellac in gentle irregular patterns to ensure you thoroughly cover the entire surface you want to apply.
3) Using a Rag
A rag is suitable for large surfaces. If you use a rag or lint-free cloth, it would be best to fold it multiple times to allow the cloth to hold more shellac. Ensure that the bottom layer that comes into contact with the shellac and pine wood surface is free from creases and wrinkles to avoid leaving unwanted marks on the painted surface.
Dip the rag in the shellac mixture and apply a sizable amount in wide and even strokes, avoiding pooling and blotches. You can then use a brush to apply on corners and tight spaces.
4) Using a Sprayer
You can use an HVLP(High Volume, Low Pressure)sprayer or an airless spray gun. Spraying shellac requires using a 2 lb shellac or thinner cut to ensure smooth and even spraying over the surface. The Garnet shellac manufacturing guide can help determine the amount of pressure and tip size of the sprayer to use. When applying the shellac using a sprayer, apply it in thin overlapping passes.
Completing the Garnet Shellac Finish
After applying a shellac coat, leave it to dry for about half an hour to 4 hours, depending on the humidity and temperature, before sanding or applying another coat. Shellac drys to the touch almost immediately but feels tacky when it’s not completely dry. Lightly sand the shellacked pine wood surface with 320-400 grit sandpaper to remove any uneven shellac globs or raised wood grains.
You can also buff the surface with a superfine #0000 steel wool between the shellac coats. After sanding or buffing, use a tack cloth to eliminate any dust or residue on the finish. Apply 3-4 coats until you get the desired look targeting areas not properly covered with each layer.
After applying the last coat, you can achieve a glossy look by leaving the coat unbuffed or a satin finish by buffing, followed by applying a thin layer of non-silicone paste wax. If you decide to buff the surface to a mirror-like look, use a FFF pumice with paraffin oil or 0000 steel wool after applying paste wax.
Tips to Consider When Applying Garnet Shellac on Pine Wood
To avoid arising issues, these are tips to consider when applying the shellac on pine wood:
- Avoid using a metal can to create a shellac mixture since shellac can react with the metal and become dark.
- Since shellac has a very short shelf life, buy the required quantity and dispose of any leftover shellac.
- Avoid exposing prepared shellac to heat since it accelerates the drying process. Instead, keep the prepared shellac in a tightly sealed container in a dark location below 75 degrees Fahrenheit /25 degrees Celsius.
- While diluting the shellac, it’s convenient to work at a temperature above 16 degrees Celsius to hasten the dilution process.
- The preparation of natural woods such as pine through sanding helps to open up the wood pores to allow a stain or any other finish to set in better.
- While sanding, using a sanding block is better than holding the sandpaper with bare hands since it helps apply consistent pressure and is easy to work with.
- While applying shellac, use a respirator mask if possible and work in a well-ventilated area.
- Use alcohol or household ammonia to clean up the tools you use to apply the shellac.
- Properly dispose of the rags you use for applying shellac since they are flammable because of the alcohol content in shellac.
Bottom Line
There you go–methods, tips, and concerns for applying garnet shellac on pine. If you follow the right procedure and tips for application, you can achieve a beautiful and durable finish.
- Can You Unmix Paint: Techniques, Consequences, Alternatives - February 23, 2024
- Does Primer Need to be Mixed? Effective Primer Application - February 22, 2024
- How to Make Old Paint Usable Again: Retrieving and Preserving Paint - February 21, 2024


