Some pieces of furniture come with a unique pattern that gives them a rustic, vintage look. Intrigued by this design, you decided to try it out for yourself. This technique is called flyspecking and it can certainly breathe life into your pieces. However, it can be a bit tricky to apply properly, especially if you’ve never done it before. What should you know before you attempt it on your own?
We prepared this article to teach you the following about flyspeck wood finish:
- What it is
- What materials you can use
- How to apply it
- What surfaces you can use it on
What does flyspeck wood finish mean?
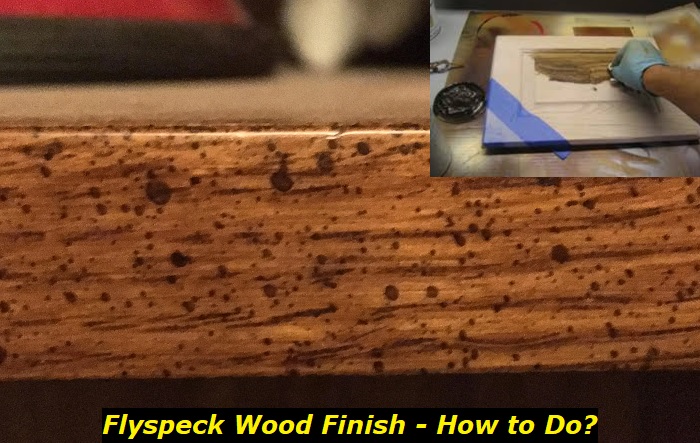
Flyspecking refers to painting your furniture with tiny speckles of paint. Sometimes, this can be unintentional. When you paint a piece of wood, some drops of paint can fall on the surface, giving it a speckled appearance. This haphazard flyspecking decreases the quality of your work.
However, flyspecking can be intentional as well. Many use it to decorate their furniture or even doors with speckles of paint. This gives each piece a vintage look. But while it sounds simple enough, this technique can be hard to pull off successfully without the right knowledge.
What materials can you use for flyspecking?
The most common material used for flyspecking is paint. Or more specifically, black paint. It is the black speckles that create the retro look. While you can use other colors, these may not fit your overall design.
The only time you should consider other colors is if you’re working with a light wooden surface. In this case, brown or orange speckles work much better than black ones.
If you decide to go with colored specks, we recommend using thinned shellac mixed with aniline dye. The thinning part is especially important – it ensures the paint will disperse into tiny droplets. If you skip the step, you may end up with giant chunks of paint on your piece of furniture.
How to apply a flyspeck wood finish – 5 simple steps
While flyspecking sounds easy, it involves a lot more work than just spraying a piece of furniture with paint. The most important step is preparing the wood before you add a flyspeck finish to it. If you skip even a single step, you may end up ruining your project.
Fortunately, we prepared this simple 5-step guide to teach you how to apply the flyspeck finish yourself:
1. Prepare the materials you’ll need
Before you start working on your flyspecked furniture, make sure you have all the materials you need.
Luckily, the list isn’t too long. All you need is paint and a paintbrush. You may also need a piece of wire screening if you’re looking for more professional results.
The paint color is up to you. The general idea behind flyspecking is to create contrast. We recommend experimenting with a small piece of wooden surface to find out what looks best for your furniture.
As for the paintbrush, it depends on your needs. Larger paintbrushes cover a wider area but may produce less detailed results. On the other hand, small brushes are much easier to use – it will just take you longer to apply them on the entire surface.
You can achieve the same results with a toothbrush as well.
2. Prepare the wooden surface before you apply the flyspeck finish
The next step is arguably the most important one. If you skip it, your flyspeck may not adhere to the surface properly.
First, sand the surface of your furniture piece. The speckles stick better to rough surfaces. Thus, this will prevent them from wearing off over time.
Of course, applying speckles on raw wood rarely looks good. Luckily, you can apply a seal and a finish before you deal with the flyspecking. The important thing to know here is order. Sealing should always come before flyspecking. This will help the paint to stick to the surface better. Moreover, it makes it look much better.
You should apply the final layer of finish last. This will act as a protective coat for the flyspecking, making it much more durable. Consider adding a clear sealant for even better protection as well.
3. Practice your flyspecking technique
It’s never a good idea to flyspeck your furniture right off the bat. We recommend practicing on a piece of cardboard before you move on to the real deal. Removing flyspecks can be tricky, meaning it’s much better to just get it right the first time.
The principle of flyspecking is simple. The most basic method is flicking your paintbrush toward your piece of furniture. You can control the size of the speckles by adjusting your distance and angle. The speckles will be small if you’re right in front of the surface. However, this may cause undesired drips. To increase their size, move farther away.
The size of your paintbrush also affects how big the speckles are. If you think it’s too big, consider using a toothbrush.
However, the method above can lead to very crude and unprofessional results. If you’re looking to step up your flyspecking game, you should refine the process by using a piece of wire screening. This will make the speckles much more synchronized, leading to a more sophisticated vintage look. In this case, we recommend flicking the individual bristles of your paintbrush. If you swing the entire tool, you may clog the piece of wire screening.
While the wire screening method leads to better results, it’s also much harder to pull off. Don’t apply it to your furniture until you get more comfortable with it.
4. Flyspeck your piece of furniture
Once you get the hang of the technique, it’s time to apply it to the furniture itself. Prepare your paint and use one of the methods above to apply the flyspeck finish. Be patient as you work – although it can feel tedious, you’ll ruin your piece if you rush through it.
Keep the same distance from your furniture during the entire project. Make sure you stick with the same tool. Otherwise, the speckles will be spread out randomly.
Make sure your furniture stays in a ventilated area once you’re done with your task. The speckles must dry completely before you apply another layer of paint or finish. If you work with it while it’s still wet, you risk creating smears.
5. Apply the final finish
Once your furniture dries completely, you can then move on to applying the final finish. The process is simple – just paint over the surface with your desired finish. Make sure the color contrasts the speckles to achieve the perfect look.
Whether you use a final finish or not is up to you. However, you should always apply a protective sealant to your furniture. This transparent substance protects the wood from wear, ensuring your furniture remains in good condition for years to come.
Can you flyspeck surfaces other than wood?
In this article, we’ve focused primarily on wood. This is because it’s the best material to flyspeck. The rough surface holds the speckles well, which isn’t true for smooth materials such as metal or glass. While you can still use it on metals, you may need to prepare the surface before you flyspeck it. Keep in mind that oil-based paints don’t stick well to metals either.
Another material that goes well with flyspecking is ceramics. However, it’s important to apply it after the finish.
If you’re ever unsure, you can first try it out on a small sample piece. This will show you whether your project will work or not.
Our final thoughts on flyspeck wood finish
Flyspecking is a design technique that involves speckling a surface with tiny spots. People apply it to make their furniture appear more rustic and vintage. And while this method may be centuries old, it remains popular even today.
The theory behind flyspecking is simple. All you need to do is flick a paintbrush over the surface to create the spots. The most popular paint colors are black or brown, depending on the color of the wood. You typically want to create a contrast between the speckles and the surface.
Although you can use this technique on materials such as metal and ceramics, it works best for wood.
You only need a paintbrush, a piece of wire screening, and paint to apply the flyspeck finish. The most important step is preparing the wood.
Before you begin, make sure you work the surface with sandpaper. This will make it rougher, allowing it to hold speckles more efficiently. You can also apply stain before flyspecking for a more polished look.
You should also practice flyspecking on a small piece of cardboard first. Once you get more proficient at it, you can move on to your furniture. Simply flick the bristles of your paintbrush in front of the wooden surface. You can place a piece of wire screen between the two to spread the spots evenly.
And finally, apply the final finish to bring the look together. We recommend using a sealant as well to protect the piece from wear.
- Can You Unmix Paint: Techniques, Consequences, Alternatives - February 23, 2024
- Does Primer Need to be Mixed? Effective Primer Application - February 22, 2024
- How to Make Old Paint Usable Again: Retrieving and Preserving Paint - February 21, 2024


