Shellac is a versatile wood surface finish that is used on a wide variety of woodwork projects. One of the most important aspects you should consider when working with shellac is cutting and applying techniques. You should do it properly for the best and most durable results.
Mainly, cutting shellac involves diluting it with alcohol to achieve the desired consistency for application. In this article, we will discuss the proper ways of cutting shellac and how to apply it for the best results.
What is Shellac?
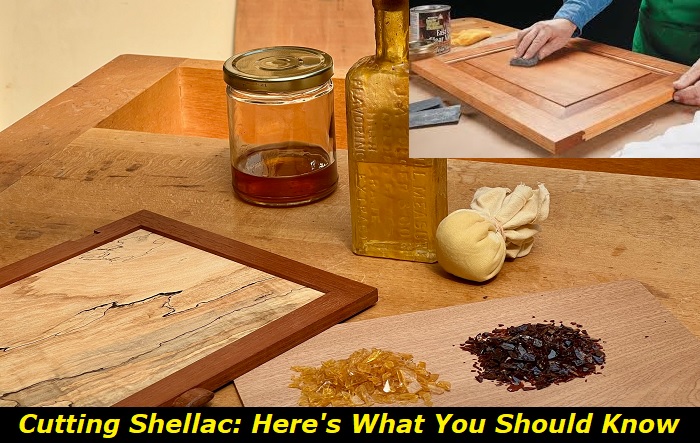
Shellac is a natural resin secreted by the lac bug mostly found in Asia, particularly in the forests of India and Thailand. Shellac is available in flakes dissolved in alcohol to create a mixture applied to the wood surface. The alcohol evaporates quickly, leaving behind a thin layer of shellac resin on the wood. This layer can be built up with multiple coats to achieve the desired level of shine and protection.
The product is commonly used as a wood finish because of its durability, water resistance, and ease of application. Mainly, when the shellac is harvested and processed, it is used as a wood finish or coating.
Importantly, shellac has been used for centuries as a natural varnish because of its unique properties. The product is available in various natural colors, from pale amber to dark brown. The color is determined by the type of tree the lac bug feeds on, as well as the ratios and processing methods used to make the finish.
Benefits of using shellac
There are many benefits of using shellac. The following are some of the main benefits of using shellac.
Shellac is;
- Durable
- Water-resistant
- Provides a beautiful, glossy finish to wood surfaces.
- Easy to apply and dries quickly
- Easy to repair or refresh. If a shellac-finished surface becomes scratched or dull over time, it can be lightly sanded, and a new coat of shellac can be applied to restore its shine and protection.
- It has a variety of other applications
Proper Way of Cutting Shellac
Cutting shellac involves dissolving shellac flakes in alcohol to create a liquid that can be applied to wood surfaces. It is important to use the proper ratio of shellac flakes to alcohol to achieve the desired consistency and quality of the finish.
Cutting shellac is diluting the shellac flakes with alcohol to create a mixture that can be applied to the wood surface. The ratio of shellac flakes to alcohol can vary depending on the desired consistency of the mixture.
The most commonly used alcohol for cutting shellac is denatured alcohol. Denatured alcohol is a clear liquid used as a solvent and fuel. It is available at most hardware stores and is relatively inexpensive.
To cut shellac, you will need the following materials:
- Shellac flakes
- Denatured alcohol
- Glass jar/dark plastic container with lid
- Measuring cup
- Stirring stick
After you have the right materials ready, it’s time to cut shellac. The following are the steps to follow.
1) Measure the Shellac Flakes
The first step in cutting shellac is to measure the amount of shellac flakes you need. The amount of flakes needed will depend on the size of the project you are working on and the desired consistency of the shellac mixture. Notably, the consistency of the shellac mixture is determined by the “cut.” For instance, a 3 lb cut will consist of 3 lbs of shellac flakes in one gallon of alcohol solvent. Notably, a 1 lb cut is light consistency recommended for beginners. The 1 lb (One pound) cut consists of 1 lb of shellac flakes to 1 gallon of denatured alcohol.
Importantly, you can break the measure flakes into smaller pieces or into powder to help dissolve the flakes more quickly when you add alcohol.
2) Add the Alcohol
Once you have measured the shellac flakes, add them to the glass jar. Then, add the appropriate amount of denatured alcohol to the jar.
3) Stir the Mixture
After you have added the alcohol and shellac flakes to the jar, use the stirring stick to mix the two. Make sure to stir the mixture thoroughly and ensure that the flakes are fully dissolved.
4) Strain the Mixture
When the flakes fully dissolve, strain the mixture through a fine mesh strainer or cheesecloth to remove any remaining clumps or impurities. This will ensure a smooth and consistent application of the shellac.
5) Let the Mixture Settle
After straining the mixture, let it sit for a few hours.
Proper Way to Applying Shellac
Now that you have cut your shellac mixture and allowed it to settle, it’s ready for use. It’s time to apply it to your wood surface. Importantly, the application process will vary depending on the project you are working on, but the following are common guidelines you can follow.
- Prepare the Wood Surface
Applying shellac involves preparing the wood surface. Therefore, before applying the shellac, sand the wood surface to remove any rough spots or imperfections. Sand until the surface is smooth and free of imperfections. Notably, it is important to remove any previous finish or wax before applying shellac to ensure proper adhesion.
- Apply the First Coat
Using a brush, apply a thin and even coat of shellac to the wood surface. Be sure to apply the shellac in the direction of the grain and avoid overlapping brush strokes.
- Allow the shellac to dry completely before sanding and applying additional coats
When the shellac is dry, it will be easy to sand without the paper clogging, producing fine powder.
- Sand Between Coats
After each coat has dried, sand the wood surface with fine sandpaper. This will ensure a smooth and even application of subsequent coats. After sanding, clean the surface with a tack cloth to remove any dust or debris.
- Apply additional coats
Applying additional coats of shellac to the wood surfaces is important. The number of coats will depend on the desired level of protection and shine. Generally, at least three coats of shellac are recommended for most woodworking projects for the desired level of shine and protection.
- Buff the final coat
After the final coat of shellac has dried, and after waiting for at least 3 to 5 days, buff the surface to a high shine. Be sure to buff in the direction of the grain to avoid creating scratches.
Tips for Working with Shellac
- Use the right equipment. When working with shellac, it is important to use the right equipment, including brushes designed for use with shellac. Also, it is important to use high-quality sandpaper and tack cloths to prepare the wood surface and remove dust or debris.
- Mix the shellac properly. To achieve a smooth and consistent finish, it is important to mix the shellac flakes and alcohol thoroughly before application.
- Ensure the mixture is free of impurities. It is important to strain the mixture before use to remove any impurities affecting the finish.
- Test the finish.Before applying shellac to a large area, it is a good idea to test the finish on a small, inconspicuous area to ensure the desired level of sheen and color. Also, this will allow you to practice your application technique and make any necessary adjustments.
- Apply thin coats. When applying shellac, it is recommended to apply multiple thin coats rather than a few thick coats. This will allow the shellac to dry more evenly.
- Sand between coats. Sanding between coats of shellac is important to ensure a smooth and even finish. Be sure to use fine-grit sandpaper and clean the surface with a tack cloth after sanding to remove dust or debris.
- Work in a well-ventilated area.When working with shellac, it is important to work in a well-ventilated area. Shellac can give off fumes that can be harmful if inhaled in large quantities.
- Store the shellac properly. To keep the shellac fresh and prevent it from drying out, store it in an airtight container away from heat and sunlight. Also, it is a good idea to label the container with the date and type of shellac for future reference. The shellac liquid can be stored in an airtight container and used for up to six months.
Conclusion
Shellac is a timeless product for your DIY woodwork projects for a beautiful, durable wood surface finish. Importantly, shellac is easy to cut and apply even when it’s your first time. Notably, when working with shellac, you mainly need more patience and attention to detail.
But, overall, shellac is a versatile and rewarding finish for various woodworking projects.
With proper cutting and application techniques and the proper choice of materials and tools, the resulting finish can be beautiful and durable. You only need to follow the above steps and take proper precautions to achieve a professional-looking shellac finish on your woodworking projects shellac.
Therefore, for those looking for a durable, glossy, and easy-to-apply finish for their woodwork projects, shellac has all the unique properties you need. Lastly, it is an attractive option for both beginners and experts that have been used for centuries.
- Can You Unmix Paint: Techniques, Consequences, Alternatives - February 23, 2024
- Does Primer Need to be Mixed? Effective Primer Application - February 22, 2024
- How to Make Old Paint Usable Again: Retrieving and Preserving Paint - February 21, 2024


