Burning wood is a Japanese tradition (shou sugi ban), which has evolved from fireplaces to propane torches. The technique makes wooden finishes and furniture beautiful and unique when done right. If you have always admired burnt wood, you are in the right place.
We will discuss the burning wood technique in a way that you can create unique designs safely. The article covers the benefits of burning wood and the process of burning wood with a propane torch.
Top Benefits of Burning Wood
Burning wood does more than give your indoors or outdoors outstanding aesthetics. Burnt wood has higher moisture resistance than raw wood. The technique adds a protective layer against water and high humidity, which cause wood to swell or warp.
You can add durable wooden finishes to your bathroom or kitchen with burnt wooden planks. Another advantage is that burnt wood is hard to burn. Your wooden fence and outdoor furniture cannot catch fire easily with this technique.
Homeowners also worry about insects that bore into wooden structures. Burning wood removes the cellulose that attracts insects and termites. In addition, burning wood improves its resistance to rotting or decay and increases its strength.
Outdoor wooden structures require regular maintenance because of the exposure to harsh weather. You can reduce the burden of maintaining wood with charring. Burnt wood is also fit for your fireplace because it takes a long time to burn down.
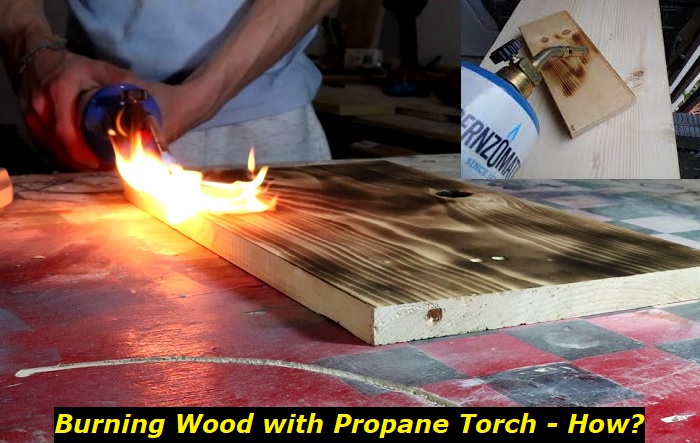
How to Burn Wood Safely With a Propane Torch
Every DIY project should start with safety precautions, especially when fire is involved. You will need fireproof gloves and a fire extinguisher before lighting your propane torch. The next precaution is to follow the right procedure for burning wood, as discussed below.
The process also requires safety glasses and a facemask. Wood knots contain sap that may pop when exposed to flames. You will also need to protect your eyes and respiratory system from dust when brushing the burnt wood.
As we talk about burning wood with a propane torch, you need the right torch to achieve the best results. You need a flame between 250 and 5000 C (482F to 932F) to burn wood. Hence, the propane torch that you choose should reach 5000 C.
You can use a weed torch or a plumber’s torch for your project. The weed torch, also known as the roofer’s torch, is easier to use. It is larger than the plumber’s torch, enabling it to cover large surfaces quickly. In addition, the weed torch has better control.
The downside of using a weed torch is that it can excessively burn the wood. You will also spend more money to find a weed torch that works with a propane cylinder. The plumber’s torch may not yield the same results as the weed torch, but it is affordable.
Choosing the right wood to burn
While the technique of burning wood sounds exciting, you need to take a step back and check the type of wood in your house. If you are starting a new project, buy wood that suits this technique.
The recommended woods for the burnt wood finish are cedar, fir, pine, and cypress. Hardwoods like walnut and teak are difficult to char because of their density. However, you can carbonize hardwoods like oak and cherry.
The outcome for hardwoods is different. You may not see the same color contrast and texture as softwoods. In addition, the burning may take longer because hardwoods are denser than softwoods.
Here is another important tip to consider when choosing wood for a burnt wood finish. Pick wood boards with wide, visible grains and knots. The details create outstanding contrasts and design after brushing.
Burning the wood
Choose an inflammable surface when burning wood boards. The recommended surfaces are flat metallic and concrete surfaces. You can burn the wood in an open outdoor space like a concrete parking lot or indoors in a metal workshop or concrete garage.
We mentioned the need to have a fire extinguisher nearby in case the wood or any other item catches fire. It is also advisable to have a bucket of water and a spray bottle with water in case the flames are hard to put out with the fire extinguisher.
The secret to amazing results from this technique is choosing the right flame intensity and using it consistently. When you choose a small flame, you must hold the propane torch closer to the wood. Consequently, the burn is intense.
A large flame will lead to a lighter burn because the torch is further from the wood. You can alternate between a small and a large flame to create a unique design. Alternatively, use the same flame from the beginning to the end for consistency.
You will have a chance at the end to create unique designs as you brush and seal the burnt surface. It is advisable to test the propane torch on a small area or an unused piece of wood. You can assess the results and determine the necessary intensity to use in the project.
After determining the right flame size and intensity for your preferred design, start burning the surface from one end to another. If you are burning a wooden fence, you can move from top to bottom or vice versa. Move the propane over the surface severally for an intense burn.
Keep the torch at the same distance from the wood as you move from one end to another. In addition, burn the surface in the direction of the natural grains. You will end up with an even finish.
You need to be aware of the veins in any wooden surface to create unique designs with contrast. The top layer of wood contains spring veins, which are easy to burn with a light flame. Summer veins lie deep in the wood, making them harder to burn.
The best results from burning wood with a propane torch require you to burn both spring and summer veins. The charred surface should appear like an alligator’s skin if the burn is deep enough to reach all veins.
The fear of warping or over-charring is expected, especially when multiple burns are necessary. Use a spray bottle to sprinkle some water on the wood in between the burns.
Brushing
The unique aesthetics that attract you to burnt wood come from this part of the process. Some people prefer to leave the wood with the thick carbon layer, especially when using the technique to protect outdoor furniture or fences.
You may use a wire brush or a stiff-bristle nylon brush to remove the excess char. A nylon brush is advisable if you want to leave most of the char on the wood. We also recommend that you start with it if you are a first-timer.
A wire brush is rough and faster in removing char. However, it may leave large scratches on the burnt surface. For some, the scratches are intentional. If you prefer a burnt wood finish with character, consider a wire brush to create the rustic design you desire.
The wood is ready to brush ten minutes after charring. Brush it in the direction of its grains. The amount of char that you remove will depend on your desired outcome. You can alternate between light and deep brushing for contrast.
Alternatively, you can brush lightly to maintain the dark, charred finish. Wipe the excess suit with a damp cloth before sealing.
Sealing the Burnt Wood
Sealing is optional. The burnt surface is enough protection against insects and fires. However, sealing provides extra protection against unwanted scratches, moisture, and rotting. Applying a finish helps you maintain the aesthetics you have worked hard to create.
Some of the products you can use to seal burnt wood include wood sealers, stains, and dyes. You can also seal it with boiled linseed oil. A clear coat is preferred to keep the extra characters on the burnt surface visible.
Water-based polycrylic and polyurethane coats are popular choices for sealing wood. Each has its pros and cons. The polycrylic finish is easy to apply with a sponge. You can also clean up any excesses easily with soap and water. The finish has a mild odor.
Polyurethane is more difficult to apply and clean up. However, it offers a more durable seal than water-based polycrylic. Oil finishes like linseed are also difficult to clean up, but they penetrate the wood deeper than water-based finishes.
Two or more coats of finish are advisable for lasting results. However, you can use a single coat or no finish at all if you prefer a rustic finish on wood.
Conclusion
Burning wood propane torch creates unique rustic designs on wooden furniture. The Japanese technique also protects wood from insects, mold, and rot. The finish is advisable for softwoods. You can use a weed torch or a plumber’s torch that can reach 5000C. Small and intense flames cause deeper and dark burns, while large flames create a light burn.
Brushing the burnt wood with a nylon or wire brush is necessary to remove excess char and create contrast. Deep brushing reveals lighter shades of wood. Sealing the burnt wood finish is optional. The finish is raw and rustic without a seal. However, you can seal the burnt wood with paint, dye, oil, or any wood seal for extra protection.
- Can You Unmix Paint: Techniques, Consequences, Alternatives - February 23, 2024
- Does Primer Need to be Mixed? Effective Primer Application - February 22, 2024
- How to Make Old Paint Usable Again: Retrieving and Preserving Paint - February 21, 2024


