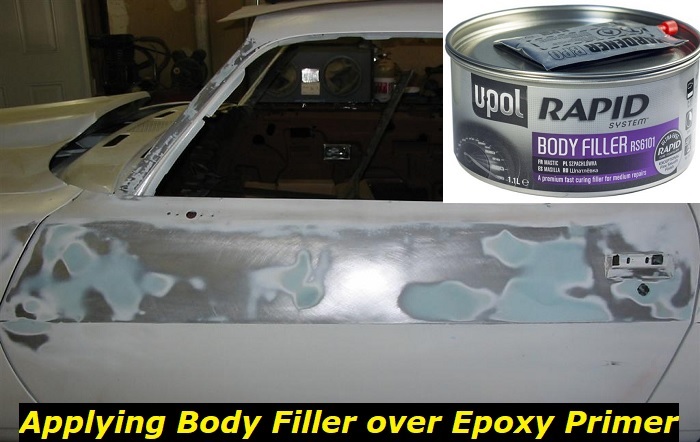
Metal is best protected from corrosion when you apply body filler over an epoxy primer. To improve adhesion, use the filler seven days after applying the epoxy primer. Optionally, you can use a red sanding pad or P120-P180 grit sandpaper for sanding the epoxy. When sanding, do not break through the epoxy.
For quick repairs, you can paint directly over bare metal. Apply an epoxy primer before applying the filler if the repair is larger or needs to last longer.
Why and How Should You Use an Epoxy Primer?
Self-etching primer used to be the standard coating applied to the bare metal of cars. Applying primer to metal requires minimal prep work, and it flashes and dries quickly. It is also available in 1K spray cans for modest jobs. In contrast to self-etching primer, epoxy primer has probably been discussed more often in the last five to ten years.
So why use an epoxy primer? And what exactly is it? This non-porous, highly adhesive sealer offers several benefits for specific materials under certain circumstances. However, to take full advantage of it, you must be careful when applying it. Let’s see the situations and uses of epoxy primer and the rules and guidelines for applying it.
- On bare metal. Epoxy primers protect exposed metal and thwart rust or moisture intrusion. In contrast to specific inexpensive spray bomb primers, epoxy primer prevents oxygen from reaching the metal, preventing the development of rust or corrosion on the surface. The epoxy primer, which also includes etch primer, is the only primer for bare metal that can be left outdoors on a vehicle without fast rusting back below. Zinc phosphate is added to two-component epoxy primers to improve their ability to prevent corrosion. To put it simply, epoxy is the best primer for bare metal, making it suitable for newly produced or totally stripped metal components.
- Diverse surfaces. Certain primers and coatings need a uniform, one-material finish applied to the whole surface. Due to their remarkable adherence, epoxy primers stick to bare metal, paint, primers, and fillers. After touching up a place with body filler, sanding it down to the bare metal, and blending it into the original paint, you may use an epoxy primer. You should blend into these areas before applying epoxy primers. Remember that a thick primer’s filling and building abilities cannot successfully hide flaws. Alternatively, you may patch up any minor flaws in the epoxy using filler or priming filler before painting.
- Coatings in stacks. Epoxy primers stick to surfaces mechanically, which means they will stick to almost any surface with a decent texture. Therefore, layering coatings are an excellent option if you need to touch up a spot that is not relatively level and needs a little additional filler. Only use sandpaper to smooth, flatten, fill, and sand edges. Then, apply a second epoxy primer, and continue until done. Unfortunately, many primers don’t function in the same way!
- Apply as the final sealant. To seal all your work and provide a great surface for the primer layer, use epoxy primer as a last sealant before the primer. Apply one or two coats and cut the quantity in half. The primer gives the majority of topcoats great adherence and keeps the paint from flaking.
- Make use of it to guarantee a lasting project. Unfortunately, not all of us have spacious garages with temperature control where we can keep our project vehicles while painting them. Consequently, you may have to leave the project outdoors while traveling daily or overnight. Perhaps the metal in your business rusts as the weather changes because it is moist. After the day, seal your work by applying an epoxy primer. If you can’t complete your job immediately, you won’t return to a rusty mess. Stock up on a few epoxy primer sprays for sealing tiny gaps. An epoxy primer spray will save a lot of time compared to bringing out the spray gun, preparing the primer, and then cleaning the area.
Applying Body Filler over Epoxy Primer Guide and Rules
Here are the steps to follow when applying body filler over epoxy primer:
- First, always sand an area much larger than the area you want to fill. This will help you smooth out the edges later. It will also help you avoid ugly paint edges that will pull together later. Next, give the epoxy a quick wipe-down with a sponge after it has dried for 24 hours.
- Remove dust, as the bog will not adhere to painted or dirty surfaces. Getting a feel for how much muck to apply at once takes some experience. Do not try to use all of the muck at once if you are working in large areas. Instead, beginners should start with manageable portions, roughly equivalent to one serving of mashed potatoes.
- Applicators are available at your local auto paint store, either metal or plastic. It depends on the individual which version they prefer. You can easily remove the bog by bending the plastic applicators. They are more flexible, less expensive, and easier to clean. Metal applicators last longer and keep their shape better. They also come in different sizes.
- Start with a fiberglass bog to create a base, as you can apply it thicker than a ready-made bog. Pour 40 to 50 mm of hardener into one portion of bog (one portion of mashed potatoes). Use a little less hardener on hot days and a little more on cool days.
- Using a clean applicator, shovel your portion onto a bog board, such as smooth MDF, sheet steel, or an old quarter window. Sometimes cardboard is used, but this is not the best solution. If you do not use a clean applicator, your bog will form hard lumps that cause problems when you try to skim the board.
- Add the hardener in a motion where you scoop it up and “fold” it on itself. To keep it all together, periodically gather the edges and push them back into the center. Mix until the paint is even and streak-free. Some parts will cure much slower or not at all if not fully mixed. Mix quickly and effectively to give yourself enough time to work.
- Dab and do not wipe. Dab evenly and entirely over the touch-up area. To remove air bubbles for the base coat, start with strong, pressing strokes and finish with gentler, gliding strokes. Bog heats up as it dries and can distort panels if you use too much. Keep the layer thickness at 3 mm for the final glaze and 6 mm for the bog.
- Once the bog has partially set – perhaps 5 minutes on a hot day, more than 15 minutes in winter – you can rough up the mold with a “cheese grater” for great work. However, it is not sufficiently firm if it jams the grater or begins to separate from the plate. Devices like inline and random orbital sanders are excellent for hardened mud, but you should always work with hand tools.
- When everything is fully cured, use a sanding board for the first few passes. If painting several small areas in a panel, you should thinly paint over the entire panel after the first coat. Then, things will be much easier since you will not miss any minor dents. Also, sanding will prevent disturbing the neighboring bog. Before covering an existing bog, be sure to sand it down.
- A quick file or small block of 60- or 80-grit “production” or “free-cut” paper can be used to resmooth the slab if the area is close to its final shape. Avoid digging trenches using a crisscross sanding pattern and be careful not to gouge the center. Run the palm of your hand over your work; if it appears lumpy, it probably is. The goal, which requires experience, is to smooth out the edges of the heavy-handled region. The edges will essentially care for themselves if you work the entire area with even strokes but do not neglect them altogether. Bare metal areas mean high spots; stop and examine the panel with your ruler; you may need to tap them off and add additional filler lightly.
- Applying several coats before the panel is ready for painting is uncommon. Applying multiple coats before preparing the panel for painting is not unusual. If you use a spray, you can apply a bit of black conductive paint and gently go over your work with an 80-grit file to remove the conductive paint. Any highs or lows will show up immediately. The ruler test is also helpful here.
- When satisfied, reapply the guide coat and sand the entire surface with 150- or 180-grit sandpaper to remove the deep scratches left by the 36-, 60- and 80-grit. You will avoid the unsightly sink marks that can occur during finishing. Always sand alternately from left to right in a crosshatch pattern.
- Can You Unmix Paint: Techniques, Consequences, Alternatives - February 23, 2024
- Does Primer Need to be Mixed? Effective Primer Application - February 22, 2024
- How to Make Old Paint Usable Again: Retrieving and Preserving Paint - February 21, 2024