Let’s say you just had a minor accident. And although no one got hurt, your car now has a dent in the side. Not too big, but big enough for people to notice it. Not wanting to spend a lot of money on repairs, you look for more affordable options. Eventually, your research leads you to Bondo, an affordable body filler. But no matter what you try, the substance doesn’t stick. Could it be because you’re using the wrong mixing ratio?

We’ll answer the following questions in this article:
- What is Bondo?
- What is the Bondo mixing ratio?
- How do you apply Bondo?
- What temperatures can Bondo handle?
What is Bondo?
A brand name for polyester putty, Bondo is a popular body filler. People commonly use it to fix small dents and other deformities on their cars. While it can’t fix damage after a big car crash, it’s a very budget-friendly option for minor repairs.
The Bondo brand belongs to 3M, an American company that specializes in making repair products. The company’s products have a wide range of applications, including cars, marine vessels, and household repairs.
Many people use the term Bondo synonymously for synthetic putty due to the brand’s popularity.
And although Bondo is intended mostly for repairs, some people use it to make crafts, much like you would use clay.
What is the Bondo mix ratio?
Bondo is a polyester putty that lets you repair small deformities in your car. But while it might be affordable, it isn’t the easiest to use.
The polyester resin’s biggest advantage is its moldability. You can shape it in any way you want to, which helps you fix dents on your car. But it won’t ever dry on its own.
That’s why Bondo comes with a hardener. You’ll usually find it in a smaller tube packed together with the resin itself.
The mixing ratio tells you how much Bondo you must mix with the hardener to achieve perfect results. If you use too little hardener, the resin won’t ever harden – you’ll have to scrape it off and start again. Conversely, Bondo will harden even before you can shape it if you use too much of the product. Thus, you need to mix it correctly to achieve the desired results.
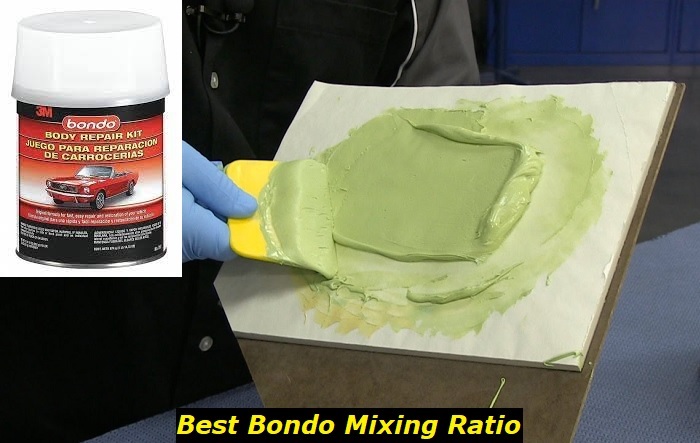
You can find the mixing ratio on the label. For types of polyester putty, it should be roughly 50:1. However, you might have issues measuring this properly. While you can mix the putty and hardener in a measuring cup, it’s extremely impractical.
We recommend spreading a golf ball-sized amount of putty onto cardboard. Then, you just add 5 to 8 drops of hardener. You can adjust this ratio based on how much putty you’ll need.
Once you try the mixture, you can experiment with a different ratio. Use more hardener if you want it to dry faster. On the contrary, use less if you need to mold it into a complicated shape.
Temperatures also affect the drying speed of the putty – higher temperatures cause the hardener to dry faster. Keep this in mind when mixing the putty.
How to apply Bondo – 7 simple steps
Bondi might sound like the perfect solution to all your worries. Who knew repairing your car could be this cheap? However, it can be deceptively hard to use. Without the right knowledge, you’ll end up wasting the product. Worse, you might even damage your car.
Luckily, we prepared this guide to help you with the process. Simply follow these 7 steps:
1. Find cardboard on which you will do the mixing
Even though the Bondo label recommends you mix the putty right on the car, we advise against it, especially if you’re new to the product. We suggest mixing the products on cardboard first.
The cardboard will inadvertently soak some of the putty. However, the amount is very low, and it won’t affect the final mixture.
Make sure the cardboard is clean – dust and debris can contaminate the putty, resulting in poor binding quality. Its surface should be smooth to prevent dilution.
And finally, your cardboard should be at least 6 x 6 inches big.
Note: You can alternatively use a plastic sheet or a particle board. Still, the cardboard is the best option if you’re on a tight budget.
2. Wear protective equipment
No matter how safe it might be, Bondo is still a chemical – you need to take preventative measures to use it safely.
The biggest concern is the vapors that form while you work with it. If you work with the resin for too long, you might experience dizziness and lightheadedness. Some users even report fainting. Consequently, always wear a mask when you work with this substance.
Furthermore, make sure you wear protective gloves to avoid skin irritation.
Note: If you experience any of these symptoms while you work with Bondo, stop working immediately.
3. Open the can of Bondo
Open the can and check the state of the resin. The product can sometimes form a liquid above the putty itself. This is completely normal – to fix it, stir it with a stick until it becomes a homogenous mixture again.
4. Spread the resin on a piece of cardboard
We don’t recommend applying the resin straight on the car – spread it on a piece of cardboard instead.
Scoop out a golf ball-sized amount of the resin. If you’re working with a large dent, you might have to repeat this step multiple times.
5. Add hardener to the resin
This is the trickiest part of the entire mixing process. Apply 1 straight line of hardener across the pool of Bondo. Maintain steady pressure – this will keep it symmetric.
Less is more when it comes to applying the hardener – you can always add more if you feel like it. But if you add too much, the putty will dry too quickly. You’ll have to throw it out and start again if this happens.
Note: Work with smaller portions if you’re new to using Bondo – any mistakes you make will be less punishing.
6. Mix the hardener and the putty
Simply adding the hardener to the putty isn’t enough – you’ll have to mix them to create a usable body filler. This is where most people make a huge mistake.
Never whip the mixture. The rapid movement will trap air inside it, resulting in a porous material. The final body filler will thus be soft and brittle, which negatively affects its longevity.
Gently mix both components. Move the stir stick with slow, gentle movements to combine them. Keep going until you create a homogenous mixture.
Note: Most hardeners come with a dye to indicate how even the mixture is. The final product should be the same color across the entire volume.
7. Apply the body filler to your car
Lastly, apply the body filler to the dent which you need to fill. You have about 15 minutes to do so before the putty dries (if you used our suggested ratio). This might be less if you’re working in hot conditions.
Repeat these steps as many times as you need if you run out of putty.
The best temperature for working with Bondo
Although Bondo is a resilient material, this is only true once it hardens. The putty is vulnerable to many physical elements in its ‘paste’ form. One of the biggest concerns is temperature.
In general, Bondo can handle temperatures from 60 to 85 °F. Low temperatures will prevent it from drying properly. As a result, you’ll end up wasting a lot of the product.
Conversely, Bondo dries extremely fast in high temperatures. While you can still work with it, it will be very difficult and impractical.
Our final thoughts on the Bondo mixing ratio
Bondo is a versatile polyester resin used mainly in the automotive industry. Cheap and affordable, it’s the perfect product for fixing small dents and scratches.
However, Bondo can be very tricky to use, especially if you’ve never used this product before. It features two components – the putty itself and a hardener. If you don’t use the correct mixing ratio, the resin won’t stick, no matter how many times you spread it over the dent.
Bondo recommends using a mixing ratio of 50:1. In other words, add 5 to 8 drops to a golf ball-sized amount of putty. We prefer mixing these components on cardboard – it will make cleaning a lot easier. But more importantly, it allows more room for mistakes.
Make sure you wear protective clothing before you begin working. The polyester putty creates toxic fumes that can cause dizziness and even loss of consciousness. Use gloves to avoid direct skin contact as well.
Additionally, mix only as much putty and hardener as you need. Too much hardener makes the putty dry too fast, rendering it unusable. And if you use too little, it will take ages to dry. Mix both components using slow, steady motions – this prevents the formation of air bubbles inside the putty.
Stir the components until the mixture reaches the same color.
- Can You Unmix Paint: Techniques, Consequences, Alternatives - February 23, 2024
- Does Primer Need to be Mixed? Effective Primer Application - February 22, 2024
- How to Make Old Paint Usable Again: Retrieving and Preserving Paint - February 21, 2024


