Some DIY projects are tough enough to give even the most enthusiastic DIYers some anxiety. Pouring self-leveling compound is one of those projects. It needs to be done just right to avoid wasting time, money, and energy on disastrous results.
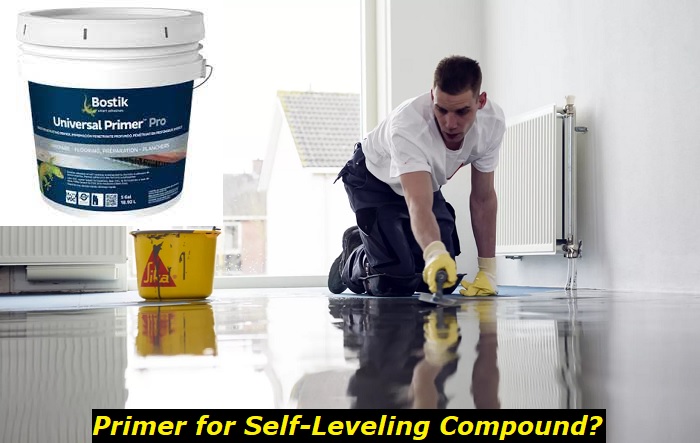
It would be best to have primer when pouring self-leveling compound on a porous surface like bare concrete. Some people choose to forego the primer when pouring the self-leveling compound on non-porous finished surfaces like tiles. Whatever type of surface you are working on, using primer improves your odds of a flawless professional finish.
This article will tell prepare you for your self-leveling project. We will help you avoid the most regrettable mistakes uninformed DIYers make when pouring self-leveling compound. You can expect to learn more about:
- How self-leveling compound works
- Selecting the right type of self-leveling compound
- How to prepare your surface for self-leveling compound (primer included)
- How to apply a self-leveling compound
How self-leveling compound works
You may find a self-leveling compound on the shelves labeled as self-leveling concrete, underlayment, or floor resurfacer. This cement-based compound has polymers that allow it to flow much easier than traditional concrete. Hence the name self-leveling. It is mostly used for internal flooring.
Selecting the right type of self-leveling compound
When it comes to this compound, purchasing the right type is much more important than the right brand. Making the right choice is essential because it ensures your surface is ready for other steps in professional floor installation. Anyone that isn’t a professional is well advised to purchase the regular self-leveling compound.
The quick-drying formula is very tempting because no one wants to watch paint or cement dry! However, this is a double-edged sword. Though the self-leveling compound will dry fast and allow you to move on to the next step, you will also have less time to apply it. If you have never poured a self-leveling compound before or prefer to work slowly and meticulously, the regular formula is the best pick for you.
How to Pour Self-Leveling Compound Like a Pro
Anyone who attempts a DIY project without doing their due diligence may make things harder on themselves in the long run. This is true for pouring self-leveling concrete as well. If you are not a professional, it is advisable to do everything you can to prepare yourself. Pouring an inch of cement
1. Gathering Materials
Having the right tools for the job makes it easier to apply the correct technique when pouring a self-leveling compound. You will need the following items before beginning your project:
- Regular self-leveling compound
- Leveling primer
- Drill
- Cement mixing paddle
- Trowel
- Filler
- Bucket
- Hardwire brush
- Vacuum
2. Prepping your surface
The first step is always prepping your surface for proper primer and self-leveling compound application. Failure to prep your surface will affect the final outcome. For example, holes, cracks, or debris will cause an uneven finish. These steps will ensure your surface is ready for the self-leveling primer.
- If your floor is uneven, level it out as best you can by scraping off any loose material. A hardwired brush and scraper are the perfect tools for removing dirt and debris.
- If your floor has a perfect silky finish, you need to rough it up a bit using sandpaper. Priming your floor will require the removal of any contaminants like adhesives, paint, or laitance. Such compounds will get in the way of your self-leveling compound bonding with your floor substrate.
- Fill in holes or cracks using. Make a dam that ensures runny concrete does not spread beyond the repair site.
- Sweep and vacuum the floor to get rid of any loose debris that may affect the evenness of your primer.
- Apply your self-leveling primer and allow sufficient time for drying. Different brands require different drying durations, so it is necessary to read the labels carefully and follow the manufacturer’s instructions.
- You can use the downtime to gather your materials and get a bite to eat. Once you start mixing and pouring the self-leveling concrete, you cannot take a break until the job is done.
3. Mixing the self-leveling compound
Mix the self-leveling compound with cold water in a bucket following the ratio and procedures indicated on the packaging. Failure to mix the self-leveling compound correctly has serious consequences.
- Mix in the correct amounts.
Underwatering makes the compound tough to work with because of improper flow. This increases the odds of cracking or ending up with an irregular surface.
Overwatering undermines the strength of your underlayment. This makes it more vulnerable to cracking or disbanding in the future. It also causes a white film to form on the surface once your underlayment has cured.
- Ensure the temperature and humidity are within the manufacturer’s range
The temperature of the room where the self-leveling compound is mixed and poured is essential. You do not want it to be too hot or too cold. This will affect the setting and healing time indicated on the packaging.
The temperature of the water and self-leveling compound is also critical. Storing your compound under the stun could cause a flash setting. Store your compound in a cool and dry place and ensure the water is cool. If you are in a hot region, throwing bagged ice in the water barrel will help maintain its temperature.
- The right type of drill
If you need more than one bag of self-leveling cement, it is best to rent an industrial drill from your local hardware store. Even the best cordless drill can only run long enough to mix one bag of self-leveling concrete. The battery is likely to drain before you are done with your second bag of the self-leveling compound.
A corded drill will not be much use, either. Using it to mix more than one bag of self-leveling concrete will likely burn it out. Save yourself from the frustration of having a drill quit on you while mixing the compound by renting an industrial drill.
- How to Mix
You begin by pouring the entire amount of water necessary into the bucket. Next, add about a third or quarter of the self-leveling compound required. Use the drill to mix the water and compound until it achieves a uniform consistency. You can then add the remaining self-leveling compound into the bucket in small amounts until it is all mixed in. Mix the compound for the duration indicated on the packaging.
4. Pouring the self-leveling compound
Pour the self-leveling compound and use the trowel to push and pull the mixture where you want it to go. When beginning, ensure you push it into the corners and pull it toward your direction. Clean up any drips and leave the surface to cure.
A layer of self-leveling concrete is usually ready for priming or the second coat whenever it is walkable. If your floor remains uneven after the first pour, e.g., exhibiting more than half an inch deep depressions, you should treat the uneven areas to another coat before priming or pouring a second coat.
A layer of self-leveling concrete is usually ready for priming or the second coat whenever it is walkable. If your floor remains uneven after the first pour, e.g., exhibiting more than half an inch deep depressions, you should treat the uneven areas to another coat before priming or pouring a second coat.
5. Allow the self-leveling compound enough time to cure
Allow the layer enough time to dry (check the recommended time on the packaging). Most take between two to six hours to cure. Ensure that the floor is not subjected to traffic during the curing process. Such movement may damage the surface of the compound and cause it to be uneven.
Close any windows and other sources of direct air movement, e.g., ventilation ducts, to avoid premature curing. Such drafts cause the top layer of the compound to dry before the bottom, thus causing premature cracking. Wait at least three days before returning the furniture.
Tips for Pouring Self-Leveling Concrete in a Large Room
Pouring self-leveling concrete in a big room will require an extra pair of hands. You will need help mixing, pouring, and troweling all the batches of the compound. It is most efficient to have one person mixing and the other pouring.
A two-person team is your best bet at ensuring the self-leveling concrete maintains a uniform consistency and is troweled properly. You will need a long hand with a squeegee attached to push and pull the compound without walking over it.
Conclusion
Priming is the best way to ensure your self-leveling compound turns out flawlessly. Of course, you will still need to mix and pour the compound properly, but failure to prime can ruin the perfect mixing and pouring.
Before your mix your compound, prep your surface and prime it. It is the best way to guarantee that your self-leveling compound will spread and adhere optimally. You should not roll the dice because the results will likely be disappointing.
- Can You Unmix Paint: Techniques, Consequences, Alternatives - February 23, 2024
- Does Primer Need to be Mixed? Effective Primer Application - February 22, 2024
- How to Make Old Paint Usable Again: Retrieving and Preserving Paint - February 21, 2024


